• Skip to primary navigation
  • Skip to main content
  • Skip to primary sidebar

Tachytelic.net

  • Sco Openserver
    • Sco Unix Support
    • SCO Openserver Installation ISOs
    • SCO Openserver Binaries
    • Add a Hard Drive to an Openserver 5 Virtual Machine
    • Install SCO Vision SQL-Retriever ODBC Driver on Windows 10
    • License Expired on Virtual SCO Openserver Installation
    • How to reset the root password on SCO Openserver 5
  • Scripting
    • PowerShell
      • Add leading zeros
      • Check if a File Exists
      • Grep with Powershell
      • Create Environment Variables
      • Test for open Ports
      • Append to a Text File
    • VBScript
      • Check if a File Exists
      • lpad and rpad functions
      • Windows Update E-Mail Notification
  • Office 365
    • Connect to Office 365 with PowerShell
    • Add or remove an email alias using Powershell
    • Change Primary email address of Active Directory user
    • How to hide an AD user from the Global Address List
    • How to hide mail contacts from the Global Address List
    • Change the primary email address for an account with PowerShell
    • Change Primary email address of an AD User
    • Grant a single user access to access to all calendars
    • Forward email to an external address using Powershell
    • Convert shared mailbox to user mailbox with Powershell
  • Get in Touch
  • About Me
    • Privacy Policy

Office 365

How to connect to Office 365 with PowerShell

December 22, 2018 by Paulie 2 Comments

Many of the posts on this blog and others will require you to connect to Office 365 with PowerShell. The web admin interface for Office 365 is very good, but there are times when PowerShell is more suited. So this post shows you how it is done and the problems you might come up against. I will go through each step in detail and then post complete code.

Connect to Office 365 with PowerShell

  1. Open a PowerShell session
  2. Store your Credentials in a variable:
    $Cred = Get-Credential
  3. Enter your Office 365 Credentials when prompted:
    Image showing dialog of Office 365 Credentials used to connect to Office 365
  4. Create a new PowerShell session from the Office 365 Server:
    $Session = New-PSSession -ConfigurationName Microsoft.Exchange -ConnectionUri https://ps.outlook.com/powershell/ -Credential $Cred -Authentication Basic -AllowRedirection

    Image showing import of PowerShell session from Office 365

  5. Import the session:
    Import-PSSession $Session

    If you do not receive any errors on this step, continue to step 6. You may receive the error:

    Import-PSSession : Files cannot be loaded because running scripts is disabled on this system.

    If you do get this error, you need to change your PowerShell Execution Policy.

  6. Now you can run any commands you need.
  7. When you have finished, remove the session you created in step 2:
    Remove-PSSession $Session

Complete code to connect to Office 365 with PowerShell

$Cred = Get-Credential
$Session = New-PSSession -ConfigurationName Microsoft.Exchange -ConnectionUri https://ps.outlook.com/powershell/ -Credential $Cred -Authentication Basic -AllowRedirection
Import-PSSession $Session
# Run any commands you want here
Remove-PSSession $Session

Change PowerShell Execution Policy

If you received this error when you tried to execute step 5:

Import-PSSession : Files cannot be loaded because running scripts is disabled on this system.

Then you need to change your PowerShell execution policy. To connect to Office 365 with Powershell your execution policy to at least Remote signed:

  1. Open PowerShell as an administrator:
    Image showing how to run PowerShell as an administrator to change execution policy
  2. In your PowerShell window run the command:
    Set-ExecutionPolicy RemoteSigned
  3. Choose “Y” when prompted to change the execution policy.

You will now be able to connect to Office 365 with Powershell.

Filed Under: How To Tagged With: Office 365, Powershell

Office 365: How to add or remove an email alias using Powershell

December 19, 2018 by Paulie 4 Comments

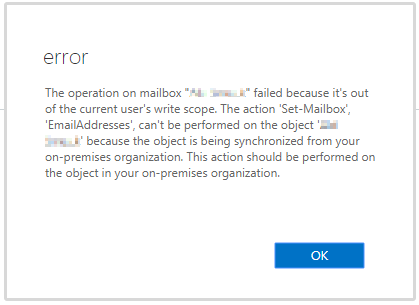
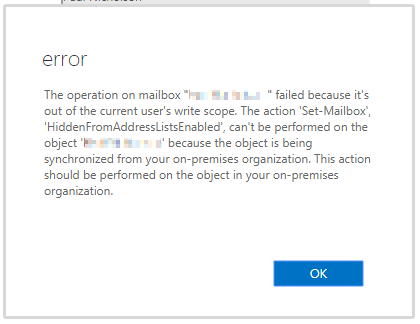
Use the Powershell cmdlet Set-Mailbox to check email aliases assigned to Office 365 accounts, add aliases or remove aliases. Additionally the handy form underneath will generate the correct Powershell commands for you.

Check current email aliases assigned to an Office 365 account:

Get-Mailbox mailboxName | select -ExpandProperty emailaddresses | Select-String -Pattern "smtp"

Add an email alias to an Office 365 account:

Set-Mailbox mailboxName -EmailAddresses @{Add='[email protected]'}

Remove an email alias from an Office 365 account:

Set-Mailbox MailboxName -EmailAddresses @{Remove=’[email protected]’}

Or you can just use the form below and the required Powershell will be generated for you….

Now that you have got multiple email aliases, here is how to configure Outloook so that you can send from an alias.

Filed Under: How To, Office 365 Tagged With: Exchange, Office 365, Powershell

Use CDO to send email from VBScript or VBA through Office 365

December 16, 2018 by Paulie 18 Comments

Sending email via VBScript or VBA using CDO is easy to do, but the correct configuration to relay through Office 365 is confusing to say the least and it took me me a while to find the correct settings.

I knew from configuring other devices and software that the preferred way to setup SMTP to relay to Office 365 was to use TLS on port 587. The problem is that officially CDO does not support TLS, but unofficially it does. So I tried in vain to develop some code that would send email via smtp.office365.com using TLS and always came up with the following error:

The server rejected the sender address. The server response was: 530 5.7.57 SMTP; Client was not authenticated to send anonymous mail during MAIL FROM

So clearly the TLS support in CDO is not sufficient to be able to work with the Office 365 SMTP Server. The trick is not to use TLS at all, but to use SSL instead on port 25 instead, which seems to work fine:

VBScript to Send Email via Office 365 (smtp.office365.com)

This is just quick sample code to get you on the right path:

Dim objMessage, objConfig, Fields
Set objMessage = CreateObject("CDO.Message") 
Set objConfig = CreateObject("CDO.Configuration")
Set Fields = objConfig.Fields
With Fields
  .Item ("http://schemas.microsoft.com/cdo/configuration/sendusing") = 2 
  .Item ("http://schemas.microsoft.com/cdo/configuration/smtpserver") = "smtp.office365.com"
  .Item ("http://schemas.microsoft.com/cdo/configuration/smtpserverport") = 25
  .Item ("http://schemas.microsoft.com/cdo/configuration/smtpauthenticate") = 1
  .Item ("http://schemas.microsoft.com/cdo/configuration/sendusername") = "[email protected]"
  .Item ("http://schemas.microsoft.com/cdo/configuration/sendpassword") = "Office365Password"
  '.Item("http://schemas.microsoft.com/cdo/configuration/sendtls") = True
  .Item("http://schemas.microsoft.com/cdo/configuration/smtpusessl") = True
  .Update
End With
Set objMessage.Configuration = objConfig

With objMessage
  .Subject = "Test Message"
  .From = "[email protected]"
  .To = "[email protected]"
  .HTMLBody = "Test Mesage"
end With
objMessage.Send

VBA to send email via Office 365 (smtp.office365.com)

The code for VBA is almost the same as VBScript and I tested it using Excel 2016 without any problems at all. But first you need to add a reference to your project:

  1. In the Office VBA Code Editor go to Tools, and then References:
    Image showing how to add references to an Office VBA Project
  2. In the References dialog box add a reference to the “Microsoft CDO for Windows 2000 Library”:
    Image showing how to add the Microsoft CDO Library to the Office VBA Environment
  3. Use the following sample code….
Sub Office365_Email_Test()
    Dim objMessage, objConfig, fields
    Set objMessage = New CDO.Message
    Set objConfig = New CDO.Configuration
    Set fields = objConfig.fields
    With fields
        .Item("http://schemas.microsoft.com/cdo/configuration/sendusing") = 2
        .Item("http://schemas.microsoft.com/cdo/configuration/smtpserver") = "smtp.office365.com"
        .Item("http://schemas.microsoft.com/cdo/configuration/smtpserverport") = 25
        .Item("http://schemas.microsoft.com/cdo/configuration/smtpauthenticate") = 1
        .Item("http://schemas.microsoft.com/cdo/configuration/sendusername") = "[email protected]"
        .Item("http://schemas.microsoft.com/cdo/configuration/sendpassword") = "Office365Password"
        '.Item("http://schemas.microsoft.com/cdo/configuration/sendtls") = True
        .Item("http://schemas.microsoft.com/cdo/configuration/smtpusessl") = True
        .Update
    End With
    Set objMessage.Configuration = objConfig
    
    With objMessage
        .Subject = "Test Message"
        .From = "[email protected]"
        .To = "[email protected]"
        .HTMLBody = "Test Message"
    End With
    objMessage.Send
End Sub

A few things to note:

  • The account that you use must have at least an Exchange Online license.
  • You will only be able to send from addresses that account has send as permission for or an alias of that account.
  • It would probably be a good idea to use an account dedicated for sending SMTP because the password is being stored in clear text.
  • Your Firewall or your ISPs Firewall may block outbound port 25.
  • I’ve left the code for TLS in-place above but commented out, in case anyone else wants to have a play with it.

I hope this helps, I spent ages trying to relay through Office 365 over TLS with VBA, but SSL works just fine.


Filed Under: How To, Office 365, Scripts & Utilities Tagged With: E-Mail, Office 365, VBA, VBScript

Office 365: Change Primary email address of Active Directory user

August 20, 2018 by Paulie 9 Comments

It is simple to change the Primary Email Address of an Office 365 user when your tenant is not being synced to your on-premises active directory, but if you are syncing to Office 365 with any of the following tools:

  • Windows Azure Active Directory Sync (DirSync)
  • Azure AD Sync (AADSync)
  • Azure Active Directory Connect

Then you will be unable to change any of email addresses associated with that account, and you will get the following error:

The operation on mailbox “Mailbox” failed because it’s out of the current user’s write scope. The action ‘Set-Mailbox’, ‘EmailAddresses’, can’t be performed on the object ‘Mailbox’ because the object is being synchronized from your on-premises organization. This action should be performed on the object in your on-premises organization.

Image showing error from Office 365 when trying to change the primary SMTP address for an account that is synced to a local active directory.

How to change the Primary Email Address for an Office 365 account using Active Directory Users and Computers

  1. Open Active Directory Users and Computers
  2. Ensure you have “Advanced Features” enabled from the view menu:
    Image showing how to enable the "Advanced Features" in Active Directory Users and Computers
  3. Double click on the user that you want to edit the email addresses for.
  4. Go to the “Attribute Editor” tab.
  5. Go to the “proxyAddresses” attribute and click edit.
  6. Edit the email addresses as per your requirements. Note that the primary address (which is the address that the user will send emails from) is in uppercase “SMTP”.
    Image showing how to edit the proxyaddresses attribute for an Office 365 user synced to local active directory.

How to change the Primary Email Address for an Office 365 account using Powershell

You can perform the same operation using Windows Powershell, the basic syntax is like this:

Set-ADUser paulie -Add @{ProxyAddresses="SMTP:[email protected]"}

The problem with running this command is that you may already have a primary SMTP address set and this will not stop you from adding another one. So first of all run:

get-aduser paulie -properties proxyaddresses | Select-Object Name,ProxyAddresses |fl

This will show you all the current proxy addresses for this user. If you want to remove an existing proxy address you can use:

Set-ADUser paulie -Remove @{ProxyAddresses="smtp:[email protected]"}

It is possible neither of the above methods will work if you have never had Exchange installed locally, as the users will not have these attributes. You can follow the instructions on this page in order to get the attributes enabled for your users.

If you have any questions, feel free to ask in the comments.

Filed Under: How To, Office 365 Tagged With: E-Mail, Exchange, Office 365, Powershell

Office 365: How to hide a user from the Global Address List when using Dirsync,AADSync or Azure Active Directory Connect

November 15, 2017 by Paulie 14 Comments

To hide a user from the Global Address List(GAL) is easy when your Office 365 tenant is not being synced to your on-premise Active Directory, but if you are syncing to Office 365 with any of the following tools:

  • Windows Azure Active Directory Sync (DirSync)
  • Azure AD Sync (AADSync)
  • Azure Active Directory Connect

Then you will be unable to hide a user from using the Office 365 Web Interface or PowerShell. From both interfaces you will get the following error:

The operation on mailbox “Paulie” failed because it’s out of the current user’s write scope. The action
‘Set-Mailbox’, ‘HiddenFromAddressListsEnabled’, can’t be performed on the object ‘Paulie’ because the object
is being synchronized from your on-premises organization. This action should be performed on the object in your
on-premises organization.

From the web interface it will look like this:

Unable to hide mailbox from Office 365 when synced to on-premise active directory

How to hide a user from the Global Address List

The active directory property “msExchHideFromAddressLists” property must be set to “true”, here are two ways of changing it:

Using ADSI Edit to hide a user from the Global Address List

You can use ADSI Edit and navigate to your user and modify the property “msExchHideFromAddressLists” and simply change it to true. It is quite easy to do, but long winded and awkward.

Using adsiedit to set MsExchHideFromAddressLists to true to hide a user from the Office 365 GAL

Using PowerShell to hide a user from the Global Address List

You can achieve the same result in a single line of PowerShell using the Set-User cmdlet. This is a much faster and less error prone method of doing the same operation.

Here is an example:

Set-ADUser paulie -Replace @{msExchHideFromAddressLists=$true}

and to un-hide the user:

Set-ADUser paulie -Replace @{msExchHideFromAddressLists=$false}

It’s much easier to do in Powershell than ADSI Edit, but either way will work and the next time your AD synchronises with Office 365, the user should be hidden.

msExchHideFromAddressLists property missing from Active Directory?

If you discover that the msExchHideFromAddressLists property does not exist in your local active directory if you have never had a Microsoft Exchange Installed locally:

Image of ADSI Edit showing that the msExchHideFromAddressLists Active Directory property is missing
msExchHideFromAddressLists property missing from Active Directory

It is possible to extend the active directory schema to contain the required Exchange attributes without purchasing or installing Microsoft Exchange server. The easiest way to achieve this is to download the evaluation of Exchange Server 2013 and then:

  • Extract the contents of the download to a folder of your choice.
  • Run “setup.exe /prepareschema /iacceptexchangeserverlicenseterms” as per this screenshot:
    Screenshot of Extending the AD Schema to include Exchange Attributes
  • You should now have the msExchHideFromAddressLists active directory property available:
    msExchHideFromAddressLists property added to active directory by extending schema using Exchange 2013 evaluation


List all users hidden from the GAL

To list all users hidden from the GAL, use this:

Get-ADUser -Filter {msExchHideFromAddressLists -eq "TRUE"} |Select-Object UserPrincipalName

Questions? please ask in the comments section. If you found this post helpful, I’d really appreciate it if you would rate it for me 😀

Filed Under: How To, Office 365 Tagged With: E-Mail, Exchange, Office 365, Powershell

  • « Go to Previous Page
  • Go to page 1
  • Go to page 2
  • Go to page 3
  • Go to page 4
  • Interim pages omitted …
  • Go to page 7
  • Go to Next Page »

Primary Sidebar

Link to my LinkedIn Profile

Subscribe to Blog via Email

Enter your email address to subscribe to this blog and receive notifications of new posts by email.

Join 107 other subscribers.

Go to mobile version