• Skip to primary navigation
  • Skip to main content
  • Skip to primary sidebar

Tachytelic.net

  • Get in Touch
  • About Me

Office 365

Office 365 – Find user by email address or alias

September 16, 2019 by Paulie Leave a Comment

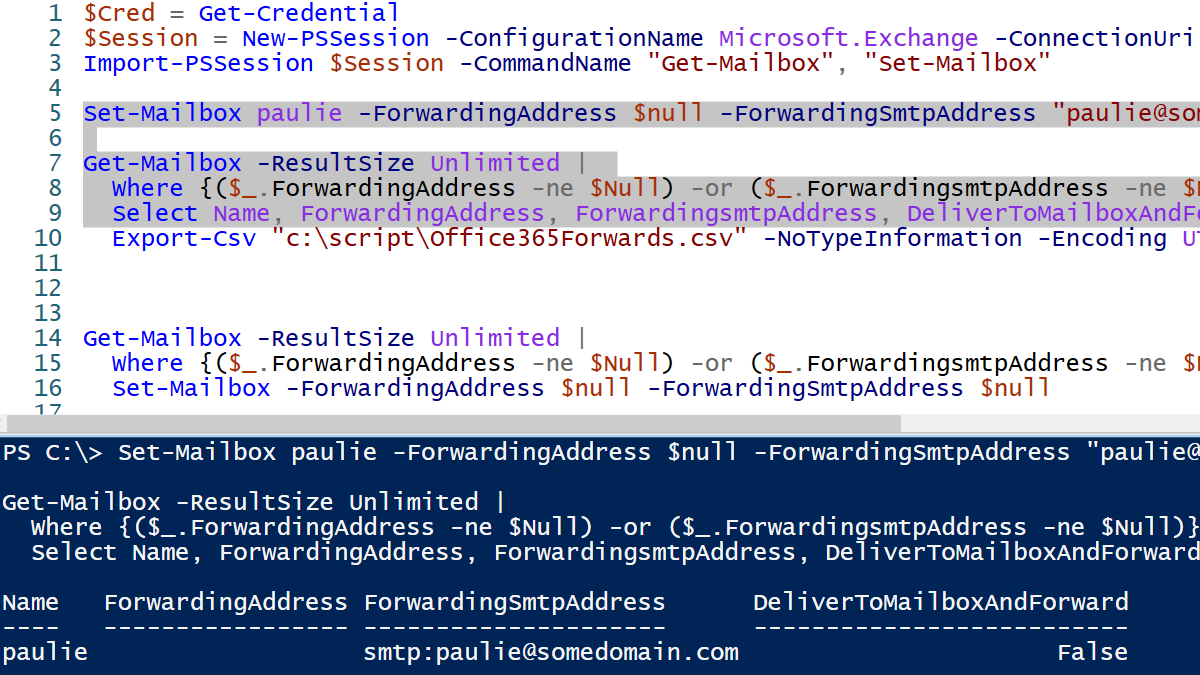
You can search for an Office 365 user by their primary email address or other aliases using Powershell.

First, connect to Office 365 with PowerShell

Once you are connected you can search for a specific address or export all addresses to a CSV file for analysis in another tool.

Find Office 365 User by Email Address

Example PowerShell code to find user by email address:

Get-Mailbox -Identity * |
Where-Object {$_.EmailAddresses -like 'SMTP:[email protected]'} |
Format-List Identity, EmailAddresses

The above command will only find this specific email address and that will have to be the primary email address of the mailbox as denoted by the uppercase “SMTP”.

You can also do wildcard searches easily:

Get-Mailbox -Identity * |
Where-Object {$_.EmailAddresses -like '*paul*@tachytelic.net'} |
Format-List Identity, EmailAddresses

By default Get-Mailbox will only return results from active mailboxes. So you may need to specify the ” -IncludeInactiveMailbox” parameter.

Below is a form you can use to help you put together the command you need.

Export all email addresses to a CSV File

If you prefer, you can simply output the email address of every user to a CSV file and analyse the addresses and aliases in another tool:

get-mailbox -identity *|
select-object Identity, EmailAddresses|
export-csv EmailAddresses.txt -NoTypeInformation

Filed Under: Office 365 Tagged With: Office 365, Powershell

List all Office 365 Global Administrators with Powershell

July 25, 2019 by Paulie 1 Comment

Time needed: 2 minutes.

Getting a list of all Office 365 Global administrators with Powershell is easy. Here is how to do it with a simple one liner.

  1. Open a Powershell session and connect to Office 365

    At a PowerShell Prompt connect to Office 365 with the command:
    Connect-MsolService

  2. Authenticate with Office 365

    Sign in to Office 365 when prompted with a Global Administrator account.

  3. List Global Admins with the Get-MsolRoleMember cmdlet

    Use the following command to list all global admins:
    Get-MsolRoleMember -RoleObjectId $(Get-MsolRole -RoleName "Company Administrator").ObjectId

If Connect-MsolService does not work for you, then you need to follow these instructions to install the Azure Active Directory Module.

If you’d like to export the list of Global Administrators to a CSV file instead, use a PowerShell command like the following:

Get-MsolRoleMember -RoleObjectId $(Get-MsolRole -RoleName "Company Administrator").ObjectId |
Select-Object -Property DisplayName,EmailAddress |
Export-Csv -NoTypeInformation -Path D:\GlobalAdmins.txt

Filed Under: Office 365 Tagged With: Office 365, Powershell

Remove forwarding from Office 365 Mailboxes with Powershell

June 30, 2019 by Paulie 5 Comments

It’s easy to check if email is being forwarded to external or inappropriate recipients with PowerShell and remove those forwards if they are in place.

First, connect to Exchange Online with the following:

$Cred = Get-Credential
$Session = New-PSSession -ConfigurationName Microsoft.Exchange -ConnectionUri https://ps.outlook.com/powershell/ -Credential $Cred -Authentication Basic -AllowRedirection
Import-PSSession $Session -CommandName "Get-Mailbox", "Set-Mailbox"

I restricted “Import-PSSession” to import only the Get-Mailbox and Set-Mailbox commands. It makes things a little bit faster by leaving out all the commands that aren’t needed.

List all users with mailbox forwarding enabled

To list all users with forwarding enabled, use the following code:

Get-Mailbox -ResultSize Unlimited | 
  Where {($_.ForwardingAddress -ne $Null) -or ($_.ForwardingsmtpAddress -ne $Null)} | 
  Select Name, ForwardingAddress, ForwardingsmtpAddress, DeliverToMailboxAndForward
Image showing the use of the "Get-Mailbox" cmdlet to list mailboxes which have forwarding enabled and will be set for removal.
The command found one mailbox with forwarding enabled

If you have many users you can export the results to CSV for analysis like this:

Get-Mailbox -ResultSize Unlimited | 
  Where {($_.ForwardingAddress -ne $Null) -or ($_.ForwardingsmtpAddress -ne $Null)} | 
  Select Name, ForwardingAddress, ForwardingsmtpAddress, DeliverToMailboxAndForward | 
  Export-Csv "c:\script\Office365Forwards.csv" -NoTypeInformation -Encoding UTF8

As you can see, there are two different types of fowards:

  • ForwardingAddress – This is set by an administrator and the end user has no control over it.
  • ForwardingSMTPAddress – This can be set by the user in Outlook Web Access

Remove forwarding from a Mailbox

You can remove the forwarding from a single mailbox with the following command:

Set-Mailbox paulie -ForwardingAddress $NULL -ForwardingSmtpAddress $NULL

This will disable both the admin forwarding and the user forwarding for the specified mailbox.

Remove User Forwarding and Admin Forwarding for all users

Get-Mailbox -ResultSize Unlimited | 
  Where {($_.ForwardingAddress -ne $Null) -or ($_.ForwardingsmtpAddress -ne $Null)} |
  Set-Mailbox -ForwardingAddress $null -ForwardingSmtpAddress $null

Remove All forwards set by an Administrator

Same as the command above with a small modification:

Get-Mailbox -ResultSize Unlimited | 
  Where {($_.ForwardingAddress -ne $Null)} | 
  Set-Mailbox -ForwardingAddress $null

Remove All forwards set by users

Get-Mailbox -ResultSize Unlimited | 
  Where {($_.ForwardingSmtpAddress -ne $NULL)} |
  Set-Mailbox -ForwardingSmtpAddress $null

Remove all User forwards to a specific domain

Get-Mailbox -ResultSize Unlimited | 
  Where {$_.ForwardingSMTPAddress -ne $null -And $_.ForwardingSMTPAddress -like '*@gmail.com'} |
  Set-Mailbox  -ForwardingSmtpAddress $null

Loop through a file of aliases and remove admin forwarding for each alias

The following code will read a file containing mailbox identity’s and remove the admin forwards on each account.

$mailForwards = get-content c:\script\AliasList.txt
foreach ($alias in $mailForwards)
{
  "Removing Forward for $alias"
  Set-Mailbox $alias -ForwardingAddress $null -DeliverToMailboxAndForward $false
}

There are so many ways of controlling the forwarding with PowerShell, I hope the provided examples are useful.

To learn how to add a forwarding from PowerShell, see this post.

Filed Under: Office 365 Tagged With: Office 365, Powershell

Scan to Email with Office 365 using a Multi-function Printer

February 27, 2019 by Paulie 6 Comments

Setting up a Multi-function device to scan to email via Office 365 is easy. This Microsoft document lists the three possible methods, which are:

  • SMTP Client Submission
  • Direct Send
  • Using an SMTP Relay

Which method you should use depends on your environment. If you already have an SMTP server configured internally, using SMTP relay may suit you better.

This post will cover the SMTP Client Submission method. The disadvantage of this method is that it requires the printer to use a licensed Office 365 account. But it is very easy to setup.

Setup scan to email from a HP Multi-function Device

I am going to demonstrate using a HP PageWide Pro 477dw MFP, but the same method will work for any brand. Before you begin configuring the printer, make sure you know the username and password of the Office 365 account you are going to use.

  1. Login to the printers web interface.
  2. Find the “Scan to Email” options:
    Image showing Scan to Email Menu option on a HP Printer
  3. Now you need to enter the following:
    1. From Address: Use the Office 365 Account Email Address you want to use for the printer
    2. SMTP Server: smtp.office365.com
    3. SMTP Port: 587
    4. Tick the box that says “Always use secure connection (SSL/TLS)”
    5. Username: Use the Office 365 Account Email Address you want to use for the printer
    6. Password: Enter the password for the account you want to use.
      Image showing setting required for Scan to Email Setup for Office 365 from a Multi-function printer or copier
    7. Scan a document!

The HP PageWide has got a nice internal address book for storing email addresses which makes scanning to email quick and easy.

Here is a video showing how to setup scan to email on Office 365 as per the above:

Filed Under: How To Tagged With: Office 365

Disable Simplified Account Creation in Outlook 2016 or 2019

January 25, 2019 by Paulie 13 Comments

Recent builds of Outlook have a simplified account creation wizard. Here is how to disable it:

  1. Close Outlook if it is already open.
  2. Next, Open registry editor (Windows Key +R, Type in regedit and click OK.
  3. In registry editor navigate to and select:
    HKEY_CURRENT_USER\Software\Microsoft\Office\16.0\Outlook\Setup
  4. From the Edit menu, click new, then DWORD (32-bit) Value:
    Image showing creation of new registry entry to disable simplified account creation in Outlook 2016 or 2019
  5. Name the new DWORD:
    DisableOffice365SimplifiedAccountCreation
  6. Double click on the new DisableOffice365SimplifiedAccountCreation entry.
  7. In the Value Data box type 1, then click OK:
    Image showing the DisableOffice365SimplifiedAccountCreation registry entry being set to 1, which will disabled the simplified account creation wizard.
  8. Close registry editor and restart Outlook.

If you prefer, simply download DisableSimplifiedAccountCreation.reg here and the correct registry entry will be imported.

Image of Windows Registry Icon
To download, right click and then choose save as.


Filed Under: How To Tagged With: Office 365

  • Go to page 1
  • Go to page 2
  • Go to page 3
  • Interim pages omitted …
  • Go to page 6
  • Go to Next Page »

Primary Sidebar

Link to my LinkedIn Profile
Buy me a coffee

Subscribe to Blog via Email

Enter your email address to subscribe to this blog and receive notifications of new posts by email.

Join 245 other subscribers.

Go to mobile version