Although it is possible to assign many email aliases to a single account in Office 365 it is not easy to send as an alias using Outlook when composing a new email.
There are two workarounds to this, the first is to use a distribution group and assign users permissions to send from that distribution group. The second, which is the method documented in this post is to set-up a second mail account within Outlook and use the account to send mail via the Office 365 SMTP servers. This will give you the ability to select the alias using the “From” button when composing a new email.
How to setup Outlook to send from an alias in Office 365
The idea behind this method is to setup a second account in Outlook that will allow sending from an alias that has been defined in Office 365. It would be better if the ability to send as an alias was native to Outlook/Office 365, but it isn’t. See these instructions for how to add an alias with Powershell.
Before you can proceed, you need to find your SMTP settings: To do this, login to Outlook Web App, click on the little cog in the top right of the screen to bring up the options menu and click on options.
- Login to Outlook Web App
- Click the settings cog in the top right corner
- In the search box at the top of the settings window, type in “pop”:
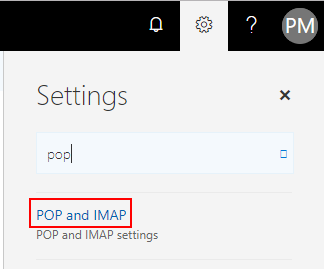
- Click on POP and IMAP
- This will show you the settings you need for POP, IMAP and SMTP access. We only need the SMTP setting:
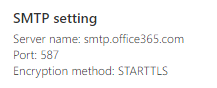
I expect your settings will be the same as mine, which means your Office 365 SMTP Server will be smtp.office365.com. Before proceeding ensure you have added the alias that you want to send from to your Office 365 account.
Setup Outlook 2016 to send from an email alias
-
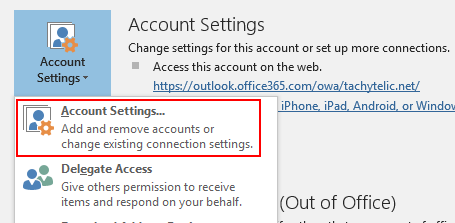
- Go to “File” and then “Account Settings”. Click the “Account settings” button and choose “Account Settings”:
- This will bring up the list of your accounts, click new:

- Recent versions of Outlook 2016 may show a “Simplified Account Creation Screen”, which makes this process much more difficult:
- If you see the above screen, follow these instructions to disable simple account creation
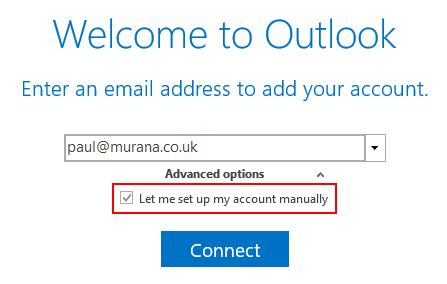
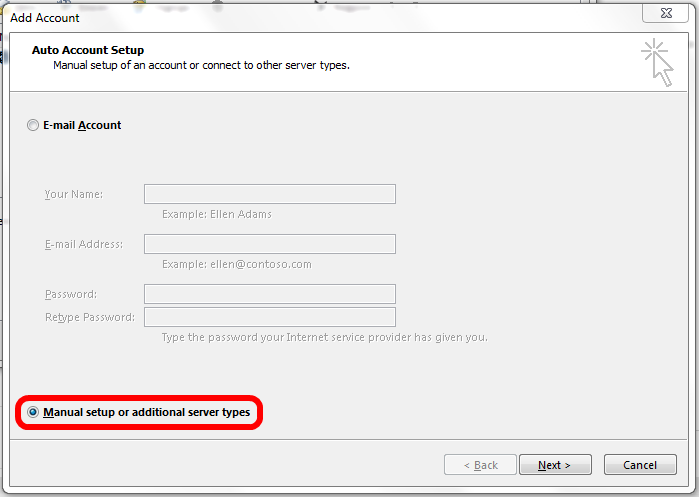
- On the account Setup screen, select “Manual setup or additional server types”
- On the next screen choose “POP or IMAP” and then press “Next”.

- “Your name” is the display name that will be presented to the recipient.
- “Email address” is the email alias that you added to your account in Office 365.
- Account Type should be POP3.
- Incoming Mail Server “127.0.0.1”.
- Outgoing mail server(SMTP) should be set to whatever your SMTP server was shown as in Outlook Web App, but probably smtp.office365.com
- Username should be your actual Office 365 username, not an email alias.
- Password should be set to your Office 365 Password.
- Untick the option “Automatically test account settings when Next is clicked”
- Now click on “More Settings …”
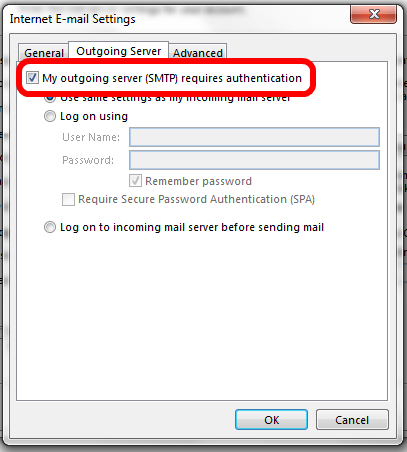
- Click on the “Outgoing Server” Tab and then tick the box “My outgoing server (SMTP) requires authentication”.
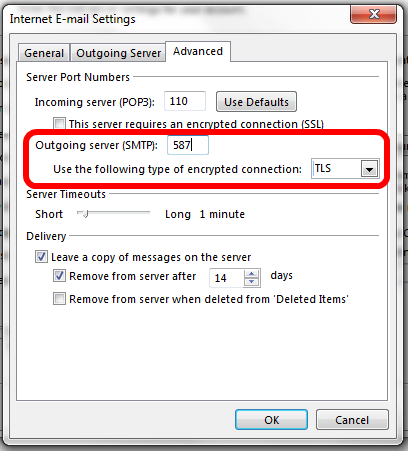
- Click on the “Advanced” tab and then change the “Outgoing Server (SMTP)” setting to 587 and the encryption type to “TLS”.
- Click OK to return to the previous screen and then click next to add the account. On the next screen click finish.
- When the account was created Outlook created a new PST file for the new account. We don’t need that as we are not going to be receiving any emails on this account. You should now be back at the E-Mail accounts screen. Click on your new account to highlight it and then click on “Change Folder” option.
- Select your inbox from your main Exchange account. Click OK and then Close. The new PST file will still be in your folder list, but you can remove it by right clicking on it and choosing close.
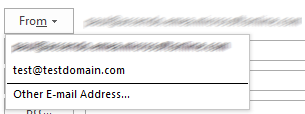
- Now your account is set-up and you will be able to send email from this address by simply selecting the from address when composing a new email.
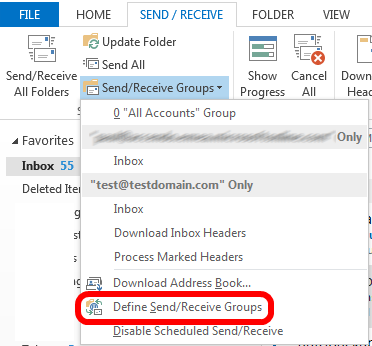
- Although you are now in a position to send emails using this address there is one additional step to ensure that Outlook does not attempt to receive email.Click on the “Send / Receive” tab and then click on “Define Send/Receive groups”In the Send/Receive Groups settings, click on “Edit”. Select your newly created account and untick the box which says “Include the selected account in this group”. Like the following picture:
- Go to “File” and then “Account Settings”. Click the “Account settings” button and choose “Account Settings”:
If you found this post helpful, I’d really appreciate it if you rated it.
Anna says
This was incredibly helpful. Thank you!
Preet Singh says
thanks for the post. But what do you do about replying from your mobile? Will you have to setup a seperate pop outgoing account on all devices?
Michael says
This rocks. Thanks!!!
James says
Hello, I followed above instructions but I get this email system administrator message after I change reply to email
“550 5.7.1 Client does not have permissions to send as this sender”
Andy says
I have been looking around for ages trying to resolve this issue. So thanks!
The only modification to your instructions is that in Outlook 2013 you do not have the option to close the account, you can only remove it and is will delete the email account you have just created.
So what you need to do is access your “Accounts Settings” windows (FILE > ACCOUNTS SETTINGS) and then click on the “Data Files” tab from here just delete the .pst file relating to the newly created email account. MAKE SURE YOU DON’T DELETE THE WRONG DATA FILE. When you go back to your folders you will see the account has disappeared, but you can still send from that email address.
I hope this helps.
Mike says
Thanks, this works. It’s too bad the right “from” address isn’t automatically selected by Outlook when you reply to an email that was sent to an alias.
Jason F says
Umm, isn’t the point of Office 365 Exchange to get away from POP/SMTP? This seems like a huge step in the wrong direction.
It doesn’t make sense to use this hack workaround when domain aliases has been a feature of exchange server ever since version 4.5. Surely there must be a proper answer.
Paulie says
I agree it is not ideal, but as far as I am aware, it is the only way. If you have a better way of doing it, please share!
Rainer says
Thanks so much! This is the solution I’ve been looking for for a long time!
@James: If you get the error “550 5.7.1 Client does not have permissions to send as this sender”, just use the smtp-server of your other mail provider (eg. smtp.mail.yahoo.com) instead of the smtp.office365.com. Then it should be fine.
@Mike: Just go the account settings and set your POP account you use for sending as your default account. Then this reply address will be preselected.
David Lopez says
THANK YOU!! VERY HELPFUL
Sam Dean says
Thank you! My Office 365 partner (Telstra Australia) said it just simply wasn’t possible.. Your method worked perfectly.
Henry says
This method is useful, the annoyance I have with it is that sent items are put into the PST file of the dummy account by default. If you go into account settings and highlight the dummy account, look for the “selected account delivers new messages to the following location” – press the “change folder” button and select the inbox of your Exchange account – this actually affects where your sent items are stored. You can now close the dummy PST file which was created when opening the account. Hope this helps someone.
Paulie says
Hi Henry,
This is actually already covered in the post, but thank you for your additional detail.
Paulie
Mark says
Hi,
I’m using Office 365 and after clicking on ‘options’ (via Outlook > little cog) I don’t see the same list of options. Under Account, I only see Bloc or allow; Connected Accounts; Forwarding; and POP and IMAP.
Any help greatly appreciated; like most, as a small business, I really need to be able to send from multiple email aliases. Surprised MS are making this so difficult, doesn’t really feel like they’ve thought much about the needs of this market.
Paulie says
Mark,
It sounds to me like you are using Outlook Web Access, not the Outlook desktop client – am I correct?
Paulie
Mark says
Hi Phil
I was using Outlook Web Access (correct, that’s what I was referencing) but also I have desktop version as part of Office 365 premium, but can’t find the relevant links/pages there either.
Mark
Paulie says
Hi Mark,
I thought so, these directions will certainly not work in OWA and I don’t believe it is possible to do from OWA. However if you also have Outlook 2013 then you should be able to follow these instructions quite accurately. I don’t really have any explanation as to why you wouldn’t see these options.
Paul
Mark says
Hmm, might have just stumbled across the issue after closing and reopening Outlook. It’s Outlook mac:2011
Paulie says
Just a minor detail then! I actually have a Mac right here, perhaps I will write up the same guide again but for the Mac
Mark says
That would be wonderful, Paul! And, thanks for your help so far, even if you can’t get the function working for Mac – all very much appreciated.
Mark says
Hi Paul
Wondered if you ever thought about creating this helpful post, but relating it to Office 365 for Macs?
Best
Mark
Anna says
Hi Mark,
Here’s a post with instructions for Macs, worked well for me:
http://guides.appriver.com/m/8585/l/203528-send-as-distribution-group-shared-mailbox-or-user-alias-address-in-outlook-2011-for-mac
Cheers,
Anna
David Melling says
Hi, I keep getting the error:
0x800CCC13. Cannot connect to the network. Check your network connection or modem
Am I missing something here?
An urgent response would be appreciated as I have someone waiting for a fix.
Shannon Struik says
YES you can send from an alias. First make sure the alias email is listed under the user in the admin center, users, active users. Is it listed for that user, if no, add it, if yes, next.
In OWA:
click on new mail, click on the little dots next to Discard and show from
In the “from” drop down, you will only have your email address, right click and remove it, then type in the alias email address.
Send a test message. When you send from the alias email address once it will now show up in your drop downs for from.
Happy sending. This has been available for 3 years 🙂
Shannon Struik says
Same for Outlook
Click on new mail, Options, and show From (if you do not see the “from” field).
Once you see the “from” field, arrow drop down, if you do not see the alias email address, click on other email address add it.
Happy sending.
Victor says
There is an alternative:
have a look at ChooseFrom service: http://ivasoft.com/choosefrom365.shtml
Josh says
Did all the above, all seemed to work correctly but now I have outlook prompting for my password and it won’t accept it (even though i’m already logged into outlook with the same password) It keeps re-prompting for it over an over and won’t send the mail under the new alias and i can’t get it to stop (can send mail find ounder the primary alias). Even closing out outlook then re-opening it, it still keeps prompting for a password to send the mail I tried to send under the different alias.
Kick says
I added everything like in this instruction, but when i tried to send test message from 2nd domain (Alias) to myself i can see it was send from my 1st domain (Main address).
The same when I send test mal to my colleague from the same domain – in outlook there is shown y main address.
But when ilve send mail to my private Gmail account i can see it was send from domain.
Could you tell me what is the clue of this issue?
Paulie says
When you send using an alias inside of your own domain it always shows your main account.
This only works when you send outside of your own domain.
ik says
Hi, your solution is working great. But for some reason I got sent email, 2 times in my sent folder.
Tim says
Hi. Thank you for publishing these instructions.
I was able to implement them as indicated without any problems.
I happen to have my outlook set up so that I get an automatic BCC to myself for any emails going out.
My primary account in Office365 is [email protected].
I have a ton of aliases set up in the Office365 admin alias area.
In this case, I am trying to set up [email protected].
However, when I send from my outlook app (windows), the emails do not seem to go out and they still seem to come from my primary account (in my automatic BCC).
I’ll try to lay out the three options I tried with enough detail for assistance.
—————————
After following all of the setup instructions, and then double checking them, I am sending an email out using the “from” button in my Outlook 2016 app (windows) using the [email protected] account and sending to [email protected] as the test recipient.
Outlook immediately reflects the BCC copy of the email in my inbox, but the email does NOT seem to go out and is NOT received at [email protected].
Also, when I click the BCC copy in my [email protected] inbox, it seems to reflect that it came from [email protected] rather than [email protected].
—————————-
I also tried one of the other ideas in the comments like simply using “other email address” in the from field from Outlook app with the option “send using [email protected]“. The result with this method is that the email DOES go out and IS received at [email protected], but shows as coming from [email protected] rather than [email protected].
Also, in the Outlook inbox, the BCC copy also shows as coming from [email protected] rather than [email protected]
—————————
I then tried one of the other ideas, using OWA and deleting the [email protected] in the “from” field and using instead [email protected].
The result with this method is that the email DOES go out and IS received at [email protected], but shows as coming from [email protected] rather than [email protected].
Interestingly, it does NOT show up in my [email protected] inbox (as an automatic BCC) in either Outlook or OWA (though I am not overly concerned about this part).
————————-
Any help would be much appreciated. Thank you so much in advance.
May says
Hi! I was able to set this up following your instructions, and sending from my alias. However when receive the email test (to external domain), it still showing my primary email address.
Thank you!
May says
Hi Paulie,
I figured it out, I have to set the Reply Email as the alias.
Thank you. Your article saved me!!!
Tiffany R says
This was very helpful. Thank you!
For our Office 365 tenant I used STARTLLS as the encrypted Connection type.
I received an error when I tried using just TTLS per instructions.
Other than that, it worked!
Paulie says
Glad it was helpful to you.
Andrea James says
Thank you. After an hour of Googling, I found your website and the solution worked.
Kaj says
I get double sent items with this pop set up.
I set popup account to deliver in primary OST.
Anyone?
Bob says
Implemented this as written, All OK but now getting regular pop-up every few minutes asking for password for smtp.Office365.com server (which is pre-filled in dialogue box) even with ‘save this password in password list’ ticked.
Ebrahim says
hi
this is the parameters I put
Incoming mail
Server 127.0.0.1 port 110
– This server require ….. un-checked
– Require logon …… un-checked
Outgoing mail
Server smtp.office365.com port 587
Encryption method STARTTLS
– Require Logon ….. Checked
Message delivery
Use an existing data file …. Empty
the error message
Something went wrong
We couldn’t connect to the incoming (POP) server. please check the incoming (POP) server and try again
Paulie says
Sounds like you forgot the last step (number 14). Which will prevent Outlook from trying to download from the pop account.
Ebrahim says
Hi Paulie
thank u for the prompt reply ,
kindly not that I did not reached step 11 yet , and I receive this error at the time of creating the email , also the interface is quit different (Outlook for Microsoft 365 MSO (16.0.13001.20254) 64-bit , it would be more helpful to share screenshot but this input box allows only to type text .
thank u again, Ebrahim
Note: Subscribe option is not working
Alan says
This doesn’t work anymore. I have tried this on three different Outlooks at different sites and Outlook times out waiting for a response from the SMTP server (smtp.office365.com)
Paulie says
I just double checked and you are right, it does work with these settings though: