In this post I will show you how you can modify the BIOS of a Dell OptiPlex 790 or 990 so that it can support an NVMe SSD drive as a boot device.
Although these machines have a UEFI BIOS, they do not contain an NVMe driver. By adding the driver into the BIOS you can boot from a PCIe NVMe SSD. I managed to achieve these speeds with a 256 Gb Western Digital Blue from Amazon.
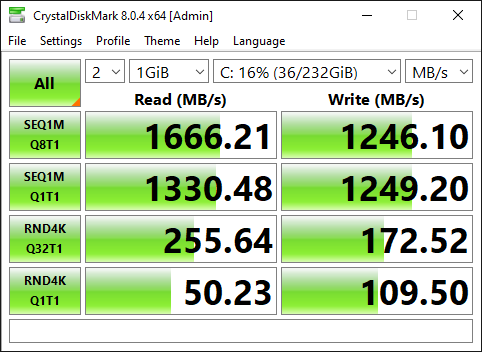
As the machine only has PCIe 2.0 it is not able to reach the full speed of the NVMe drive, but it still represents a significant boost in speed over a SATA SSD.
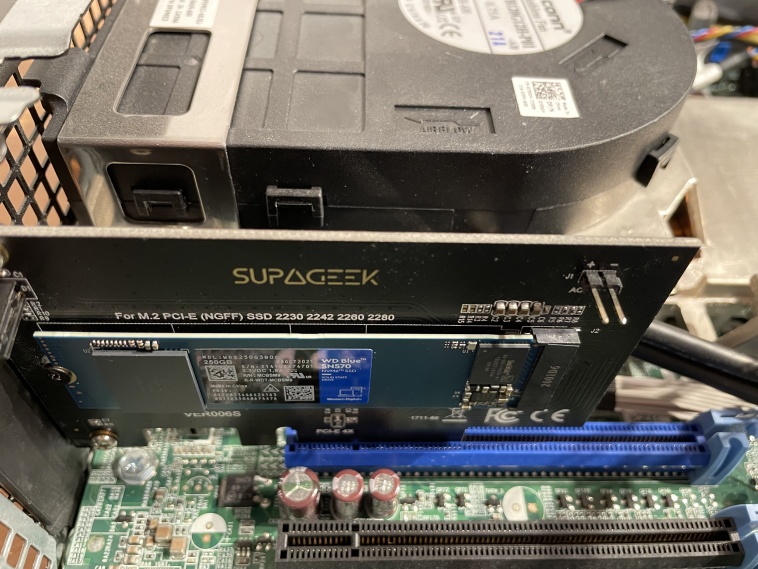
Here is the PCI adapter and the Western Digital SSD installed in an OptiPlex 790 Small Form Factor:
Warning
This blog post contains instructions on how to modify your BIOS.
You could easily break your machine. Proceed at your own risk!
Table of contents
Required Hardware
In order to carry out this upgrade, you will need a few things:
- An NVMe SSD. I used a 256Gb Western Digital Blue NVMe SSD.
- An NVMe to PCIe Adapter, I used this one from Amazon.
- A Dell OptiPlex 790 or 990 to upgrade.
Any NVMe SSD will work, and you can find the perfect one for your budget and requirements using my SSD Search Tool on whatssd.com. It’s quick and easy to use, helping you choose the right SSD for your needs.
The procedure is slightly different depending on the model and form factor, but mostly the same. I have not tried this on an OptiPlex 390, so I have no idea if it will work.
Procedure Overview
This process involves the following steps:
- Upgrade to the most recent BIOS from Dell:
- Installing Required Software and drivers.
- Backing up your current BIOS.
- Adding NVMe driver support into the BIOS backup.
- Writing the modified BIOS back to the system.
- Optimising BIOS settings.
Install the Required Drivers and Software
Before being able to read from or write to the BIOS, you need to install Intel Management Engine drivers. But instead of installing them from Dell, get these more up to date drivers from Lenovo.
Next, download the Intel Management Engine System Tools v7 r2, which contains the tools required to flash the new bios.
Also download the NVME Driver which will be injected into the BIOS Image.
Finally you will need UEFI Tool 0.28 to make the actual BIOS modification. Here is a direct link to that version.
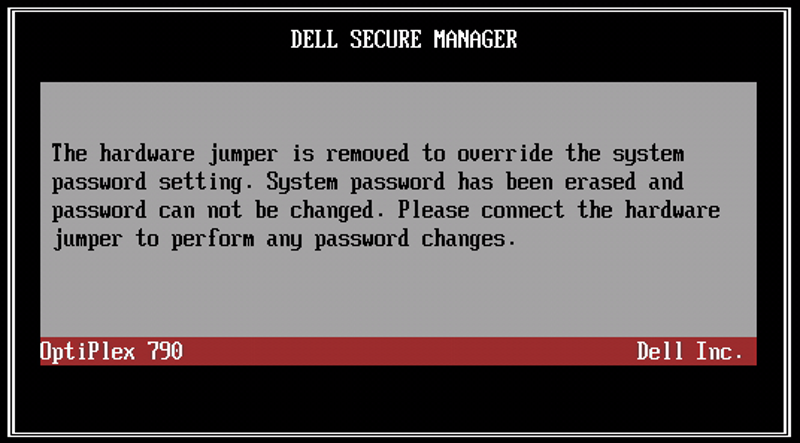
Put the machine into Service Mode
Now that you have the machine prepared, you need to put the machine into service mode before you can proceed:
- Shut the machine down.
- Remove the mains power supply.
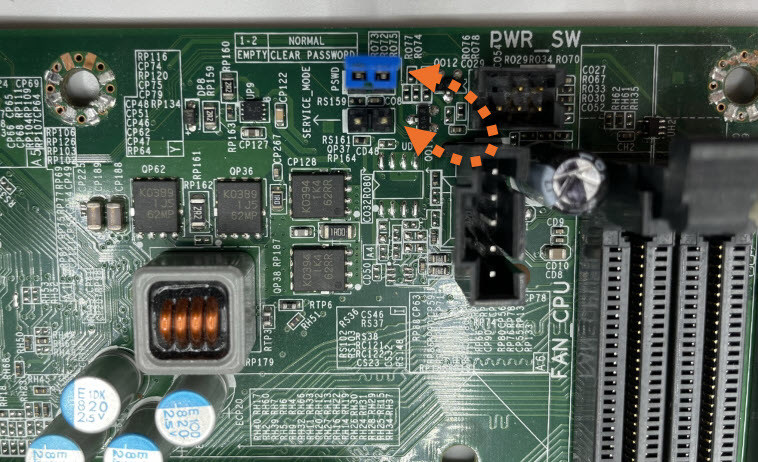
- Locate the two pin service connector and put a jumper on it.
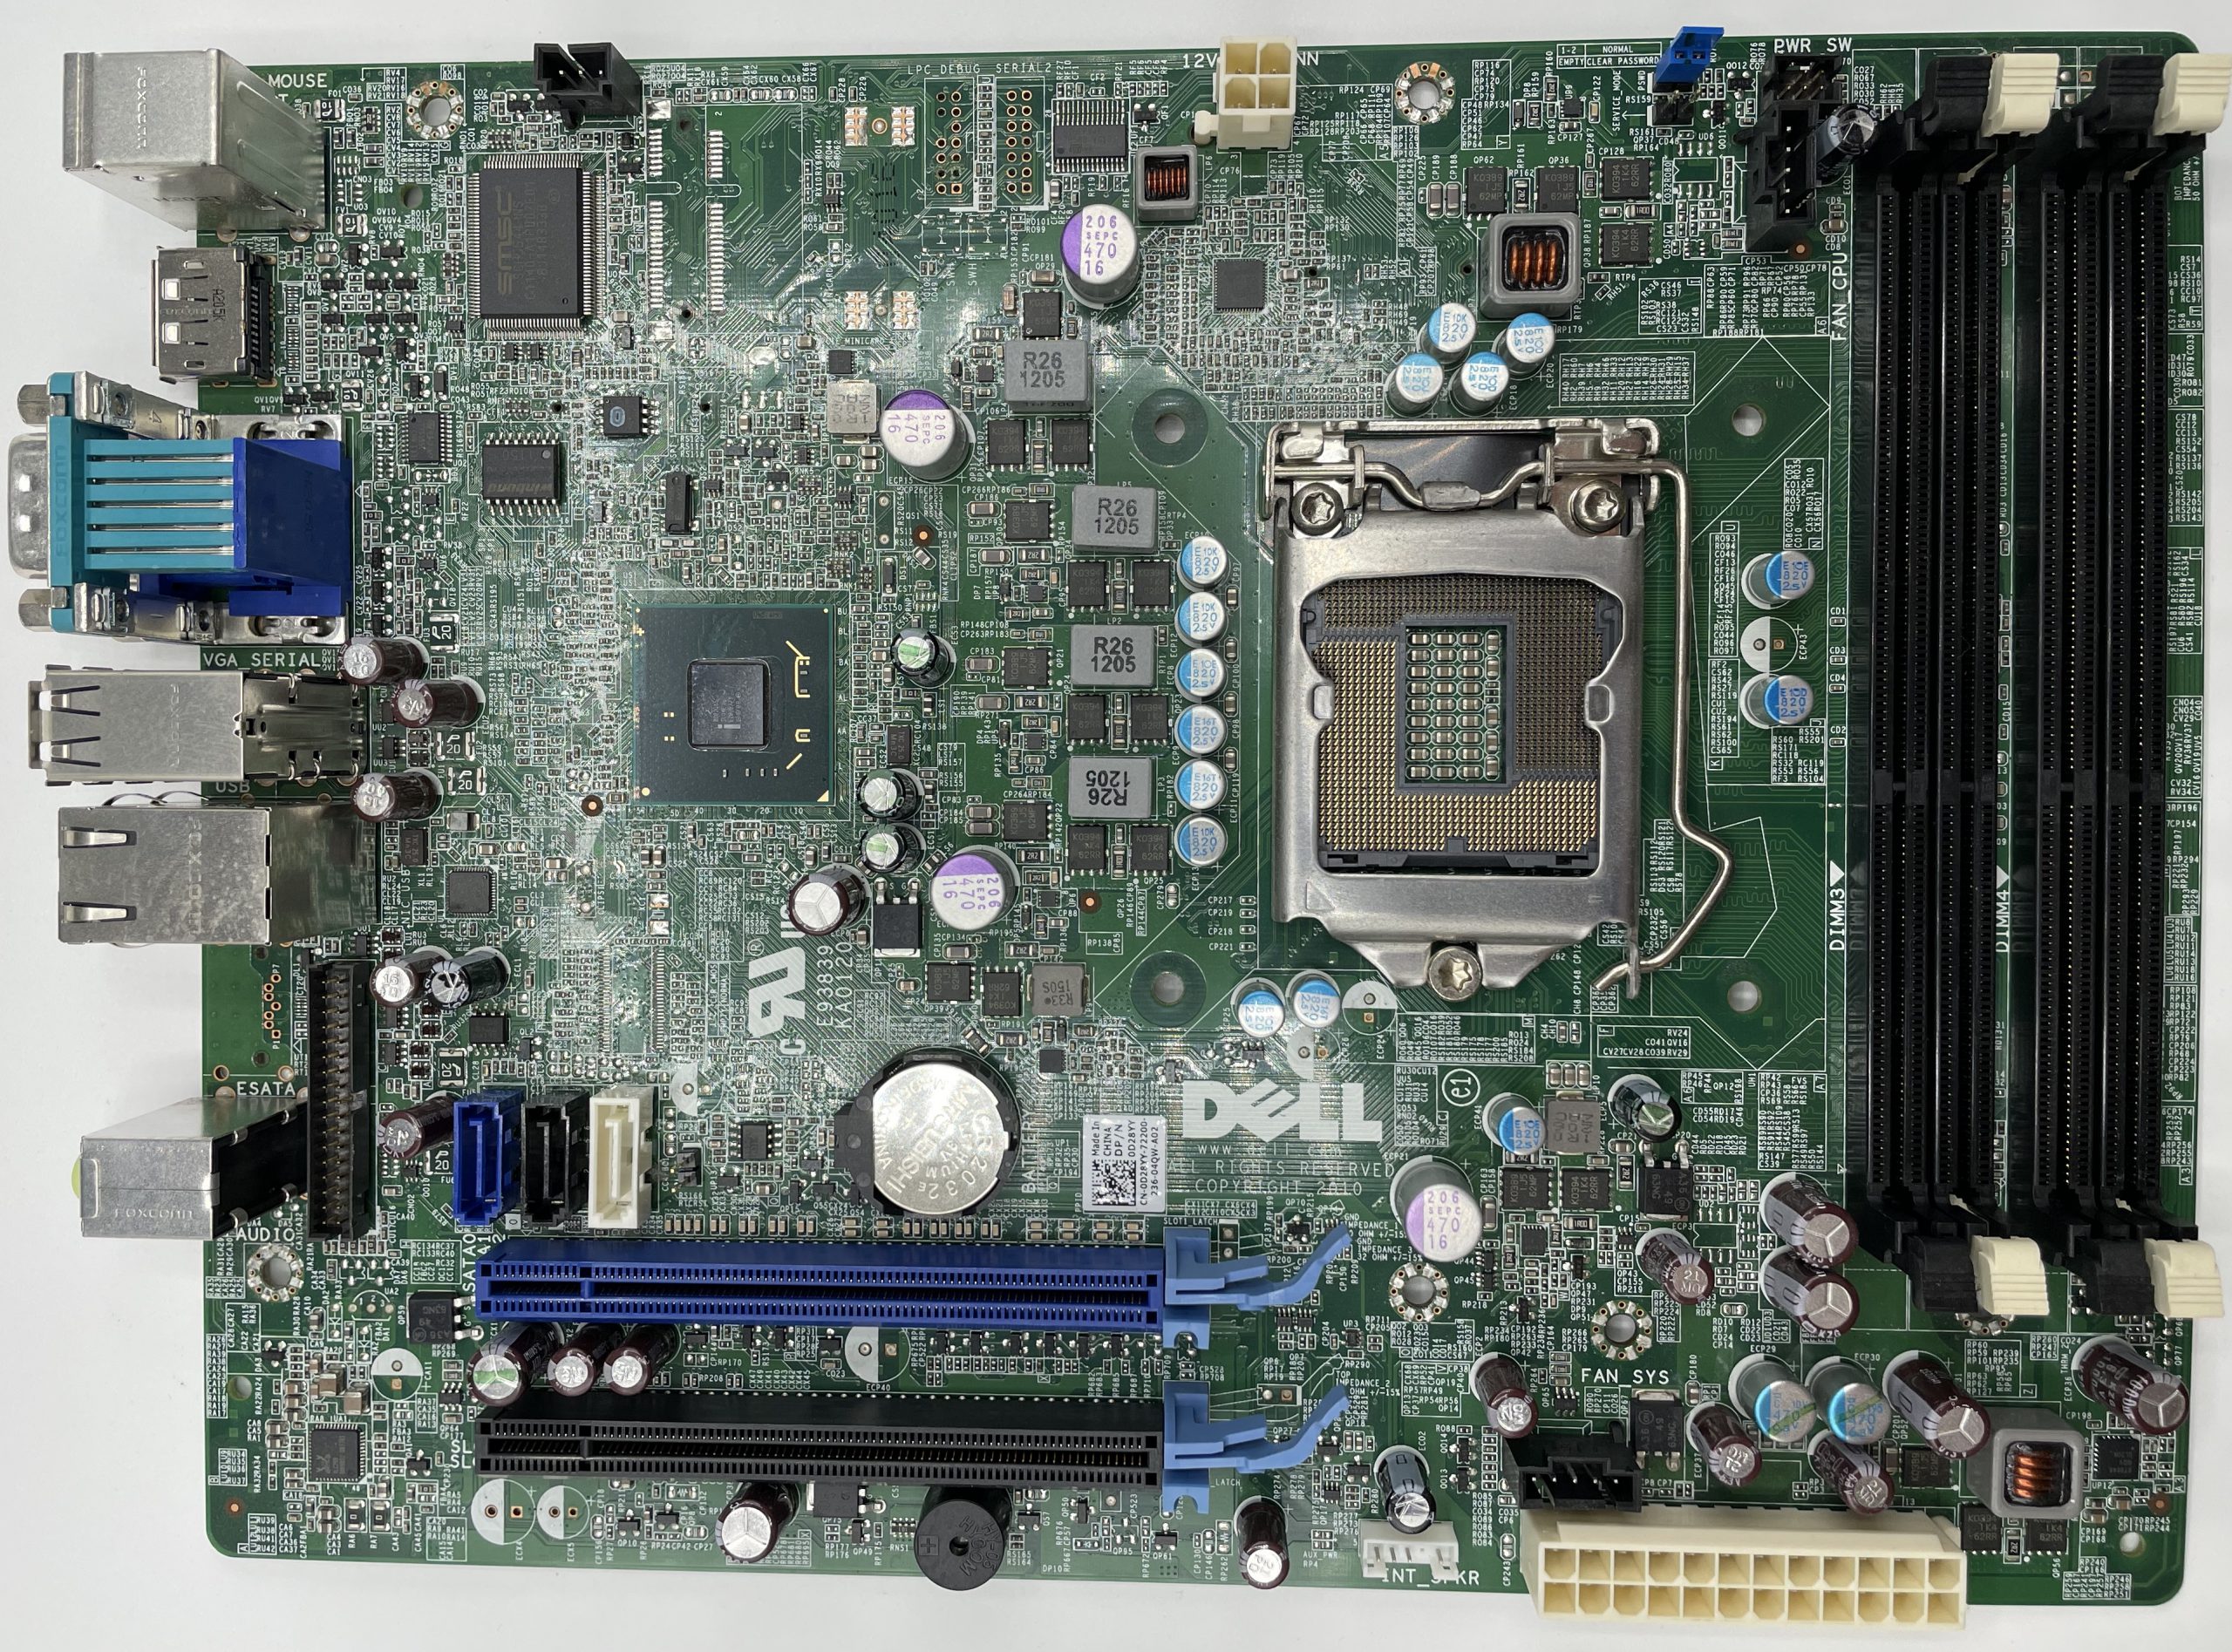
If you are upgrading a Small Form Factor machine, the service jumper is in an awkward position which will require you to remove the Optical Drive and Hard Drive cage to access it. Once those are out of the way, you can find near the RAM slots. Here is an image of the motherboard from a 790 SFF:
If you do not have a spare jumper, you can borrow the one from the Password reset jumper. Simply shift the jumper from the password pins to the service mode pins as shown below:
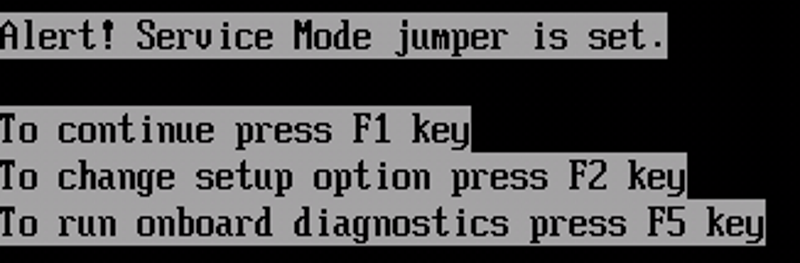
You can now boot the machine again in service mode, but you will receive a couple of warning messages:
You will then receive a message informing you that the machine is in Service Mode:
If you do not put the machine into service mode you will not be able to backup or update the BIOS properly.
Modify and Upgrade the BIOS
Now that you are in service mode, you can continue with the backup and modification.
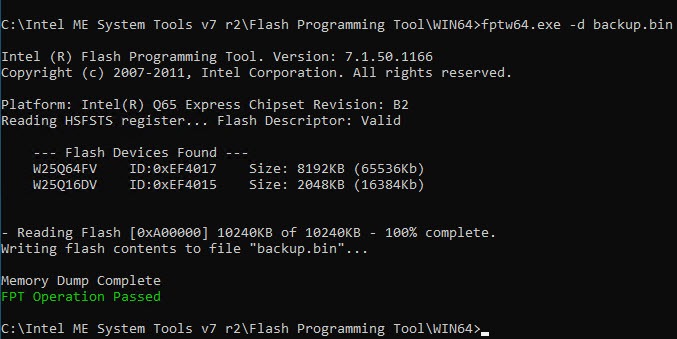
Backup the existing BIOS
Open a command prompt as an administrator and change to the directory where you extracted the Intel ME System Tools. Then navigate to the subdirectory \Flash Programming Tool\WIN64 (or WIN32 if you are on 32-Bit installation).
Within that directly use the command:
fptw64.exe -d backup.bin
Modify the BIOS and Inject the NVMe Driver
Next, open UEFI Tool and open the backup.bin file. Expand the sections as per the following screenshot:
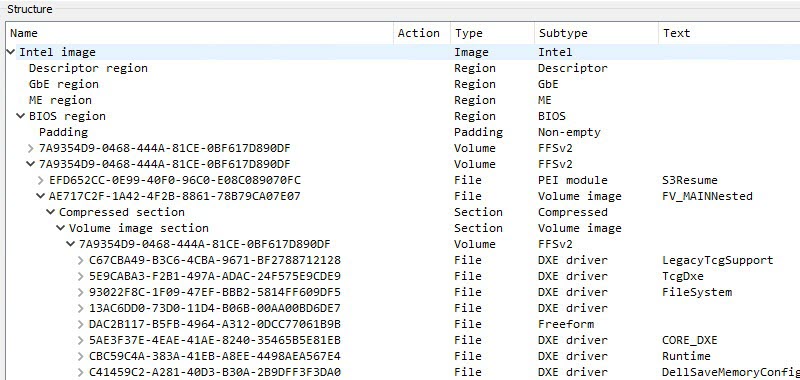
Scroll to the bottom of this section and you should see an area that looks like this:
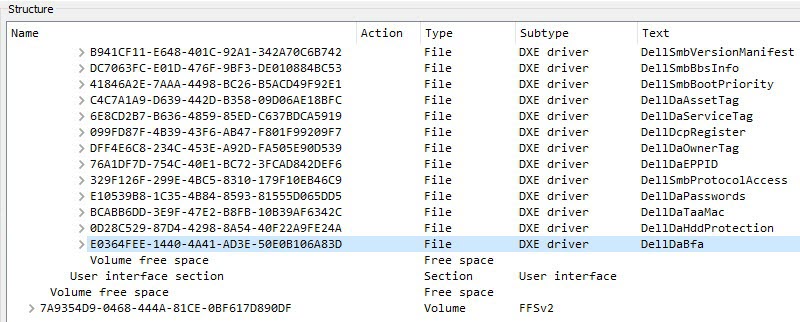
Next, right click on item with the name E0364FEE-1440-4A41-AD3E-50E0B106A83D and choose Insert After.
Choose the file NvmExpressDxe_Small.ffs that you just downloaded earlier and you will see it appear right after the DellDaBfa section:
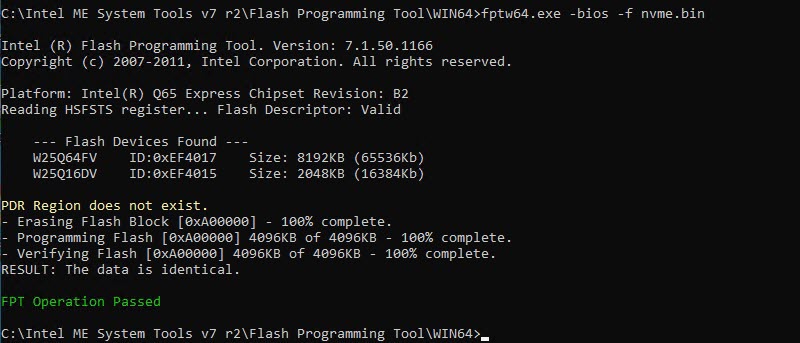
Now go to File -> Save Image File and save the file as nvme.bin and put it in the same location as the flash tool. Go back to your command prompt and run the command:
fptw64.exe -bios -f nvme.bin
Shut down the machine and remove the jumper from the service pins and move it back to the password reset pins if you took it from there.
The BIOS modification is complete!
Install the PCI NVMe SSD
If you have not yet installed your SSD into the machine, you can do it now.
Optimise BIOS Settings
Now that you have written the new BIOS, restart the machine. If you do not have any SATA drives connected you will receive a warning on start-up that says:
Alert! Hard Drive not found
You can fix this by going into the BIOS Setup and then System Configuration -> Drives. Untick all the SATA ports which do not have drives connected:

Finally, if you want the maximum possible speed from your new drive, consider disabling C-States in the BIOS. This makes it marginally faster, but I doubt you would notice much difference:

Enjoy your NVMe Enabled OptiPlex 790 / 990
Now you can install an operating system of your choice or clone one of your existing drives to your new NVMe drive and enjoy a decent performance increase.
In my opinion, upgrading the Dell OptiPlex 790 or 990 with PCI NVMe Solid State drive is a brilliant value upgrade. If an old machine can be given a new lease of life, then that is a great win. The performance boost if you are upgrading from a mechanical hard drive will be huge.
On my machine I can boot to the Windows 10 Desktop in 11 seconds. The configuration of my machine is:
- Intel Core i5-2400
- 16Gb Ram (4 x 4Gb)
Again, here is the PCI adapter that I used:

- Western Digital Blue SN570
- NVMe to PCI Adapter (The adapter comes with a heatsink also)
If you upgrade your OptiPlex 790 or 990, please let me know your results in the comments.
Ganesh says
Hi Paul,
Is it possible to do the Optiplex 3040 Micro, yes I knew that, there is no PCIe but there is M.2 SSD Slot Mini available (For Wifi & BT ) maybe this question silly one but curiosity, thanks in advance.
sam ito says
So graet!
Please tell me about optiplex 980 bios modification.
and when I try to optiplex 780 with same procdure, but I didnot read orig. BIOS.
??
Alex says
So great it’s working
Alex says
Great it’s working
John K Peterson says
Hey Paul. Thank you so much for posting. I bought a 990 with no HD or os. I assume this method won’t work
Paulie says
Why don’t you think it will work?
Steve.P says
It worked for me on Dell OptiPlex 990 but can you explain how you can boot straight from an NVME as it is not seen at bootup and In the bios I use opencore and the NVME.efi driver before!!
Paulie says
The whole post is about how to do this. Which part is unclear? You can boot directly from NVMe if you have made the modification described in the blog post and have your BIOS set to UEFI mode.
Steve.P says
Hello Paul,
Please let me thank you for your efforts on enabling NVME booting straight from bios, once I enabled UEFI booting from the OptiPlex 990 bios Iwas able to add an entry from Windows Boot Manager and was able to boot the NVME from start without an sata or usb stick into windows, great job and thanks again.
Paulie says
Cool – glad you got a good result.
Bob says
Thanks for your guide. but… no joy. Windows 10 recognizes the PCIe SSD once the OS is booted from a SATA drive, but evidently the bios on my machine does not.
Optiplex 790 Desktop (DT)
I7 processor
A22 bios
The bios install and flash works as per your guide, but even a windows install usb can’t recognize the PCIe. I’ve tried the SSD in both the PCIe16 & the PCIe4 slots.
Steve.P says
Did you remember to enabled UEFI booting from the OptiPlex 790 bios?
Bob says
Yes, Steve. And I cloned the SATA OS to the PCIe once with it formatted MBR and once as GPT (like the SATA).
After surrendering I added a boot option with bcdedit for the PCIe and a timeout of 0. I imagine the system starts from the SATA then jumps to the PCIe at some point, There’s only a savings of 3 seconds (boot in 32.02) but other monsters like Photoshop & Visual Studio load dramatically faster
Steve.P says
Hi Bob, Once I used used this guide I noticed that the PCIe drive light would flash to indicate that the drive was recognised. As for your boot options I would try booting with only the PCIe drive and as long as your windows installed PCIe is formated to GPT and you have changed the bios to boot from UEFI after a reboot an entry appeared for Windows Boot Manager, But you can also go into the Bios and add an entry for it as seen in this link. The path should be \EFI\BOOT|BOOTX64.EFI
https://cdn-ak.f.st-hatena.com/images/fotolife/u/usagi_2017/20181106/20181106235931.png
Hope this helps
Bob says
Thanx again, Steve. Added a boot entry, but suspect it’s the same as the SATA (not the Windows Boot Manager) I tried disabling all the SATA drives (unchecking in bios) but the bios then reports no bootable device found. I don’t want to try deleting the other boot options because the only way to get them back is to return to Service Mode & reflashing the bios.
My SSD doesn’t have an onboard access led
Steve.P says
Hi Bob, I am not sure why you are not able to boot from your NVMe but I found this video that might help you fix it.
https://www.youtube.com/watch?v=Lqt3qs8F8Cw
Hope this helps
Bob says
Success. The problem lay in wanting to keep my current Windows 10 setup.
Solution: unplugged all SATA’s & performed USB Windows install on top of the already cloned OS on PCIe, plugged all back in, rebooted but had to go back to bios to uncheck the SATA’s & boot again. After that, re-checked the SATA’s in bios and the machine will now allow setting priority to either OS without the dreaded “No Hard Disk Found” mesasge (I got that several times while the USB was re-installing but advanced via the F1 key.)
Evidently the install USB wriote something to UEFI that no amount of my tinkering did.
Paulie says
Well done Bob – great to hear these success stories.
Richard Sittig says
Paul, You took the risk and created a success! I praise you for that.
I have Optiplex 790 and 990, running well on SATAs with MBR. I tried a MBR to GPT, but it failed and messed up both drives. Have since reinstalled Win10 MBR on them.
Do you have a favorite way to do a Windows 10 MBR to GPT conversion? I had used command line MBR-GPT command. I have a blank Samsung NVMe in a Sabrent 4 lane PCIe adapter. It reads at 1660MB/s. Would like to make that my UEFI boot drive.
Is it too roundabout to convert one Win10 MBR disk to GPT. then clone it to the Samsung NVMe in order to be ready with 2 possible UEFi Boot drives, when the BIOS entry is done
Richard
Deepak says
Thankyou. It works. My 790 now boots with nvme drive. Also is there a way to modify bios that at uefi mode windows logo doesn’t appear like with newer motherboards windows loading happens at motherboard logo itself, it doesn’t show windows logo. Is there a way to do that in 790?
Fabien says
Hello. Thank you very much for the detailed and clear tutorial. I have a problem though when switching the jumper from password to service, the PC just doesn’t boot. When I put the jumper back on password, it boots normally… Any idea on how to fix it ? Maybe using a second jumper ? Thx for your help. Fabien
Bkwld says
Thank you so much! This is amazing speed and still giving life to my Optiplex 990.
Steven says
Do you think you could do the same with a Dell Optiplex 760 Tower? I would like to get a little more speed and efficiency. Thanks
Oliver says
Hi Paul,
i have an old 790 i3-2105 (Intel HD 3000) with a SSSD PCIe Nvme, works great with Windows 11 or Linux, EFI Boot both.
I use cheap PCIe Nvme Adapters x4, everything works.
I also upgraded a 3020 and xe2, works.
Great work from you, thanks, greetings from Germany, Oliver
Bob says
Hi I am trying to mode Optiplex 790. I updated bios as per instruction and installed Intel management engine driver. After booting in service mode I am getting flowing error..
_______________________________________________________
C:\Opt790>fptw64.exe -d backup.bin
Intel (R) Flash Programming Tool. Version: 8.1.60.1561
Copyright (c) 2007 – 2014, Intel Corporation. All rights reserved.
Error 201: [FPTw64.exe] cannot be run on the current platform.
Please contact your vendor.
________________________________________________________
Bob says
Sorry found problem .. need to use older version of fptw.exe
Thanks for great instruction …..
quaker says
Just hacked my OptiPlex 990. Magic happend and my system recived wings! Thanks for comprehensive guide.
Jay Graham says
Just patched my Optiplex 790 following your instructions, worked like a charm.
No issues whatsoever. Installed Win10 right after and getting 1647 write / 1200 read on a 512 gig Silicon Power nvme drive.
Thank you!
Jim van Keulen says
Tried to patch my Optiflex 9020 (bios A25). Saved bios backup succesful. However, after opening the backup.bin in UEFITool I got a message “unaligned file”. I could not find the insertion point mentioned. My structure looked different. I can insert the nvme driver after the last dxe driver and before the following PEI-module (S3–).
BUt I’m unsure of the result. Should I rebuild?
Mark says
I don’t think it’ll work on my Dell Optiplex 390 Desktop since it doesn’t have service mode pins (only meclr1, cmosctr1 and pswclr1 pins), but the good news is that it worked on my Dell 3020 and 9010. I’m very happy about that. Thank you!
Enzo says
Muchas gracias, excelente articulo, me funciono perfecto!!, si vienes por Chile, yo invito las cervezas, Saludos!
Thank yoy very mucho, excelente post, it’s work perfectly!!, if you visit Chile, I invite the beers!, best regards
Menz says
Great Tutorial. Does anyone know if this will work on a 790 usff with the Mini Pcie Slot?
Fernando says
Hello Pauli, this is a good tutorial, but you should have mentioned your source regarding the BIOS modification and where you got the NVMe BIOS module named NvmExpressDxe_Small.ffs.
Paulie says
Thanks – I don’t remember where I got it from – Winraid forum probably.
Fernando says
@Paulie
It is hard to believe, that you don’t remember your source. It was me, who detected the method in June 2015. My detailed step-by-step Guide can be found here: https://winraid.level1techs.com/t/howto-get-full-nvme-support-for-all-systems-with-an-ami-uefi-bios/30901
Paulie says
Well done, it’s a good guide.
Chandra says
Hi Paul
It was a great contribution by you
I could understand your documentation and procedure
which is well supported by video as well.
Thanks once again Paul for great article and making things crystal clear.
regards
VRC
Budi says
HI Paul, is it possible to use the same method for Dell 980? Its recent BIOS is A18.
Paulie says
No idea as I don’t have one to try it on. If the machine is important to you then I would advise you not to try.
But if you do try, I would be interested to hear your results. You will probably need a different version of the Intel tools.
Budi says
Ok I have successfully upgrade my 3010 and was amazed with its performance, so i will take risk to try to my 980. Regarding the intel ME system tools, how to decide which version i need for my 980 (A18)?
Fernando says
Hi, I need a litle help here. I have a Opltiplex 790
Did you get this error ?
Error 104: The 2 SPI flash devices do not have compatible command sets.
when I run
fptw.exe -D backup.bin
maybe a older version than
Intel Management Engine System Tools v7 r2
?
Thanks
Fernando says
It has not been me, who had written the last post.
Fernando
Juergen says
Hi Paul, great job.
I have an DELL Precision T3600. Can the BIOS modification also be done with this machine in the same way ?
Thanks
Paulie says
Yes, I think someone in the comments did it to a T3600. Perhaps the comment was on YouTube or here. If you can confirm it works I’d love it if you could get a photo of the service pin header for me.
Juergen says
Hi Paul. Thanks for the hint. I will try it shortly. Photos cannot be posted on these platform.
Leave an email-adress for it.
CU Juergen
Juergen says
Hi Paul,
sorry there was a typo in the email-address
Paulie says
Just upload them to imgbb
Martin says
Hello.
For me it was not working on a 990. During flashing the nvme.bin the pc completly frooze during the flash erase at 20%. i had to hard reboot it. and now it only displays 3 and does not boot anymore. Any ideas?
Martin
Paulie says
The only thing you could do is restore the BIOS with the backup that you made using a hardware programmer, like this one from Amazon. You could take a look at this guide I did on a similar subject:
http://tachytelic.net/2021/06/repair-dell-alienware-area-51-r2-corrupt-bios/
Martin says
Hello.
Luckily i already have one of those flash programming adapters from another project.
The 990 has 2 flash chips on the mainboard:
MX25L6406 64mbit nor flash spi 16pin
MX25L1608E 16mbit cmos flash spi 8pin
which one is used for what?
Paulie says
It’s possible the bios image could be divided across two chips. But I would guess that the one you want is the 8 pin 16mbit one. 64 is too big for a normal bios image.
Martin says
at least the size of my backup.bin is 10240KB
your area15.bin has 16384KB
will give it a try later on. the 8pin package is the only one to connect easily to.
Paulie says
Connecting to the 16 pin ones is very tricky. I bought an adapter that makes it much easier to do. The clip on ones are super challenging to get locked on.
Damien Lynch says
Thanks so much Paul. It worked like a charm for me. The only hiccup I had was having to convert my original sata boot disc from mbr to gpt before cloning it so I could boot from the m2 ssd.
akhmarizal says
i have a problem the dxe driver not show
Joe Oaks says
Paulie,
U R an excellent teacher. Just try it today, and as you said, everything works in my Optiplex 990. Thanks a lot.
Lou says
@Paulie, Great information, but I failed to execute correctly. I followed your instructions to the letter. My bios does not appear to see the SSD. I am using a Sabrent NVMe M.2 to PCIe card with a Samsung 970 EVO Plus 1TB SSD.
I copied the image of my 1TB WD1002FBYS with EaseUS “Disc Copy” program – the paid version.
I have my SSC/Sabrent adaper in PCI1 (normally for video cards) but I get “No Boot Device Found. Press Any Key To Reboot.”
Any ideas or suggestions?
Lou says
Ok, so I think I figured out what I did. The BIOS was still at A11. Right after the backup.bin creation, you are missing the step that says “Run the O790-A22.exe bios update tool and let your PC reboot.”
Now I am working with an A22 BIOS when I modify it.
I also made a backup of that before editing it to add the NVMe driver.
The image after the section “Choose the file NvmExpressDxe_Small.ffs that you just downloaded earlier and you will see it appear right after the DellDaBfa section:” is the wrong one. It does not show the added NVMExpressDxe_Small after the previously mentioned line.
Yet, having done all of this – I still get the same “No boot device found.” problem.
Paulie says
And so you should – you still need to run the windows installer to have it install and become a bootable device.
Lou says
I cloned my HDD to my SSD with EaseUS Disk Copy program.
I am trying the windows repair utility with a bootable USB, but not having luck. Could it be the Sabrent adapter?
PCSteve says
Hi,
Just a thought is your NVMe drive GPT format as it won’t boot if the drive is set to MBR and is east to cover with a partition software or a quick Google search?
My advice would be to download a Windows ISO and create a bootable USB drive using Rufus and make sure you set it to boot from UEFI eg GPT and re-install Windows as the drive will be visible if you followed the steps correctly. and make sure your bios is set to boot from UEFI and not legacy.
Hope this helps.
Lou says
I tried everything. Even wiping the drive and making it GPT and using the USB WinISO bootable could not get the drive to work. I tried the same adapter card Paulie mentioned. I tried different slots.
I messed with it for 3 evenings with no luck getting it to work. IDK how many times I changed the BIOS from UEFI to Legacy and back, but it has to be more than 20. I would try, it wouldnt work. I’d have to go back to the HDD to read some more.
Nothing worked. The drive would only be seen as a mass storage drive.
I wound up returning the SSD and both adapters to Amazon and bought a SATA SSD – no problems at all.
Needless to say, I could not get this going using this how-to guide.
Sherif ahmed says
Hi Pauline
* I have done all on optiplex 990 ,and I installed the new windows on the nvme and removed the hdd .computer is running very fast .
* I am facing one issue which is computer is freezing time to time ,the screen will go white and freeze ,I have bought new nividia card I thought from graphics card but same although, I tried many thing but same result although I tried 2 different types of nvme both with different heatsink
* can you please guide what to do
Cliff says
Hello Paul,
I just finished this mod. Thank you so much for the info. I’m using a 790 with A22 BIOS. I did run into a problem, but the more I thought about it, I couldn’t help be realize I had missed a step. I forgot to format the NVME in GPT format. Once I did, it only took two boot attempts to go through. It’s working perfectly now. The first attempt was as if it just needed to go through the F2 Setup option to make sure it had everything correct. Then it booted on the next go. I’m getting ready to do my wife’s 790 as soon as I can get things together. Thanks again for the information, my computer is flying now. I definitely see a huge boost!
Mike says
Thank you so much! This worked perfectly. You’re the man.
Erhard Falkenberg says
Hi Paul, again a great instruction. I had success with the hp 800G1 upgrade
I have some Compaq HP Elite 6200 pro units.
They have the same chipset (Q65 express) as the Dell above, so I tried a flash by combining the intructions for the Dell an the 800G1.
Everything seemed to work but when flashing the modified nvme.bin I recieved an error.
Is the bios write protected somehow and is there a way around?
Any help is much apprechiated an would enlarge your device list making old hardware young.
As you see, it ist running win11 already and boots rather fast from sata-ssd drive .
I would love to have the 4 sata connectors available for a nas configuration on the machine..
error message:
PS C:\intelmetool\flash programming tool\win64> .\fptw64.exe -bios -f nvme.bin
Intel (R) Flash Programming Tool. Version: 7.1.50.1166
Copyright (c) 2007-2011, Intel Corporation. All rights reserved.
Platform: Intel(R) Q65 Express Chipset Revision: B2
Reading HSFSTS register… Flash Descriptor: Valid
— Flash Devices Found —
MX25L6405D ID:0xC22017 Size: 8192KB (65536Kb)
Error 280: Failed to disable write protection for the BIOS space!
PS C:\intelmetool\flash programming tool\win64>
Mariusz says
Thank you for a great guide. I was able to update my Dell Optiplex 390 SFF. The problem was switching to service mode. To enter the service mode, you must turn the MECLR1 switch, it is not described in the documentation and is hidden under the radiator (the radiator must be removed). After updating the BIOS, the switch must be reset to the initial position. It was possible to install Windows 11 on an NVMe disk configured as GPT (boot).
PCI Adapter – DIGITUS, WD Red SN700 1TB, speeds: SEQ1M8T1 = 1711/1126, SEQ1MQ1T1=1311/987, RND4KQ32T16=791/453, RND4KQ1T1=47/112
Regards
Amandeep Jassi says
Hi,
Thank you so much for the guide. I followed your guide step by step without any errors. I have not installed PCIe adapter or nvme drive yet and computers boots normally with older SATA SSD drive. But when i am in bios setup > boot sequence > uefi> add boot option . It gives error “ file system not found”. Do i need to install pcie adpater first to make this option work.
Before flashing new bios it was showing option to add boot device. Kindly guide. Thank you .
Amandeep Jassi says
Thanks, its fixed. I was on windows 7 and that don’t support nvme. Now m on window 10pro. Thankew so much.
thano says
worked beautifully on a 990 will try on 790 . boot time is a few seconds but hard to judge with the extra time windows boot manager is adding which im sure can be disabled but dont yet know how
Microdian says
I’m so glad I found your page and I’m looking forward to getting the parts and trying this. Fantastic!!
It looks like you ran your install in the PCI-e x16 slot and no GPU card installed. Do you know if all you same steps in your guide should work with a graphics card in that PCI-e x16 slot and running the nvme adapter on the PCI-e x4 slot?
Do you recommend running through your step by step guide with the GPU card removed and then adding it back in later once the nvme setup process is completed with WIN 10 installed and running?
These 790 small form factor and tower units are so well made and reliable. Has anyone else bumped their unit up to 32GB of RAM? The technical guide says 16GB is the maximum but checking specs with command prompt shows that it can do 32GB and some users have posted in the Dell community that they got the 790 to run with 32GB of RAM.
Gaurav says
Can you please guide on how to update BIOS for – Dell Vostro 3268 SFF
Josué Altamirano says
Good afternoon, did works for dell optiplex 960 bios A18?
Paulie says
I haven’t tested it, so if you do it would be at your own risk.
Dustin says
Yikes! My Dell Optiplex 990 no longer boots after this. My BIOS was upgraded to A24 and everything went swimmingly. I installed a Windows 10 partition in my Linux install to run this. Definitely use at your own risk!
For future reference, the 990’s service mode jumper is right beside the last PCIe slot.
Dustin says
Scratch that! I had not re-added my Password Reset jumper switch all the way down and I got the plain black screen. Works like a charm now, thanks! This breathed new life into my old 990.
Tommy says
Hi Paulie,
Thanks to your tutorial I spent 30 hours on upgrading my Optiplex 990 (i5-2500, 16 GB RAM, Win 10). I needed 7 minutes to make the changes described by you and 1793 minutes on cloning my Windows from SSD MBR to the new disk without data loss and making it booting. Installing new clean Windows and restoring from a system backup would have been 10 times faster.
As the PCIe x16 slot in my machine is used by a graphic card I bought an x4 adapter similar to yours, connected it to the x4 slot and put a 512 GB NVMe disk into it.
Here are the results of some tests (old config.: system on 2.5’’ SSD, 256 GB, SATA, 1/3 free space –> new config.: system on NVMe disk):
Crystal DiskMark read (MB/s) 282 –> 1621
Crystal DiskMark write (MB/s) 255 –> 1438
HD Tune average (MB/s) 171 –> 475
Windows boot till desktop (s) 46 –> 26
Copying of 10 GB (600 files) (s) 105 –> 14.5
Copying of one 3.4 GB file (s) 10 –> 3.5
Extracting 3.4 GB rar archive (600 files, 10 GB) (s) 120 –> 110
Copying of 1 GB (2000 MS Office files) (s) 27 –> 21
Opening PaintShop Pro (s) 17 –> 17
Opening Pinnacle Studio (s) 14 –> 13
Pretty nice improvement. Thank you for sharing your wisdom.
I wonder how it would work on the PCIe x16 adapter and slot.
Peter Muss says
How to install Window 7 pro 64bit? (*)
After the BIOS mod the 990 let me install W10/W11 bootable from the NVMe.
Its a Samsung PM 981 with 512 GB. Works like a charme!
Now I want to install W7 pro 64 bit in UEFI mode to the NVMe, but a cant figure out the needed drivers to make W7 detect the NVMe during installation.
I try this drivers without success, all files from Samsung, date stamp is 2015-12-16
nvme.cat
nvme.inf
nvme.sys
nvmeF.sys
Using “Load driver” at setup will not detect the NVMe.
That to do in this case?
Thx and best regards
(*) all W7 machines are used offline, so no security concerns!
Paulie says
Windows 7 does not support NVMe – but I believe there is a way to make it work, but I do not know the details.
Steve Pitt says
I had the same issue with installing Windows 7 and I used the MSI win 7 Smart tool to create a USB to install Windows 7 to a nvme. download here
http://download.msi.com/dvr_exe/NB_Win7_Smart_Tool.zip
Steve Pitt says
Sorry this version doesn’t include NVMe support but I have uploaded this one that has this feature
https://mega.nz/file/5JIRwAZK#uNCgkEzxs2y1BzhTx9Y3Cf9EWv_CqYikDfgPFhHP_5Y
Steve Pitt says
The first MSI link does make a ISO or USB of Windows 7 with NVMe support.
Peter Muss says
This tool works like a charme:
https://www.sevenforums.com/installation-setup/415754-update-your-win-7-installation-media.html
What I have done to get NVMe boot-support for W7 pro 64bit:
1) extract an untouched W7 ISO to c:\W7-64-Work
2) followed the steps from the mentioned sevenforums thread
3) install NTLite and let NTLite make an ISO from the c:\W7-64-Work directory
4) download RUFUS and let RUFUS create an UEFI boot stick from the W7 ISO
5) W7 setup will discover the NVMe and setup will install W7 to the NVMe
You Are a Liar says
Stop lying. This is impossible.
Peter Muss says
@You Are a Liar
Did you check it or do are you just a troll?
Shourya says
Thank you very much. Your tutorial was very easy to follow and tackled a very complex issue with ease. I can now enjoy the benefit of NVMe SSD on my PC.
I really appreciate your coming up with this solution and sharing it on the internet.
Alex says
Hello, Paulie,
I need a little help. I have an Opltiplex 790.
I can’t create a bios backup.
An error message appears on the command line: “Error 75:”fparts.txt “file not found.”
Paulie says
I don’t know – haven’t seen that message. Sorry I can’t help more.
Gene says
Great Tutorial. Does anyone know if this will work on a 790 usff with the Mini Pcie Slot? I have a spare 256gb NVME drive that would fit perfectly.
Peter Muss says
@Gene
no, that will NOT work. The mini pcie slot is not wired for NVMe use.
Menz says
@Gene
i have a 790 usff here and this is working like a charm. Do not expect Ultra-Fast Transfer Rates but they are faster as SATA Speed.
Gene Floyd says
We’ll see, my mini PCI adapter is being delivered today. My biggest problem so far is that when I download my BIOS and open it up, it doesn’t look anything like what he said it would.
Peter Muß says
@Gene Floyd
what mini PCI adapter is it? I tested a couple of adapter and not a single one was working.
A link to the product will be fine!
thx
Peter
Christian Viewmont says
Dear Pauli,
Thank you very much indeed for the tutorial! My primary (boot) drive is now a 500GB Crucial CT500 P3 M.2 NVMe SSD, and my secondary drive is a 500GB WD Blue HDD. I installed Windows 11 Pro using this YouTube method: https://www.youtube.com/watch?v=rUXLAhYFTtc&ab_channel=Tips2Fix
This method uses a clever Windows Server backdoor. Also successfully installed an i7-2700K and 4x8GB RAM, running at 1333 MHz in Dual Channel and Dual Mode: Crucial CT102464BD160B.C16. Here is my Userbenchmark link: https://www.userbenchmark.com/UserRun/70593159
Kind Regards,
NonSequitur777 (my HP Community username)
Christian Viewmont says
And by the way, I also installed a low-profile Dell Radeon RX 6500 4GB GDDR6, which also runs very well.
Kind regards,
NonSequitur777
pohef42382 says
This is an incredibly useful guide for breathing new life into older Dell OptiPlex systems with NVMe support! The performance gains you demonstrated (11-second boot times!) prove how transformative SSD upgrades can be for legacy hardware.
For users who may not want to modify their BIOS or need a simpler upgrade path, a 240GB SATA 6Gbps SSD (2.5-inch) https://serverorbit.com/solid-state-drives-ssd/sata-6gbps-ssd/240gb-2-5inch is still a great option for these OptiPlex models:
Plug-and-play compatibility: No BIOS mods required—just swap the HDD for a SATA SSD.
Cost-effective: Ideal for budget upgrades (often under $30 for 240GB).
Still a massive improvement: 4-5x faster than HDDs for boot times and app loading.
That said, your NVMe mod is perfect for power users pushing these systems to their limits. The PCIe adapter solution is clever!
Mike says
Your tutorial is great and I did succeed in Optiplex 9020. Then, I tried it on Optiplex 990, however, I got error in running ‘fptw64.exe -d backup.bin’ that gave me Error 201: [FPTw64.exe] cannot be run on the current platform.
Please contact your vendor.
Not sure what happened!! Any idea?
Dave says
I found that this will not work with Windows 11. Tried a lot of work arounds, but in the end I had to install Win 10. Then it all worked great. Thanks Paulie, this how to was much appreciated.
Will says
Error 284: Fail to load driver (PCI access for Windows) appears when trying to do the fptw64.exe -d backup.bin command. Searching for answers I tried running outside of a full boot of windows in the “shift+restart” screen, and I also tried disabling all security stuff. Still not getting past this point.
Any ideas?
Will says
Okay, so after a couple attempts, I tried to do it one last time after reinstalling the lenovo driver set. I did not restart again after that install. Disabled the defender security and closed that window open command and it worked. I am now the proud owner of a way way way too old PC running a gen 3 at somewhat slower speeds NVME. Successfully running Windows 11. I am doing this as an experiment mostly but also because my friend is taking classes online and needed a school PC for doing his training. His budget is really tight atm so, this should help get him through…totally in awe of this process. I have updated and backed up firmware a lot but never so involved. Thank you to the op.
Sunny says
If you follow the directions listed here exactly as described, it will work on an Optiplex 790 SFF. Thank you OP for posting this.