In this post I will show you how you can install an NVMe SSD into a HP Compaq Elite 8300 Small Form Factor and modify the BIOS so that the machine can boot natively from it. The 8300 SFF does have a UEFI BIOS, but there is no NVMe driver present.
I wrote a post on how add NVMe support to a Dell OptiPlex 7010 which has the same Q77 chipset at the HP 8300. So I wondered if the the same procedure could be used to upgrade the HP. Although the procedure is quite different, it is easy to do and can be completed in under 20 minutes.
The completed modification produces impressive results. Here is my CrystalDiskMark Result from the 8300 using a Samsung 970 EVO Plus:

Warning
This blog post contains instructions on how to modify your BIOS.
You could easily break your machine. Proceed at your own risk!
Required Hardware
In order to carry out this upgrade, you will need a few things:
- An NVMe SSD. I used a 512Gb Samsung 970 EVOPlus
- An NVMe to PCIe Adapter, I used this one from Amazon.
- A USB Memory Stick of at least 2Gb.
- A jumper cap/paperclip etc.
- A HP Compaq 8300 computer to modify.
Any NVMe SSD will work, and you can find the perfect one for your budget and requirements using my SSD Search Tool on whatssd.com. It’s quick and easy to use, helping you choose the right SSD for your needs.
These computers are now really cheap on Amazon and in they are a bargain in my opinion if you just need a basic machine work school or office work.
Procedure Overview
The process involves a number of steps:
- Upgrade your current BIOS to the latest version.
- Create a SystemRescue bootable USB Drive.
- Put the machine into service mode.
- Modify the BIOS and inject the NVMe driver.
- Install the new NVMe hardware.
BIOS Upgrade
Before proceeding with the rest of the steps. Take a moment to check that you are on the latest BIOS available from HP. At the time of writing that was version 00.03.08 Rev.A.
ROM Firmware for 8300 Elite and 6300 Pro Business
I’d be interested to know if this BIOS mod also works for the 6300. But I do not have one to try it.
Create the bootable SystemRescue Image
Next, download SystemRescue using and make a bootable USB drive using Rufus. There are instructions on the SystemRescue website on how to make it bootable.
Put the machine into service mode
Once you have created the bootable USB you can shut the machine down and put it into service mode.
To put the machine into service mode you will need to remove the lid and find the FDO (Flash Descriptor Override) jumper, which is here:

Jump the pins with a jumper cap or anything else that you can find (paperclip etc). So it should look like this:

Boot the machine with SystemRescue
With the jumper on the FDO pins, insert your bootable USB into the machine and turn it on.
Press the escape key to access the boot menu and select your USB Stick. You will come to the SystemRescue boot menu, which should look like this:

Press the e key to change the default boot options. Use the cursor keys to move down to the line that says linux and add the following to the end:
setkeymap=uk copytoram dostartxChange the keymap to be appropriate for your own environment or if you are in the USA, just leave that part out.
Press CTRL-X to proceed with the boot.

Backup and modify the BIOS
The system will boot into a graphical interface. From there open Firefox and come back to this blog post so that you can copy and paste commands.
We have booted the USB drive using the copytoram option, which will enable us to mount the USB drive from within our booted environment to store the backup of the BIOS.
Backup Bios
First, open a terminal by clicking on the terminal icon:

Type the following command:
fdisk -l |grep "W95"The output of the fdisk command should be something like this:
/dev/sda1 * 2048 500118191 500116144 238.5G c W95 FAT32 (LBA)
Make a note of the device, this should be your USB thumb drive, in my case it is /dev/sda1. Then type the following commands:
mkdir /mnt/usb
mount -t vfat /dev/sda1 /mnt/usb
flashrom -p internal -c MT25QL128 -r /mnt/usb/backup.bin
It should look like this:

The flash chip will now be read and you should get output like this:

Leave the terminal window open as we will be coming back to use it again soon.
Now the backup of the HP BIOS is safely stored on the USB device we can inject the USB driver. Open Firefox and download UEFITool 0.28.0 from here.
Open the downloaded zip file and drag the executable on to the desktop. Then open UEFI Tool. Open backup.bin that was created in the previous step by navigating to Other Locations -> Computer -> mnt – usb.

Modify the BIOS in UEFITool
Next we can modify the BIOS.
- Expand the BIOS Image like this:

- Scroll to the bottom of this section until the final DXE driver, which should be HpDigitalSignatureVerification.
- Download this NVME Driver and save it to your machine.
- Right click on the final DXE driver and choose Insert After.

- Choose the NvmExpressDxe_Small.ffs that you just download and then save the file as nvme.bin.
Write the modified BIOS back to the HP 8300
Now that you have the modified BIOS image complete, go back to your terminal and use the command:
flashrom -p internal -c MT25Q128 -w /mnt/usb/nvme.binThe new BIOS image will be flashed to the chip and it should look like this:

Now you can shutdown the system and remove the jumper from the FDO pin headers.
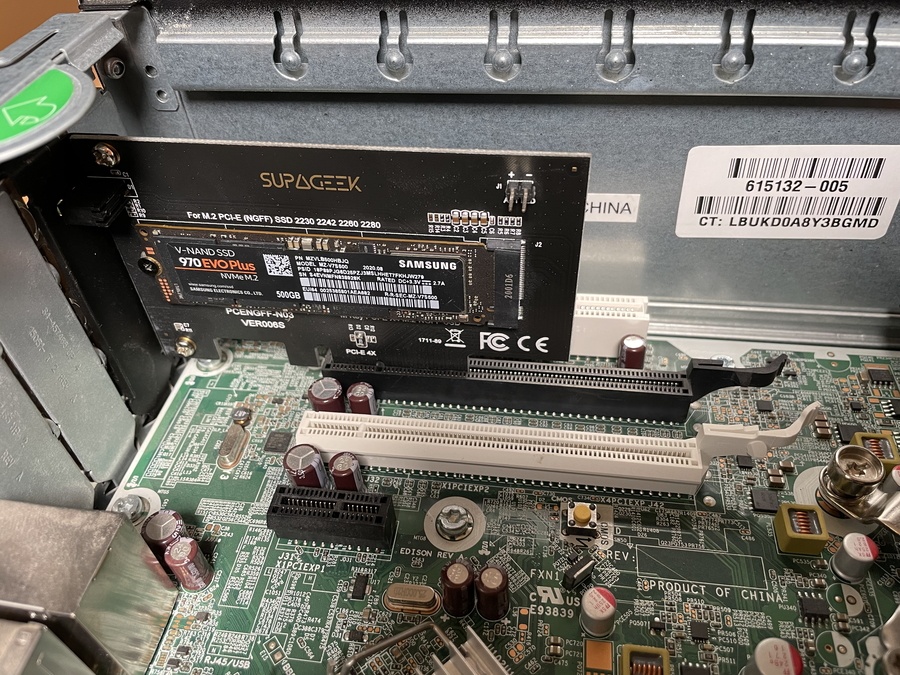
Add the NVMe Adapter and Drive
The system will now be able to from an NVMe drive! You can either complete a fresh install of your Operating system or clone your existing installation to the new NVMe SSD
Here is my Samsung 970 EVO Plus NVMe SSD from Amazon installed on to a PCI Adapter in the machine:
Performance
Adding NVMe support the HP Compaq 8300 Elite does provide a massive boost in performance. The machine I upgraded had a mechanical hard drive so the difference was astonishing. Here is the difference in speed results:
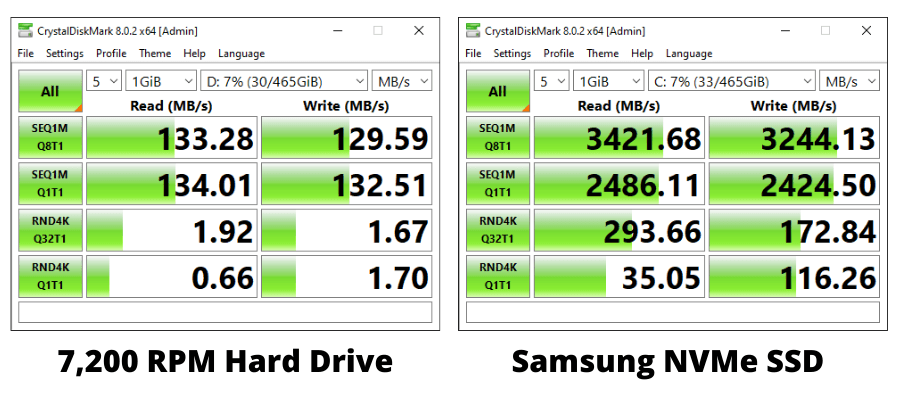
Cold boot time for Windows 10 with the mechanical hard drive was 1 minute and 16 seconds. With the NVMe drive it was 20 seconds.
Google Chrome OS Flex
As the HP Compaq Elite 8300 is a Chrome OS Flex Certified Device I decided to install that on to the NVMe drive and try it out. The installation worked no problem and it booted in 12 seconds. I really like OS Flex for giving older machines a new lease of life. It feel like a brand new machine.
Conclusion
You will have to judge if this is the right upgrade for you. A SATA SSD would be much easier to fit and does not require any additional hardware. This NVMe modification provides greater performance.
I would like to say a big thanks to Ivan in the comments who found that the BIOS chip could be flashed using the Linux based Flashrom tool. Previously this guide contained a much more complicated procedure.
In the end I actually used this Dual M.2 NVMe and SATA adapter from Amazon:

This allowed me to have the Samsung NVMe drive with a Western Digital SATA drive for additional storage. I used a short right angled SATA cabled which turned out to be a very neat solution. I removed the hard drive completely.
Jake Klumpp says
How do you get those speeds its only pcie 2.0, more like 1650mps ?
Paulie says
Those are the speeds I got. According to the service guide:
HP Compaq 8300 Elite Maintenance and Service Guide
The computer has one PCI expansion slot, one PCI Express x1 expansion slot, one PCI Express x16
expansion slot, and one PCI Express x16 expansion slot that is downshifted to a x4 slot.
Tony says
Hi Paulie, I have HP Compaq Elite 8100 SFF. Do you think I can do the same upgrade just like here ?
Tim says
Paulie, Do you think you will be trying the HP 8200 in the future? I have 3 or four.
Ivan says
@Paulie – I used flashrom (https://www.flashrom.org/Flashrom) for reading and writing flash, and UEFITool 0.28.0 (https://github.com/LongSoft/UEFITool/releases/tag/0.28.0) for modifying the firmware adding your linked .ffs.
Find below the precise commands executed by root:
# flashrom –programmer internal -c MT25QL128 -r backup.bin
(Modified backup.bin inserting NvmExpressDxe_Small.ffs and saving as Fixed_NVME.bin)
# flashrom –programmer internal -c MT25QL128 -w Fixed_NVME.bin
Juan Carlos says
Hola, intento implementar esto en un HP Z230 SFF, de momento no lo he probado, solo he encontrado las guías para poder hacerlo.
Os adjunto 3 enlaces sobre como instalar NVMe M.2 pcie, reprogramando la bios por software (1 y 2) o, alternativamente, mediante un simple arranque alternativo del bios (3). Para quién pueda interesar
1. [Cómo] Obtenga soporte completo de NVMe para todos los sistemas con un AMI (American Megatrends Inc) UEFI BIOS
https://winraid.level1techs.com/t/howto-get-full-nvme-support-for-all-systems-with-an-ami-uefi-bios/30901
2. [Solucionado] HP Z230 Tower Workstation
https://winraid.level1techs.com/t/success-hp-z230-tower-workstation/38156
3. [Guía] NVMe-boot sin modificar su UEFI/BIOS (método con Clover)
https://winraid.level1techs.com/t/guide-nvme-boot-without-modding-your-uefi-bios-clover-efi-bootloader-method/31665/639
Mike Steak says
Great work that is impressive!
Maybe you can help me with an issue. I have a 6300sff i7 3770 – 16gb- sata ssd.
Its been nothing but issue after issue. I have had great results in the past with similar models like your 8300 and an older version that had a core 2 quad.
The rear usb 3.0 ports are the main reason I bought this machine and the damn things wont transfer faster than usb 2 speeds.
Ive updated BIOs to 3.08 but I only read too late that you have to do 2.99 first.
Ive even reverted from windows 10 to 8.1 pro.
theres a guy on the hp forum with my exact same issue and he said if he boots into linux they work at usb 3 speeds but not in win 10.
in windows 10 No matter what I did it would not find a driver for a few components even with snappy driver.
Windows 8.1 found the driver as soon as I got wifi.
my current bios version reads 3.08. Do I have to rollback to 2.99 and then go back up again? or since it accepted the flash that means its algood?
it wont accept rollbacks now through BIOs flash or winflash.
If I have to I will buy a 3.5″ front usb 3 panel that connects to the pci slot from memory?
Look forward to hearing from you.
Artur says
Hi!
I’d like to say BIG Thank You! – for your amazing knowledge, great tutorials on modding BIOS for NVMe boot capability and your willingness to share this information. I really appreciate your work because I’m very interested in these old and affordable SFF office PCs/desktops that lack NVMe boot support.
So far, I managed to enable NVMe boot in my DELL OptiPlex 3020 SFF PC – making a good use of your tutorial. I also would like to try modding BIOS in DELL OptiPlex 790 and HP Elite 8300 SFF that are on my shelf.
However, I’d love to learn about modding BIOS in my current main PC which is HP Z230 SFF (BIOS L51 v01.63 – Rev.A / Xeon E3-1245 v3). So far, I was able to open BIOS .BIN file in UEFI Tool (.BIN BIOS file taken from this official HP repository https://ftp.hp.com/pub/softpaq/sp103501-104000/sp103745.exe ) I managed to insert NvmExpressDxe_Small.ffs somewhere after the last DXE driver (I’m not sure if this place was chosen correctly).
However, after saving modded BIOS .BIN file to nvme.bin … I don’t know how to flash it back into my machine. I tried via USB DOS Flash option but system said it could not find proper BIOS .BIN file on my pendrive formatted in FREE DOS via Rufus. Maybe it can recognize that BIOS file has been changed in an unauthorized manner? I can only guess because my knowledge is very basic in this area. Can I somehow switch this PC in Service Mode or flash back modded BIOS via clip and programmer … I’d like to read your opinion or advice if possible.
Best Regards,
Artur
Cosmo says
@Artur
See this post here: https://winraid.level1techs.com/t/success-hp-z230-tower-workstation/38156
This person gives you step by step instructions for what to do and how to do it for your specific machine+bios file and version.
Cosmo says
Hmm so here’s my update. I suppose it could just be the m.2 adapter I got, but the nvme isnt showing up in bios. anyone know why that might be? I guess I will order another adapter to rule the first one out.
clonezilla does detect the nvme drive though. I am presently cloning my SSD boot drive just to see if that will do anything.
Cosmo says
ok so my issue now is MBR vs GPT. I guess my SSD that I am cloning is GPT. but with the nvme on the pcie adapter, it needs to be MBR. the bios doesn’t detect the drive unless it is MBR. so there’s no way that I’ve tried that will clone the SSD to the NVME, keep the data, but make it bootable over MBR. Maybe someone here can drop a hint. Really don’t want to have to reinstall my entire system and all the settings and data etc.
Cosmo says
lost patience and just started a fresh windows install. so so so much to restore now. but at least I have an nvme running as a boot drive. anyone who has questions I spent a lot of time on this and now know it like the back of my hand. feel free to reach out and I’m happy to help
Cosmo says
ok, final word on this. originally had a crucial 500gb p3 plus nvme in there. 3500 read and 1900 write. just used clonezilla to clone that 500gb drive to a 1tb version of the same drive with 3500 read and 3500 write. then used gparted to move my recovery partition, permitting me to expand my data partition to the full 1tb. read and write speeds confirmed at 3400ish/3400ish. seems like this project has reached its end for me. this PC will now have another 5-7 years of life. thanks to all who have helped me along the way.
again, if anyone has any questions, please feel free to reach out. [email protected]
Jim G. says
@Paulie
Do you recall what kind of processor is in your HP 8300?
It looks like you are getting PCIe 3.0 speeds with your setup.
This is a gen2 and gen3 crossover motherboard. Whereas a lot of the newer chipsets only handle 1 generation of cpu.
It sounds like 2nd gen sandy bridge chips are PCIe 2.0 and the 3rd gen Ivy Bridge chips are PCIe 3.0
I was under the impression this is a PCIe 2.0 board only.
Oscar says
@Paulie and @Ivan Thanks for the instructions.
I modified the flash following Paulie’s path and Ivan’s Linux way on two HP 8300 SFF PCs.
I did something like:
– Install the internal jumper
– Format a USB pen with SystemRescue (https://www.system-rescue.org/) I used RUFUS utility.
– Boot from the pen and select SystemRescue to be fully loaded into ram memory. This allows the USB pen to be mounted and used to exchange the files.bin with Windows.
– run #flashrom -p internal -c MT25QL128 -r backup.bin
– Modify backup.bin inserting NvmExpressDxe_Small.ffs and save it as Fixed_NVME.bin.
I did it in Windows and copied the fixed file to the USB pen back to Linux.
– run #flashrom -p internal -c MT25QL128 -w Fixed_NVME.bin
– Remove the internal jumper
Note that the procedure generates different NVME.bin code starting from each backup.bin .
If you write the wrong one possibly you will require the hardware programming tool to recover the flash ?
@Paulie thanks again for the very useful post.
Oscar says
System is HP 8000 SFF, I7-3770, BIOS 3.08 modified, Window10 Pro 22H2.
After bios mod to move Win10 to the new NVME disk I followed this tip https://youtu.be/Z939daHclxY .
It run well for my GPT partition system.
Cosmo says
@oscar, I think the reason you had different nvme bins generated is because the bios clock changes, so the CRC or the bin necessarily changes. that’s my logic to justify the change anyway.
@Jim G, i have the same speeds as @paulie. I am running an i7 processor in this machine: Intel(R) Core(TM) i7-3770 CPU @ 3.40GHz 3.40 GHz.
i am using a piece of sh*t nvme adapter purchased from amazon — cheapest i could find. i also bought 4 others to test and they all produced identical speeds. my nvme is a crucial p5 pro 1tb drive. dont forget, most drives market as UP TO 3500meg/s or whatever. because the 500gb and smaller drives are slower. typically only the 1tb and up drives support the fastest theoretical transfer speeds.
Joseph Shaff says
Will that method work on the HP Compaq Elite 8300 CMT (Convertable Micro Towers) ?
Gary Sapir says
@ Joseph Shaff, i can’t speak to that, sorry. I would think if the bios file used to upgrade the 8300 sff and cmt is an identical file, then the method should work the same
Paulie says
For anyone following this blog post, it has now been completely rewritten with the useful information provided by Ivan. Let me know how you get on!
Jim G says
Thanks for the heads up. I’m glad I made a PDF of the old one. Honestly if it was me I would have made two pages, offering two different methods. Why dump up tried, tested, and true work? Method 1 would have been with the SOIC 16 programmer stuff you have already done, and Method 2 as a whole new write up using the the Linux programming.
As for me, I wouldn’t have even have the idea right now to try resurrecting my bad flashed HP 8300 if it weren’t for @Paulies original article with the SOIC 16 programmer stuff… After 2 weeks of delays from amazon, I finally got an SOIC 16 cable to go with the usb programmer. I had to go with an off brand, and hope it works. It’s 16 pins and 16 cables. The DollaTek from the article was out of stock.
I am wondering too about other HP system possiblities, but I have to find out more on the flash chips for them.
HP Pro 6200 (it’s only PCIe 2.0 and would be similar in NVMe speed to the Dell 990 write up), plus HP 600/800 G1 core 4th gen and HP 600/800 G2 core 6th gen machines. They all use a similar ‘blue bios’ to the 8300. All things being equal with the programmer, chip etc… it might work.
Hoping the HP 8300 will come back to life trying this method to read and flash the bios. Then will try the other steps to add the NVMe support…
Paulie says
Hi Jim, I did toy with keeping the existing page active. But I want new visitors to have the clearest, and easiest possible solution. The Linux method is very easy and will make this modification straightforward for anyone else trying to do the same. Your situation is a bit of an exception.
I wouldn’t worry too much that you couldn’t get the same brand programmer, they all seem to be the same until you get into the higher quality, more expensive units. I am sure there are many possibilities of machines that this mod will work with. But right now I have an Office full of old machines that I need to get rid of before trying any more!
Jim G says
@Paulie
I hear you, true the Linux method is easier overall. I wish someone out there had a writeup about programming using the SOIC 16 method some time ago. Without your old post, I would have never known about any of this, so thanks for the idea anyway.
I am having some problems with your old SOIC 16 clip method though. I noticed my off brand cable did not come with the 8 to 16 pin header that yours has with the Dolla Tek (which is still out of stock right now at Amazon). It only came with a 16 pin header for the clip cable to connect to the programmer. Do you think this is a problem? Only once has the aux light came on so far. So maybe this 16 pin header is an issue?
Even with the ram chip white holder clip fully removed for the same slot that your top part was broken for in the old post: the clip still does not like to stay on the chip, and it is a bit difficult to line up right.
All the software and drivers installed ok, the programmer red power light is on, so all looks well.
The problem is this: The HP 8300 mainboard aux light has come on only one time. The AS programmer just keeps returning FF FFF FFFF etc for all the stats. It is not reading the IC correctly. I have tried flipping the SOIC 16 cable every which way at the programmer side and at the BIOS chip side, and no luck. Do you think this 8 pin to 16 pin converter is really needed? Is it a bad cable?
Maybe I need take the board fully out of the case and look to see what the clip contact looks like? I don’t get why only 1 aux light in about 12+ tries at getting this clip to make good contact, unless it IS that 16 pin header vs the 8 pin header you have???
I can see why you broke part of the RAM slot holder off in your original post with the programmer method. The SOIC 16 clip is very sensitive, the spring is super tight. I managed to take out the RAM slot holder clip completely, by gently but firmly pulling on it with a needle nose pliers. Squeezing in the right spot apparently released the tabs enough for it to come out as one piece. The holder tabs on the sides of it look ok. We’ll see if it goes back in or not later once the machine is repaired…
Paulie says
It can be very difficult to get the clip on. But when it’s on you’ll know you have it right. I’ve got the knack of it now having done it to several machines, but the first time I tried I just couldn’t get it right for quite a while.
Cosmo says
if you need the old guide, you can reference it using waybackmachine
Paulie says
If people really want the old guide, I can make it available again. But it is a very complex procedure for most people to follow.
Jim says
Hi @Paulue @Cosmo
Getting further with the SOIC16 clip, but still no luck.
Got a 2nd cable, it seems to be making better contact than the first one, but still problems. I don’t know if I fudged my AUX light on the mainboard, but it is not coming on now no matter what I do.
Programmer is reading the IC but the codes are all different each time. As the old article said, to stop ‘here’. None of the codes matched what you had on the page.
The IC Chip on the 341A also getting VERY hot. I think this programmer is shot from the get go. It’s never read anything correctly with 2 different SOIC 16 cables now. The programmer usb device is coming up as unrecognized too after a few chip detections too and programmer not recognized (-1). I don’t think a bad SOIC 16 cable would cause this… very strange.
Should the LEFT side light on the programmer stay ON when it has made a proper connection to the SOIC16 clip? Or does that light only blink when there is activity?
Either way: getting another programmer… having such horrible luck with this.
Trying this with win 11, maybe this weekend I need to break out a win 10 box… I don’t think the OS would make that much difference.
Paulie says
You might be better off using a higher quality clip if you are struggling. Have a look at this one made by Pomona: https://cpc.farnell.com/pomona/5250/test-clip-8-pos-1-27mm-soj-soic/dp/IN08790
Jim G says
@Paulie Have you got more info for that Pomona clip: a part number, or model number, etc? Maybe I can google it or something. Getting Access Denied error…
Access Denied
You don’t have permission to access “http://cpc.farnell.com/pomona/5250/test-clip-8-pos-1-27mm-soj-soic/dp/IN08790” on this server.
Reference #18.cc1c2117.1679079529.1011d76
Paulie says
POMONA 5250
Jim G says
Thanks @Paulie
Ok so I got your clip page to come up now. Went to https://cpc.farnell.com and searched for Pomona 5250.
it came up, but it is only 8 pins:
8-Pin SOJ/SO IC Test Clip – 5250
https://cpc.farnell.com/pomona/5250/test-clip-8-pos-1-27mm-soj-soic/dp/IN08790?ost=pomona+5250+test+clip
The winbond bios chip for the 8300 is 16 pins. Shouldn’t I get one that is 16 pin like this one? Pomona 5252
16-Pin SOJ/SO IC Test Clip – 5252
https://cpc.farnell.com/pomona/5252/test-clip-16-pos-1-27mm-soj-soic/dp/IN08792
https://www.amazon.com/Pomona-5252-0-050-Spacing-0-830/dp/B00CO8B1QS/ref=sr_1_1?crid=IJR0NLZJ4A69&keywords=POMONA+16+pin+test+clip&qid=1679203898&sprefix=pomona+16+pin+test+clip%2Caps%2C100&sr=8-1
Thanks.
Paulie says
Yes, sorry. I’ve ordered a selection of them. I don’t know what they are like yet – but they seem to be higher quality (but may be not better for our purposes).
Jim G says
@Paulie
Understood. Let us know how it goes, I hope the Pomona clips work better for you. Amazon can’t get me one until May and for $35.00 or so US to use with the 8300…
Before dropping back to punt with a totally different working motherboard as a replacement:
I was wondering too about somehow using patch wires to piggyback a good working bios rom from another working HP 8300 board to fire up the ‘dead’ one and get it reflashed. Is that even possible somehow without soldering?
@Paulie @Ivan
As for the Linux steps in the new article: I have prepped a system rescue usb drive, while I figure out my next move for the 8300.
I was considering trying the patch on a working HP 6200, or maybe the 800 G1 or G2, but you have just posted a new article for the 800 G1 🙂 yay!
I still have a question on this new method for the Linux programming though:
It looks like one has to know what kind of rom chip with the -c switch from your Linux commands:
ex:
flashrom -p internal -c MT25QL128 -r /mt/usb/backup.bin
and
flashrom -p internal -c MT25QL128 -w /mt/usb/nvme.bin
I am confused why MT25QL128 (Micron Technologies?), when the bios chip on my HP 8300 mainboard says Winbond on it? In the old article for the 8300 for the 341A programmer, you had us select the W25Q128BV for the winbond chip.
Is the Linux flashrom util able to detect what kind of rom is on the mainboard? If not, how are you getting this info about MT to use in the command?
That said I’ll look up the IC info for my HP 6200 bios (its probably a similar winbond chip). I’d like to know how to figure out what to use for -c if I were to try this with some different HP machines, where the Intel ME tools might not work.
Cheers
Ashok Sagar says
Hi Paul, I tried to use your guide for modifying my hp 8300sff but after finding my Intel Q77 chipset I keep on getting this message: No EEPROM/flash device found
Please help as I am stuck at this point.
Thanks in advance.
Ros De Siena says
Hi Paule, thank you for your article.
I got the whole thing, when I type the string:
mount -t vfat /dev/sda1 /mnt/usb
the system warns me that the usb drive is read only.
How can I fix?
Thanks again for your explanation.
Ros.
jordi says
Thanks for the guide, I used in my HP elite 8300 tower. The flash chip is diferent, is “W25Q128.V” so the orders are:
# flashrom -p internal -c W25Q128.V -r /mnt/usb/backup.bin
and
# flashrom -p internal -c W25Q128.V -w /mnt/usb/mod.bin
To add the driver I used MMTool 4.50.0023(https://winraid.level1techs.com/t/howto-get-full-nvme-support-for-all-systems-with-an-ami-uefi-bios/30901).
Thanks a lot,
Jordi
Ros says
RESOLVED
There is an error in the command syntax when rewriting on the Chip with the modified file, the command: flashrom -p internal -c MT25Q128 -w /mnt/usb/nvme.bin, the L is missing in the name the correct one is MT25QL128
I managed to get root permissions, using Linux Mint.
I too used #flashrom with the values ??described by Ivan. Thank you all, now it works perfectly!!!!
siliconbeaver says
I have an HP Elite 8300 tower (NOT mini, nor SFF). my order of PCIe adapter card and NVMe SSD 512 GB is shipping. I have read all 37 comments. Do I need a SOIC 16 programmer someone mentioned in comments?
Per Paul’s guide, looks I need a USB drive. That’s it. am I right?
(then follow 1st part of this post, Paul’s guide).
Thanks,
Paulie says
You don’t need a programmer. The comments reflect an old version of the post.
Marco says
Hi. I have used my HP elite 8300 tower to allow nvme boot. I followed all of the steps. Pci and nvme is inserted, jumper removed. I do not see boot option for NVME. What else I have to do to enable boot option for NVME in Bios? Thanks.
Paulie says
Nothing more, you need to install an operating system on to it to boot from.
em says
Hi. The method presented also works for the HP 6300 MT workstation.
Thanks for the guidance offered.
Paulie says
Thanks for letting us know. We’re the steps exactly the same as the article?
siliconbeaver says
Thank Paul,
finally my order of hardware delivered (NVMe SSD 512GB and PCIe adapter card) today. couldn’t wait any more.
plugged the card and SSD onto HP Elite 8300 tower, tested them both “good” (but non-bootable at this moment)
Next, I completed the modification produces using your method, step-by-step, less than an hour.
OS Install,
I was using Windows 7 install media from HP Cloud Recovery
https://ftp.hp.com/pub/caps-softpaq/CloudRecovery/crsupportedplatform.html
Windows 7 clean install no any problem
1. install media offered by HP Cloud Recovery
2. run Simplix (update of hotfixes, a step longest time)
3. install HP Elite 8300 drivers
4. apps
Windows 7 is up on NVMe SSD now.
the HP install media works for HP PC only (tested on my HP G3/G1, Elite 8300). its beauty:
1. naturally activated. no need of Window 7 key. no need of online activate.
2. including NVMe driver.
con:
my PC was running GPT disk. while could boot MBR to use many MBR-boot tools (such as Ghost, Macrium). Now my PC is GPT-boot only. Lucky, some of them, GPT version available.
siliconbeaver says
looks like my PC is running PCIe 2.0, read/write some 1700 MB/s.
the test was performed on black PCIe slot of HP Elite 8300 tower. i3-3220 CPU @ 3.30GHz.
btw, the CrystalDiskInfo cannot detect the NVMe SSD. hence no CrystalDiskInfo data. it only reported SATA SSD data.
——————————————————————————
CrystalDiskMark 8.0.4 x64 (C) 2007-2021 hiyohiyo
Crystal Dew World: https://crystalmark.info/
——————————————————————————
* MB/s = 1,000,000 bytes/s [SATA/600 = 600,000,000 bytes/s]
* KB = 1000 bytes, KiB = 1024 bytes
[Read]
SEQ 1MiB (Q= 8, T= 1): 1762.071 MB/s [ 1680.4 IOPS]
SEQ 1MiB (Q= 1, T= 1): 1242.946 MB/s [ 1185.4 IOPS]
RND 4KiB (Q= 32, T= 1): 457.474 MB/s [ 111688.0 IOPS]
RND 4KiB (Q= 1, T= 1): 39.334 MB/s [ 9603.0 IOPS]
[Write]
SEQ 1MiB (Q= 8, T= 1): 1123.503 MB/s [ 1071.5 IOPS]
SEQ 1MiB (Q= 1, T= 1): 1090.117 MB/s [ 1039.6 IOPS]
RND 4KiB (Q= 32, T= 1): 356.137 MB/s [ 86947.5 IOPS]
RND 4KiB (Q= 1, T= 1): 162.347 MB/s [ 39635.5 IOPS]
Profile: Default
Test: 1 GiB (x5) [C: 14% (66/476GiB)]
Mode: [Admin]
Time: Measure 5 sec / Interval 5 sec
Date: 2023/05/06 1:23:57
OS: Windows 7 Professional SP1 [6.1 Build 7601] (x64)
Jim G says
@SiliconBeaverLooks like you need to upgrade your processor to an i5-3470 or so… you need something in the i5 range for sure, as that series supports PCI-E 3.
The i3 you have apparently does NOT support PCI-E 3.0 according to Intels’ specs
https://ark.intel.com/content/www/us/en/ark/products/65693/intel-core-i33220-processor-3m-cache-3-30-ghz.html
Also, check the specs of your SSD itself, what kind of disk is it? The crystal disk mark isn’t telling us on what you posted.
i5 CPUs can be found at ebay these days for $10 USD or less shipped.
The same fan you have should work, just need to bump up the cpu
Jim G. says
Sorry for the double post. Needed to add some clarity.
@SiliconBeaver
The i3-3220 you have apparently does NOT support PCI-E 3.0 according to Intel’s specs. It is only PCI-E 2.0
https://ark.intel.com/content/www/us/en/ark/products/65693/intel-core-i33220-processor-3m-cache-3-30-ghz.html
you can google ‘i3 3220 ark intel’ or any intel cpu model to get the spec sheets to find out this kind of info.
You need to upgrade your processor to an i5-3470 or so… and you’ll need some new thermal paste too in order to properly cool the new CPU. If you don’t know how to change out CPUs, before doing anything, you should google how to replace an intel i3 3220 cpu, and find out how to proerly add the conductive thermal paste to the cpu.
You need something in the 3rd generation core i5 or i7 range for sure, those series do support PCI-E 3.0. I had the same problem with an i3-2120 (only PCI-E 2.0) and went straight to an i5-3550. With the latest 3.08 bios installed on the HP 8300, it should be just fine to swap in the new CPU and do the mod. I would go with the i5 for the price, the i7 cpus are high $$$ even used. You can get a whole newer generation machine with an i5 already in it for the same price of the i7 3rd gen cpu alone: something like a HP 800 G1 with an i5 4570 or so that Paulie has an article for too.
Also, check the specs of the SSD drive itself, what kind of disk is it? The crystal disk mark isn’t telling us on what you posted.
i5 3rd generation CPUs can be found at ebay these days for $10 USD or so shipped.
The same fan/heatsink setup you have will fit just fine.
If you don’t find the cpu somewhere else and are in the US- I have an i5-3470 I can sell you for $10 shipped US. You can drop me a line at [email protected] if interested.
siliconbeaver says
Many thanks, Jim. 🙂
Frankly, I am NOT confident on CPU upgrade engineering. I recently updated ASUS motherboard. the CPU fan is getting noisy after CPU replace. no matter how to adjusting its seating, fan, or CPU thermal paste/glue. I was struggling about two weeks then gave up. Its CPU temp is about 23C, runs normal. Just it cannot be in Office because of the loud noise.
siliconbeaver says
typo,
upgraded ASUS than updated ASUS
Jim G. says
I see what you mean, then yes don’t pursue the cpu upgrade.
The other thing you could do is use a slower NVMe SSD in the HP 8300 machine. There are SSDs with about 1800MB or so read/write speeds. something like a TeamGroup MP 33 is perfect for what you need with a PCI-E 2.0 computer. They’re under 50 bucks these days new for a 1tb and have a good long TBW workload life as well.
It sounds like you have an 800 G1 already. You’re probably better off with that pc and finding some way to sell/trade the HP 8300 and upgrade it another 800 G1. The cost is minimal really between the two…
siliconbeaver says
Read Jim’s comments again. Thanks Jim, really good to learn.
Did google as suggested, the result is tantalizing,
Intel Core i3-3220 CPU “Upgrade Chance”
https://www.cpu-upgrade.com/CPUs/Intel/Core_i3/i3-3220.html
siliconbeaver says
@jim is right, a single i7 CPU costs more than an i5 PC system, when I was shopping for replacement.
I am taking Jim’s suggestion, replacing my HP Elite 8300 i3 system (PCIe v2) with an i5 system (HP 800 G1).
i5-4590 system, $35
i5-4670S system, $50
siliconbeaver says
Update
After HP Elite 8300 mod (i.e. flashing BIOS by Paul’s guide), my test confirmed
If PICe slot taken by NVMe SSD, then PC boot GPT only. MBR OS wouldn’t boot. on F9 boot menu, any legacy option was out of order.
If PICe slot empty, then PC boot SATA interface as usual. either MBR OS or GPT OS boot. F9 boot menu, each option worked normal (legacy or NOT).
My HP Elite 8300 tower was migrating to HP 800 G1 SFF. hence I did the test when removing NVMe SSD. was thinking if I should restore backup.bin. no need after test.
Jim G. says
@siliconbeaver
Yeah there are plenty of cheap 800 G1s in that range for 40-50 bucks on ebay and elsewhere. They also take DDR3 so you could even move your ram from the 8300 to the 800 G1 too, in most cases.
The boot option you are talking about also happens when a 3tb or larger disks are installed in the 8300 as well. With GPT disks, you can only boot them using UEFI, it takes precedence. NVMe M. 2drives are probably native GPT anyway by default. I’m assuming that’s why the BIOS switched over.
I would just clean install Win 10 22H2 or Win11 22H2 on the new GPT drive, with either machine. It will make cloning the disk easier in the future. There are utilities to convert MBR to GPT for Win 10/11 boot drives. But I have yet to see windows own util for this, to actually work.
You’re better off with GPT in the long run. MBR only handles 2tb disks. If later you want to use a 3tb or larger regular hard drive or SSD in the machine as a boot disk, you’re going to have to move to GPT anyway. Or you’ll be limited to just a 2tb disk.
—–
Going to try my 8300 soon. Will let everyone know how it goes once done. Just finished making a USB flash drive and got the files on it… just have to find time to do it.
I decided to put a folder on the usb disk called HP8300, and I put all the files from the article in it. ZIP already extracted and ready to go too…
siliconbeaver says
The last HP model taking DDR3 is HP G1 (600/800 DM). Paul has released a mod guide to HP 8300/G1.
I did test, HP G3 is much faster than HP G1. HP G3/4 can be $60s (i7-8700). Hence, it’s better migrate to HP G3/G4 simply.
Jim G. says
@siliconbeaver
I was suggesting the 800 G1 because there is a mod, and the price diff between it and the 8300 are next to nothing, one could effectively upgrade for nothing provided they had a buyer…
Yeah you are better off going for a G3 or G4, for the extra money. I have yet to see a 600 G4 with i5 8500 8th gen series go for $60 US, because they natively support Win 11. HP 600 G3 does not, but there are workarounds to get it installed on it.
I have done so with My 8300 as of today as well. You can get the 600/800 G3 for $60-75 with i5 6500 6th gen series. These are DD4 systems, so ram for the 8300 will not fit.
I would suggest the G3 or G4 because you get an actual M.2 slot with that one, and none of these mods are needed. The add in cards do work with those, they can always be moved off of these older ones and into those as a secondary disk.
Myself I went with an 800 G3 because of the dual 3.5″ drive bays and raid support for the spinning drives… my media center runs one.
anyway- did my 8300 mod, notes to follow…
amitri55 says
Thanks for the guide, tried in my HP Elite 8300sff.
No EEPROM/flash device found with your command. It seems different chip is used. From other comments below I found and tried with W25Q128.V (Winbond chip) on SFF.
So – alternative BIOS chip read command:
flashrom -p internal -c W25Q128.V -r /mnt/usb/backup.bin
Write command:
flashrom -p internal -c W25Q128.V -w /mnt/usb/nvme.bin
Success!
lala says
i have hp elite 8300 micro tower can i install nvme on it to upgrade it
Jim G. says
@Paulie @Kramer @jordi and the rest of you who came up with the linux guide to do this NVMe patch- thanks.
This is long, so forgive any typos 🙂
I got the mod done and working on my HP 8300 SFF today. I wound up getting a different mainboard for it that is running an i5 3570. It should be plenty fast and has good PCIe 3.0 speed, vs the i3 2120 that was in it before with the BIOS problem it had… I was done in less than 20 mins. It took more time to get a second computer set up and going with a second monitor to read and work at the same time…
Interestingly my 8300 SFF does have the winbond chip I mentioned before. So thanks @jordi for the extra commands. We both have the same bios between SFF and CMT versions.
Apparently there are at least two variants of the flash rom floating around for the HP 8300 SFF – micron and winbond.
Happy to say Win 11 Pro installed in just a few mins, very speedy. 10 sec boot up time is nice, but the real icing on the cake is the speed imporovement in getting windows updates downloaded and installed. So much faster, this alone to me was worth the effort.
I’m getting 3341 MB/sec reads and 3104MB/sec writes with my WD Blue SN730 NVMe 1tb SSD. So in line with what @Paulie gets with his Evo config.
@Paulie I think there’s a typo or two in the instructions:
adding the dostartx on the turquoise boot screen did not work – it wound up going to a terminal prompt and I knew enough to type startx which went into the GUI. And I was fine from there.
and a typo in the screenshot for this command also, you may want to fix it sometime?
flashrom -p internal -c MT25QL128 -r /mnt/usb.backup.bin
should be
flashrom -p internal -c MT25QL128 -r /mnt/usb/backup.bin
flash commands
this did not work as my bios is a Winbond W25Q128BV
ex:
flashrom -p internal -c MT25QL128 -r /mt/usb/backup.bin
and
flashrom -p internal -c MT25QL128 -w /mt/usb/nvme.bin
root@sysrescue ~]# flashrom -p internal -c MT25QL128 -r /mnt/usb/backup.bin
flashrom v1.2 on Linux 5.15.83-1-lts (x86_64)
flashrom is free software, get the source code at https://flashrom.org
Using clock_gettime for delay loops (clk_id: 1, resolution: 1ns).
No DMI table found.
Found chipset “Intel Q77”.
This chipset is marked as untested. If you are using an up-to-date version
of flashrom *and* were (not) able to successfully update your firmware with it,
then please email a report to [email protected] including a verbose (-V) log.
Thank you!
Enabling flash write… The Flash Descriptor Override Strap-Pin is set. Restrictions implied by
the Master Section of the flash descriptor are NOT in effect. Please note
that Protected Range (PR) restrictions still apply.
OK.
No EEPROM/flash device found.
Note: flashrom can never write if the flash chip isn’t found automatically.
[root@sysrescue ~]#
—–
this below did work to read the bios with flashrom – mine is an 8300 SFF with a W25Q128BV BIOS chip. I took 5 read backups before I tried the modifications. Yeah it was overkill, but worked fine.
as @jordi mentioned:
Thanks for the guide, I used in my HP elite 8300 tower. The flash chip is diferent, is “W25Q128.V” so the orders are:
# flashrom -p internal -c W25Q128.V -r /mnt/usb/backup.bin
and
# flashrom -p internal -c W25Q128.V -w /mnt/usb/mod.bin (I named mine nvme.bin per the instructions)
[root@sysrescue ~]# flashrom -p internal -c W25Q128.V -r /mnt/usb/backup5.bin
flashrom v1.2 on Linux 5.15.83-1-lts (x86_64)
flashrom is free software, get the source code at https://flashrom.org
Using clock_gettime for delay loops (clk_id: 1, resolution: 1ns).
No DMI table found.
Found chipset “Intel Q77”.
This chipset is marked as untested. If you are using an up-to-date version
of flashrom *and* were (not) able to successfully update your firmware with it,
then please email a report to [email protected] including a verbose (-V) log.
Thank you!
Enabling flash write… The Flash Descriptor Override Strap-Pin is set. Restrictions implied by
the Master Section of the flash descriptor are NOT in effect. Please note
that Protected Range (PR) restrictions still apply.
OK.
Found Winbond flash chip “W25Q128.V” (16384 kB, SPI) mapped at physical address 0x00000000ff000000.
Reading flash… done.
[root@sysrescue ~]#
—–
and the write stats as well:
[root@sysrescue ~]# flashrom -p internal -c W25Q128.V -w /mnt/usb/nvme.bin
flashrom v1.2 on Linux 5.15.83-1-lts (x86_64)
flashrom is free software, get the source code at https://flashrom.org
Using clock_gettime for delay loops (clk_id: 1, resolution: 1ns).
No DMI table found.
Found chipset “Intel Q77”.
This chipset is marked as untested. If you are using an up-to-date version
of flashrom *and* were (not) able to successfully update your firmware with it,
then please email a report to [email protected] including a verbose (-V) log.
Thank you!
Enabling flash write… The Flash Descriptor Override Strap-Pin is set. Restrictions implied by
the Master Section of the flash descriptor are NOT in effect. Please note
that Protected Range (PR) restrictions still apply.
OK.
Found Winbond flash chip “W25Q128.V” (16384 kB, SPI) mapped at physical address 0x00000000ff000000.
Reading old flash chip contents… done.
Erasing and writing flash chip… Erase/write done.
Verifying flash… VERIFIED.
[root@sysrescue ~]#
I’m finding I cannot boot a legacy device as @siliconbeaver mentioned. So for my true image boot USB, I had to use one that is UEFI boot. No biggie, E2B and some other legacy utils might not work. I’ll take the speed for the trade off.
—–
In one of the NVMe guides for a different computer: some people were asking about what PCIe cards are people using
for those interested:
I am using the MAIWO adapters as they are relatively cheap and easy to work with. I actually stumbled across @Paulie’s articles from a review on one of them. They dont use slot covers, no worrying about slot cover heights. They clip in using the slot retaining clip. They’re actually very easy to move from machine to machine if you wanted to do some tasks like flash bios via windows, or backup some things pretty fast.
These go on sale from time to time for about 8-10 USD for the no heatsink and 10-13 USD for the heatsink version (heatsink one also supports the forthcoming PCIe 5.0 as well). What I like about the heatsink version, it uses 4 screws instead of rubber bands to hold the heatsink on.
no heatsink version
https://www.newegg.com/maiwo-kt058a/p/17Z-0103-00001?Description=maiwo%20pcie%20nvme%20adapter&cm_re=maiwo_pcie%20nvme%20adapter-_-9SIAVF7E2Z1315-_-Product&quicklink=true
and heatsink version
https://www.newegg.com/p/17Z-0103-00002?Description=maiwo%20pcie%20nvme%20adapter&cm_re=maiwo_pcie%20nvme%20adapter-_-9SIAVF7EVS4360-_-Product&quicklink=true
I can confirm these work in the HP 8300 black x16 slot. My WD drive is mounted on one right now. They also work well with Teamgroup MP33 and MP34 drives, kioxia, and others I have tried with… I haven’t tried the white PCIe slot yet. The manual says it is an x1. 🙁 so probably will not bother with it.
Also, Amazon is another good source. I think @Paulie and our European friends are getting their PCIe to NVMe adapters there.
—–
800 G1 is next on the list to do. I’m sure it will go just fine as this one was easy.
And I’m debating whether or not try the HP 6200 SFF. Some digging and research will be needed. Will the NvmExpressDxe_Small.ffs from the 8300 mod even work with the 6200? Plus, the BIOS chip itself on that machine is different from the 8300. No idea what kind it is, or where it is located on the board. I don’t think it is by the ram slots, like the old guide pictures showed. Funny that HP doesn’t list it on the mainboard layout specs for either the 8300 or 6200.
How does one pull up a list of supported bios chip types that flashrom supports? Is there a switch for the flashrom util to auto detect what kind of bios chip is on the mainboard?
Thanks again all, you guys are great.
amitri55 says
It worked also in my HP Pro 6300 SFF with same BIOS 3.08.
Same commands with success!
However, disk speed with Intel Core i3-2120 CPU is lower – probably PCI-E 2.0
(1658 MB/s read, 1440 MB/s write). Even so 3x speed of SATA disks!
Cheers!
harpmaster says
this is great! thanks for this post. i have an 8300 microtower and your instructions worked beautifully. thanks also to @jordi for saving me the search for my chip.
Gio says
Hi,
Great guide. 100% success
Only 1 note; read and write commands:
“flashrom -p internal -c MT25QL128 -r /mnt/usb/backup.bin” were throwing the “No EEPROM/flash device found ” message.
it is because not all chips are called the same..
you need to identify what chip you actually have in order to make the backup and then modifications.. To show what chip you have; use:
“flashrom -p internal:boardenable=force”
“Found Macronix flash chip “MX25L12805D” (16384 kB, SPI) mapped at physical address 0x00000000ff000000.”
now just use replace as needed. in my case the chipset was MX25L12805D so I needed to run:
“flashrom -p internal -c MX25L12805D -r /mnt/usb/backup.bin”
hope that helps.
Jim G. says
@Gio. Thanks for sharing. I have two posts awaiting moderation that asked this very question of how to detect what kind of flash rom the motherboard has.
Mine turned out to be the same one as @jordi has and apparently our winbond chip is in the sff and cmt.
Adding your Macronix to the list, there are now at least 3 different flashrom types for the HP 8300 sff: micron, winbond, and macronix
Paulie says
I will update the post soon with all of the different types of chips
siliconbeaver says
@Jim
According to your suggestion, I have disposed my 8300 microtowers, then migrated to G3/4. meanwhile I have kept and modded my G1s (to re-use DDR3 RAM). In this way, the M2 SSD sticks are fully re-used.
I prefer G3/4 after test. more powerful CPU. I was stuck with 8300/G1 years, and was trying my best to upgrade hardware to run them faster. That indeed costed more. the cheaper and easier way is to upgrade to G3/4 (this week G3/4 on ebay $40-$70)
https://www.ebay.com/itm/334896750790
https://www.ebay.com/itm/275855272028
https://www.ebay.com/itm/325669376018
I didn’t go i3-8100. worried about its performance. minimum is i5 or higher.
btw, have you done any OS backup after mod?
most backup software cannot “see”/detect the NVMe SSD on the modded PC.
however, on G3/4 (non-modded) no this issue. can even run DOS version GHOST (<2 MB) to image OS.
siliconbeaver says
Sorry, no idea where got copy of “Your comment is awaiting moderation.” 🙂
Jim G. says
@siliconbeaver I see what you mean
and yes an i5-8500 or higher is probably best with a 600/800 G4 if you want to do Windows 11
latest version rufus util can make a win 11 installer that bypasses check for cpu type / secure boot tpm 2.0
I have it running on an my HP 8300 actually, and on a 600 G1 right now with an i5 4570 in it, both running @Paulie ‘s mod
The rufus installer will also work with anything 600/800 G1-G4 that I have tried.
plus the newer rufus does have options to enable all the privacy stuff by default, which is handy too…
as for Ghost, that software was great for back in the day. I quit using it in 2017 when I got True Image. DOS bootable Ghost will not support drives above 2tb, and won’t support GPT partitions. What version of ghost are you running? I bet your are still using MBR partitions…
If you have some kind of western digital drive somewhere, I would suggest getting the free version of true image that WD has on their site. I think it requires you to have a WD drive of some sort hooked up, either internally or via USB. I don’t know, I don’t use this one. I bought mine.
True Image USB ISO does see the NVMe and it can back up the NVMe drive just fine. It has worked fine for me on the HP 8300 after mod and also on an HP 600 G1 I just did the NVMe mod on.
Also, I was able to use MiniTool Partition Wizard to migrate the Win 11 OS from a SATA drive to the NVMe on a 600 G1 today. There is a free version of that, I don’t know its limitations. The full version worked fine for my needs.
I used to use AOMEI partition assistant too and that one is free, it might do what is needed, don’t know, have not tried it. There is clonezilla (linux bootable usb) and that is free too… it can do images of windows drives as well as linux. There are options out there. Just have to find something and try it.
I have yet to hear of a version of Ghost that works with drives above 2tb or GPT partitions. As far as I know, they stopped making that software before these things came out. If someone is aware of one that works for these bigger drives and newer partitions, let me know what version.
Joan says
Thanks for the guide – it worked flawlessly. I have a question though: I get the fast speeds on the black slot (where my graphics card usually sits) and half that in the white slot next to it. Is there any way around that? Thanks!
ss says
Has anyone tried this with a q67 chipset? I have an 8200 elite SFF.
Paulie says
I have done it on a Dell Optiplex 790 (blog post on this site) and it worked very well.
ss says
Hey there,
So I went for it and got to the point where I was using flashrom to backup my bios but I’m getting an error and can’t get by it. Have you run into this at all?
BIOS region SMM protection is enabled.
I can’t get around it no matter what security settings, etc. I change in the BIOS. I’ve jumped the FDO so that’s not the issue.
Jim G. says
@ss I am wondering if you are using the right chip type for the flashrom -c switch. I don’t know the commands to auto detect what type but there at least 3 different flash chip types for the 8300. And I would say the same for the 8200 series, that there are probably some different flash types for ut as well.
See if you can figure out how to have flashrom auto detect what flashrom type you have.
ss says
Duh. Thanks for that Jim, I was able to figure out my flashrom and it reported it’s one of three. When I read the flash I’m still getting a warning. I was able to open the backup.bin and insert the NVMe driver but am nervous about bricking my comp if I send it back. Here is a link to what flashrom reported.
https://imgur.com/wGD0PBJ
Any thoughts by anyone? I have work to do so can’t afford to brick it right now so just looking for insight before I attempt it. If successful I’ll be sure to post my exact steps.
Right now I was able to upgrade my ram from 4 to 32 Gb and by a 1Tb M2 with a PCI-e 16 card and put it in the motherboard and currently using it as a data drive. My machine RIPS after it starts up now and it only cost $170 CAD for all of that. Rediculous.
Jim G. says
@ss you’ll want to check the make and model of the flash rom on the main board. Not sure on the 8200 if it is by the ram slots or elsewhere. It is near the ram slots on the 8300.
If you can wait a few weeks I can take a look at this stuff on an HP 6200 which should be very similar to the 8200. I think they use same intel chipset anyway.
Nico says
Thank you so much this worked however I only get 2GB/s because my card is only PCIE Gen2 X4 same Mainboard. How were you able to get these high speeds? Do I need a X8 or X16 card or are my other PCIE cards 10GB ethernet SFP+ X16 and 2.5GB RJ45 X1 the problem as they use these lanes?
Jim G. says
@Nico pcie Gen2 will max out at like 1600Gb/sec. You need a pcie 3.0 or higher adapter card, a pcie 3.0 or higher ssd, and the right cpu. And the latest 3.08 hp 8300 bios installed.
What kind of ssd and processor are in the machine? It sounds like you my be facing the issue that siliconbeaver had with an i3 processor. You need an i5 3rd generation processor to get the pcie 3.0 support in the hp 8300. If you don’t have the i5 cpu, you’re probably better off moving yo an 800 g1 as I mentioned in some older posts.
unes says
i did all steps correctelly exept for the last one i got an error of the chip :
[root@sysrescue ~]# flashrom -p internal -c MT25Q128 -w /mnt/usb/nvme.bin
flashrom v1.2 on Linux 6.1.30-1-lts (x86_64)
flashrom is free software, get the source code at https://flashrom.org
Error: Unknown chip ‘MT25Q128’ specified.
Run flashrom -L to view the hardware supported in this flashrom version.
Hugo Simões says
Hi there. Yesterday, by chance, I landed on this tutorial when I was wandering around the web.
I bought myself a cheap HP Elite 8300 CMT. Very good quality machine. It seems that this machine has some annoyances. Today, I converted my SSD that had MBR to GPT and since then, when I reboot the machine, it no longer shuts down and starts up… which is great.
I do not see the need to follow this tutorial because the SSD is fast enough. I can reach the Windows lockscreen in less than 20 seconds. I just use it casually to watch youtube, some programs, but still don’t see the need to move to NVMe.
I do have an offtopic: when Windows boots up, which logo appears to you? The Windows Logo or the HP blueish circle logo? I wanted the HP logo instead of Windows logo… is it possible?
Oh… another question… Is it possible to edit the colors of the hp bios screens? My eyes are no longer what used to be and the white/light backgrounds hurts my eyes. Some dialogs are presented with dark blue background with white text but if I select some option, some white dialog goes over that dark blue dialog….
Thanks.
David says
I bought the following adapter for PCIE to NVME:
https://www.amazon.com/gp/product/B07FN3YZ8P/ref=ppx_yo_dt_b_asin_title_o00_s00?ie=UTF8&psc=1
Is that the fastest port to use? I’m seeing people use the full-length PCIE slot.
I have an HP Elite 8300 CMT with the highest i7 CPU, 32 gigs of ram.
Also, for those that want to put a faster video card in their computer but cannot because it lacks the additional power.. there are solutions out there that fit in a drive bay and turn on at the same time as the computer and supply the supplemental power to the video card. I used one for a long time and it works great.
Jim G. says
@unes which form factor is your HP 8300? There are different kinds. Are you using the SFF small form factor the article was written for? A Mini? Or a CMT Mid tower?
“[root@sysrescue ~]# flashrom -p internal -c MT25Q128 -w /mnt/usb/nvme.bin
flashrom v1.2 on Linux 6.1.30-1-lts (x86_64)
flashrom is free software, get the source code at https://flashrom.org
Error: Unknown chip ‘MT25Q128’ specified.
Run flashrom -L to view the hardware supported in this flashrom version.”
That error means you have a different flash chip than what the article was written for. As I mentioned in an earlier post on this article, HP used at least 3-4 different types of flash roms for the 8300 series. You will need to find out what kind is in your machine. @Paulie is working on updates for that I think. Otherwise you can check the info markings on flashrom IC itself. For the SFF, the IC above the first white ram slot on the side nearest the DVD/CD drive, or the hard drive under the power supply.
I guess I would see if there is flashrom -h or -help some sort of help list for the switches, to see if flashrom can detect what kind of chip you have. If it cannot, I have no idea what linux built in tools in the sys rescue image can do this.
You definitely need to find out what flashrom type your board has for this to work.
@Hugo Simões
hp logo during boot is an oem modification in the Windows 10/11 install image. That is why HP, Dell, and other vendors have their logo when you turn on the pc and boot, because you’re using their customized windows installer, which adds that feature. You’d need to extract the hp logo screen from an HP windows installer image. This is someting out of scope of the mod article. Do some googling on how to modify the windows load screen image. That’s where you would start for that. I have no clue how to do it. Given time and other constraints. I just use the defaults.
Later versions of the HP 600/800 G3 and G4 seem to have the HP logo from the bios on the screen during boot up. They also have a native NVMe slot that you can boot from without the need for mods. You can easily update the bios on these models too from within the bios via network, and other things. Honestly I think that upgrading to one of those for 50-60 bucks is worth the time saved and money spent vs customizing the logo. Definitely easier than messing with creating custom wim images for install for a HP bitmap image. My 2c.
@David
That card in your link is an pcie 3.0 x4 / 4.0 x4 card. Your i7 supports PCIe 3.0 The card is fine for this.
IIRC, the WHITE 16x size slot is downshifted to either 8x or 4x, the BLACK 16x slot is full 16x for video, and the SSD will work in either slot. Both slots should work up to PCIe 3.0 x4 max speed. Running a crystal diskmark will definitely show you the if speeds are similar for either slot. Crysal Diskmark is freeware. If you have a PCIe 4.0 SSD, you’re not going to get PCIe 4.0 performance, it will top out around 3000MB/sec + or – depending what kind of drive you have. Either the PCIe 3.0 slot or the drive will be the bottleneck, it depends on what kind of drive you are using.
Dave says
I have a double width video card .. I forget the exact model.. the highest Geforce GTX that doesn’t require supplemental power.
So, I’ve put the NVME adapter in the black slot. The video card is now in the white slot.
Is this going to hamper my video performance?
I don’t have a choice but to do it this way.
Dave says
I have a double width video card .. I forget the exact model.. the highest Geforce GTX that doesn’t require additional power.
So, I’ve put the NVME adapter in the black slot. The video card is now in the white slot.
Is this going to hamper my video performance?
I don’t have a choice but to do it this way.
Jim G. says
@Dave what is the video card used for? Games?
The manual says the WHITE is a 4x slot max. Yes, the video card will be slower. Performance wise I don’t know how much losing these lanes really matters. You’ll want to do some video benchmarks with the vid card in either slot to see how much of a drop in performance drop it really is.
You definitely need an x4 slot to get any decent performance out of any NVMe. They don’t make x1 NVMe adapters cards because they would be no faster than SATA SSDs. Same for USB 3.x Gen2 10gbps or 20gbps PCIe cards for external SSDs, they require the x4 slot too for the same reason, they would be no faster than Gen 1 5gbps.
If you’re super worried about vid performance, you might have to move your vid card back to the black slot, with a SATA SSD in the 8300 as your best option.
As I mentioned to someone else in the other post: you may want to look into an HP 600/800 G3 or G4 simply for the built in NVMe slot alone, and then add your vid card to that. The G3 is an excellent value you can grab for about 50-60 bucks today with a quad core i5 6500 in it and no drives. Your i7 chip alone probably sells by itself for near the price of the G3 unit alone. The G4 is the bear minimum to ‘officially’ run win 11 with an i5 8500, about $100 and up… both are good cheap options. There are options anyway…
Hugo Simões says
Hi again and thanks for the response above… which got me confused… kinda. I wanted the hp logo during Windows boot. I turned legacy support off, Windows logo still shows up even if I hook a pendrive with Windows installation made with Rufus with GPT and UEFI enabled.
Since someone touched the graphics card subject, I have myself added a Sapphire Radeon HD 4650 PCIe 2.0 to the black slot. UEFI hates this card. If I turn legacy support off and save settings, there will be no video output anywhere except when Windows reaches the GUI (pre-lockscreen). So I searched online and I read that turning off legacy off also turns off support for legacy boot and legacy graphics cards.
What’s “legacy graphics cards” for HP? What’s the minimum gfx card that UEFI likes?
I do plan to get a graphics card that UEFI loves. that doesn’t suck no more than 25W from PCIe, and also has at least OpenGL 4.4+ support. I’m thinking of getting Radeon HD 5450. HD 5670 is too hungry.
Is there an specific place where we can have general purpose talk about HP 8300 and other such machines, instead of filling this page with other things than NVMe?
David says
I have another question. Not 100% related, but it does have something to d with the BIOS.
I want to flash a new bios logo and change it from the standard HP to another logo.
However, for the LIFE of me I cannot get it to boot from the USB stick so I can use DOSFlash /I (image file name).
It always shows up in the BIOS under the Devices. I then set the boot order to USB Floppy in the Legacy options and when I reboot and go to the Boot Menu it’s not always there (probably changed some option somewhere).
But, when it is there specifically by name even (Sandisk), I select that and it’ll usually got to a black screen with the cursor in the top left and nothing else.
I can boot from that USB just fine from a new generation computer.
I guess I should mention I used both MSDOS and FreeDOS created from Rufus.
The sticks I have tried are a 16 gig and two different 128 gig sticks.
HOWEVER … I was able to install Windows 11 from the same USB stick.
One is a SANDISK USB Extreme 3.0 16 gig.. older stick from maybe about 10 years ago.
The other is a USB 3.0 / USB-C (double ended) SANDISK 128 Gig stick. Fairly old.
The other is a newer SANDISK Extreme PRO 128gig.
So, since I was able to install Windows 11 from one of the 128 gig sticks it tells me that for some reason it recognized that as bootable but doesn’t like my MSDOS or FreeDOS.
Driving me crazy.. it’s a little thing, but my son loves playing Overwatch so I created an image with the Overwatch logo and then changed the Overwatch name to say “DAVEWATCH” instead of “OVERWATCH” in the regular Overwatch font. He’ll like that.
I know this is unrelated to the post, but someone might like flashing the bios image as well.
Jim G. says
@Hugo @Dave
I would suggest that both of you do some googling on how to change the windows boot screen logo image. You can take a look at reddit for something like that or maybe sevenforums, windows central, or forums.anandtech.com <– that one is a great resource I used to use… if there aren't posts about this stuff elsewhere out there already, perhaps people at these places can help. I know nothing about this stuff. I use the defaults and seldomly reboot. (that is what hibernate is for, or leaving the pc on 24/7 🙂 Without add on video cards, the HP8300 only uses about 60 watts of AC power from a 110v AC wall socket. I checked it with a killawatt type device, so barely 1.440 killowatts per day if left on 24/7. Modifying things in windows or wim images for custom boot screens opens up it's own possibility of problems, issues, and headaches too. One would certainly want to back up their current windows os disk before changing any of that stuff.
I can try to answer any off topic stuff at [email protected] when I have time, but it is best for people to do some googling for best and fastest solutions really… many of these things have been covered many times already on the web.
I guess @Paulie quit replying after all the off topic messages. Sorry.
There is still the issue of the several different flashrom ICs that HP used with the 8300 series. Some of them are listed in various flashrom commands in various posts.
For those having problems, you really need to figure out what flashrom IC chip you have.
If you have a winbond flashrom chip, see below. Or take a look at some of the other ones other people have used.
Someone else listed these, these worked for my HP 8300 SFF winbond flashrom chip:
Read command:
flashrom -p internal -c W25Q128.V -r /mnt/usb/backup.bin
Write command:
flashrom -p internal -c W25Q128.V -w /mnt/usb/nvme.bin
Jim G. says
@Dave
Short answer: You need to get a smaller usb stick.
There IS a limit microsoft set with Fat32 partitions, and it is 32gb. You can’t boot DOS from an NTFS partition. Your windows installer is NTFS, and that is what it works to install windows from it only. The disk is too big for DOS booting.
If you have an older 1 to 16gb stick or something, that would be perfect for this. You can try to format one of the 128gb sticks as 32gb, but it may not work still because the actual physical disk size is too large. You may need something like partition wizard to reduce the size of the fat32 partition to 32gb. If still not working, you will need to get like a 5pk of 16gb sticks from amazon or something…
Please drop me a line at my email above for off topic stuff or check those forums. Thanks.
Jim G. says
Well Ladies and Gents:
I am happy to say I have managed to get a nice little USB EFI NVMe booter going on. 😉
Though I still have yet to get legacy BIOS to work with ANY boot stick, it just hangs.
For those who are having problems flashing the ROM for the HP 8300 for NVMe support, OR for other models that support EFI boot: you may find this post to be- very helpful.
I have tested the Clover installer method below with the HP 8300, and it DOES work to boot to the HP 8300 PCIe NVMe via Clover. So in effect, one does NOT need to flash the HP 8300 bios, if they want to use this method.
My test machine is an HP 6200 Pro SFF with latest stock bios 2.33, no NVMeExpressDxe was added to it as a BIOS mod. No bios mod guides are out there for it either. So this machine was a great choice for this. The drive is a Western Digital sn730 1tb disk with a MAIWO PCIe x16 adapter card in the only pci x16 slot available on the HP 6200 SFF.
Some of this may be slightly similar to what @Paulie did in his Dell poweredge article. Mine is a different usb boot stick and a different windows setup method.
Please be aware that you do any of this below at your own risk. I cannot say this method is *completely* universal, but that certainly is the hope for other uEFI systems. The HP 6200 has no raid controllers built in, such devices may throw a monkey wrench into things with other systems, or other non intel systems or chipsets with proprietary SATA or RAID controllers, etc… things you would need the proper Dxe files for in the Clover USB stick config or drivers in Windows installer boot images, so I cannot say that other things will work with anything else, outside of my test hardware. So try this at your own risk.
First, what does NOT work: posted here to save you time:
I tried some things with @Paulie’s BDU, plus DUET/rEFInd, and Clover original iso, all in BIOS only mode. None of these would ever work, the system would just hang. Yet there is supposed to be a way to make those older machines boot with with usb sticks… so older BIOS only (non uEFI) machines are out (for now?)
Next, turned on EFI mode. DUET/rEFInd would boot the win 11 usb installer stick, but it would never boot the NVMe drive. It does not see it, my guess is it needs a Dxe file somewhere in the config to solve this problem.
Now, what DOES work:
The current full Clover stock ISO works 🙂 so that is what we will use.
I can’t share a link to download it, because the post will just sit in awaiting moderation status in purgatory. :/
I got my clover iso directly from github, or you can Google search for Clover EFI boot ISO, and you make the bootable usb with Rufus and the defaults on the FIRST usb stick, just like you would for a windows usb installer image. Paulie’s BDU Boot Disk Utility image he used for the dell poweredge might work too, I did not try it.
Before you get started: you MUST use a GPT disk for your windows installation. Throwing an a MBR disk with a previous windows install on it into this deal, may be a big monkey wrench. If you do not have a GPT disk set up already, my suggestion is to go with option 1 below, and start from scratch with your PCIe NVMe drive.
I used AOMEI Partition Assistant free version to switch the PCIe NVMe disk to GPT mode, before doing anything. This GPT setting remained throughout the install process. I did this to save time and avoid a headache, this may or may not be necessary. Something like Minitool Partition Wizard or other utils should do the same.
Two ways to get the HP 6200 PCIe NVMe to boot Windows 10/11 with Clover USB boot stick:
Method 1. Install Win 10/11 Pro from scratch.
Prerequisites: have a licensed version of Win 10 or Win 11 ready to go for your machine. Win 7 does NOT support NVMe booting at all, as far as I know.
Get your windows install files ready on a SECOND usb stick.
I did use the Clover and Windows Installer sticks together (whereas @Paulie did not in his poweredge config), actually selecting the clover stick from the boot menu, only on the first boot. Once clover loads, you can select to boot the windows installer from EFI via clover.
To keep things simple, with the HP 6200 machine laying flat horizontally as a desktop pc:
I used the front usb ports next to power switch, power switch on left side:
I have both my clover usb stick and win 11 pro installer sticks connected:
left to right 1 2 3 4
1 windows installer usb image
2 empty
3 empty
4 clover install boot stick
The HP 6200 Bios sees these ports in REVERSE of this numbering, it sees the first boot device of 2 the usbs- as the clover installer on port 4. Clover installer can be moved to the back of the machine, once completed.
This will be DIFFERENT for other machines, you will have to figure it out from your BIOS boot ordering.
The BIOS is set to boot for EFI section to boot first. Windows boot manager is still at the top of the list, because MS likes to put it there (I purposefully left it this way, given MS will set it to this with a NEW install anyway, and future MS Windows upgrade probably switch it to this also). Since Windows doesn’t find the NVMe drive (the machine has no NVMe BIOS mod), it flips down to the next boot device: the First USB booter it finds, which is the Clover usb. If for some reason you get a non system disk error when booting, then move the USB boot device to the TOP of the list in your BIOS setup.
Once the initial setup is done and the first reboot happens:
the pc should automatically go to a clover boot screen if all goes well. Boot Microsoft EFI Boot from EFI is the default, and it will boot within a few seconds. The rest of the setup will finish. And you can continue using the clover default from now on. 🙂
Once windows setup is complete: remove the usb sticks, and plug the clover USB boot device on a usb port in the back of the machine. It will need to be there permanently. Be aware that if you do want to boot other devices in the future, you may need to use you bios boot menu to select the appropriate usb stick.
———
Method 2. Clone previous/current GPT mechanical hard disk to the PCIe NVMe.
Again please DO NOT clone a previous MBR Windows installation over to the new PCIe NVMe drive, Windows may not like it with this Clover config.
I used Acronis True Image for this. Full disk clone worked perfectly, no issues. If you don’t have a paid license for this: there is another way. If you have a Western Digital drive of ANY kind (even an old 500gb usb 2.0 my passport will do), Western Digital has their own custom version of True Image as download on their site. It is FREE and works for 5 years. (You will need to swap to a different WD drive to re-trigger it as useable for another 5 years.) You can also use things like clonezilla that is free, and other softwares.
Once cloning is complete: remove any usb sticks, and plug the clover USB boot device on a usb port in the back of the machine. It will need to be there permanently. Be aware that if you do want to boot other devices in the future, you may need to use you bios boot menu to select the appropriate usb stick.
The pc should automatically go to a clover boot screen if all goes well. Boot Microsoft EFI Boot from EFI is the default, and it will boot within a few seconds. And you can continue using the clover default from now on. 🙂
———-
My test WD black SN730 1tb disk gets 1641MB/sec read and 1144MB/sec write. The drive is more than fast enough for this PCIe 2.0 system. Older NVMe drives actually might be better for this pc. Meaning: you can upgrade an SSD in a newer machine, and repurpose the drive that was removed from the new machine: by using it in this setup.
Again, I cannot say this Clover boot stick is universal for ALL uEFI systems, but that certainly is the hope.
I hope this helps those of you who are having problems modifying your HP 8300 bios, or those who don’t have a way to do bios mods for their particular setup.
-Jim
Christian K says
I did this on my HP Compaq Elite 8300 mt and it worked like a charm.
Thank you for this guide, couldn’t have managed without it!
Cheers.
Mitchell says
Hey @Paulie
great article very nice to breath new life into an older machine …
@Jim G. is there a reason that you didn’t use the method used by Paulie in the 8300 machine for the 6200pro ? …
I have an HP 6200pro sff that I would like to use as a lab server (it cost me nothing) and I have just recently switched a bios mod on my old MSI desktop to run a nvme (WD black) to be fair I down loaded it and flashed and it worked well.
My question is, can @paulie’s method work on the 6200 pro?… what made you use the Clover boot method ?
I’ve downloaded most of the relevant files and willing to give it a shot. I’m not going to be installing windows but will need a uefi bios.
@paulie any reason why the intel management engine has to be present?… could you explain why your tutorial made a point of needing it….
again nice work and thanks
Jim G. says
@Mitchell if not using windows, I guess you are using linux. Linux? That’s a whole different story… I don’t know if clover will work or not for Non Windows or Mac OS. It might. IDK if the latest GRUB boot loader can assist with this or not in some sort of similar way with a USB stick. I know there are GRUB mods to make it boot GPT partitions for non uEFI systems, NVMe? I would assume it would need some type of Dxe or driver loader.
Give the clover a try and see how it goes with the 6200. As I mentioned, you’re only going to get about 1600MB/sec speeds, so you will see about HALF of the performance with an NVMe SSD in the HP 6200 vs the HP 8300 getting about 3000-3300MB/sec. If using in a server, get an NVMe PCIe adapter card that has a heatsink for the SSD. There’s plenty of overheating problems and slow performance problems when SSDs get hammered with high use in general.
Using the clover usb idea was to try getting something going that was as ‘universal’ and as simple as possible for most uEFI Windows machines (there have been people asking for this mod for various HP and other systems, which there are not any articles out there for), without the need to program every machine out there. Clover definitely does work with the HP 6200 + HP 8300, and probably others. Plus, the 8300 and 6200 use different bios code. The revisions do not match. The 6200 will need customizations to flash properly.
And because I am just too busy lately to really mess with more mods that may not work (especially undocumented ones like the 6200), among other reasons. I just wanted something that would work, without headaches or wasting a lot of time. PNY usb sticks were under $30 for a 15pk of 16gb sticks recently at amazon, they might still be. And the ones I got were actually 32gb.
The Intel ME? That’s for the 800 G1. I don’t see it mentioned here. The intel tools are used to flash the 800 G1, instead of flashrom the 8300 uses. FDO jumper is needed, or changes will not write. FDO basically enables a ‘service mode’ to update the BIOS manually.
For programming: The 6200 will require you to figure out what flash rom IC you have. You’ll have to look at the motherboard. It probably doesn’t match up with these flashrom excecutable steps in the 8300 article, who knows. You’ll have to change that to fit what kind of flash IC you have. You’ll also have to figure out where at in the BIOS code to drop the Dxe entry also. And that probably doesn’t line up exactly with this article either. It’s going to require some time and effort.
And FYI: It has been noted that there are at least 4 different flashrom chips that HP used for the HP 8300 series between SFF, Mini, and CMT Tower. I would expect the same of the 6200. Even the 8300 SFF has at least two- mine has a Winbond IC and @Paulie’s 8300 article here was for a Micron IC. We have seen some people having problems with the 8300 or 800 G1 programming because their IC doesn’t match the flashrom lines listed here, or the flashrom code for the mini is different than the SFF for the Dxe insertion point, etc… I think my HP 6200 SFF flashrom is a 16mb Winbond, similar to the one in some of the HP 8300 machines.
Going with clover eliminates all these hassles and potential flash problems, at least for Windows boxes. At the very least, it can make for a good test before flashing the machine. You can always try the clover and see if it works for your setup, before going through with a BIOS mod that will need some tweaking to do correctly.
Technically the USB could be removed after booting into the OS, but it is needed for the next reboot.
It could probably also be ran from a bootable CD/DVD, which I was going to try next.
It uses a whopping 9MB or so of code to boot the machine. Old flash drives are perfect for this kind of use.
I still think the flash programming is great and a sound solution, provided it is done correctly and works. It has worked pretty well for the 800 G1 and most of the 8300s, when the code lines up right for people. As for me, I already accidentally pooched one 8300 board with the old method (this article is actually a NEWER method, the old method required an IC programmer) and had to replace it. I figure clover is great for some cases to save headaches, time, and money, especially for undocumented systems where a bad flash could maybe pooch the board.
Good luck, hopefully the flash will work for the 6200, with the proper information changes. Make a good backup or 2. I made 4 bin backup files before proceeding with the 8300, one cannot be too cautious.
Mitchell says
Hi Jim
Thanks for dropping me a line ….
Yes i hope to install fedora server on it …. just a small home lab to learn and try stuff out on, it’s small has good enough specs and less than a 280 watts. It wont be running full time and i plan on trying out some “wake on lan” magic out if all goes well. Pretty sure clover works on any uefi bios(youtube has a few nix conversions) and then there is also Libre boot and opencore but i’m not to clued up on either. Not getting the full whack out of the nvme is the reason i want to drop the nvme dxe driver into the bios rom, it just seems like a more elegant solution.
“Plus, the 8300 and 6200 use different bios code. The revisions do not match. The 6200 will need customization’s to flash properly.”….
aye this is what i’ve been finding out over the last 2 evenings… i have got the latest bios update released for the 6200 (mine sadly is not the latest) and i was wondering if this was strictly necessary, because while going through a hp forum it said don’t update if you wanted to update to win 10 as it would take almost 2 mins to boot (something to do with TPM) also not sure it was just an update for all the other hp / windows cruft that gets put into cmos a lot of the time …. i do have a rom file … the latest one comes with a warning about not been able to downgrade it again for security reasons … i assume it has to to do with specter / meltdown and other side execution vulnerabilities
TITLE: ROM Firmware for 8200 Elite and 6200 Pro Business PCs (J01) ####—-the (J01) is my mb..
VERSION: 00.02.33 REV: A PASS: 1 ####—- my current version is 00.02.15
the next step is to identify the actual rom ic as you say, i have looked for nix commands to read it from the cmd but to no avail.
i’ll keep at while i can and if i find a solution (it must be doable) i’ll post the nfo here as there are quite a number of machines that share this spec.
thanks again
Jim G. says
Hey @Mitchell.
Sure, hope the notes here will help.
Yeah I think those 2.33 BIOS updates were for meltdown, they definitely were for ‘cpu security flaw’ related things. That 2.33 version is installed on mine, and was the latest I saw on their site.
My HP 6200 Pro has Win 10 22H2, and no boot time issues that I have seen, with any drive I have used in it. I use the onboard intel gfx. I don’t use secure boot for anything, and I have the TPM turned off. (I don’t suppose Linux really uses these either?) so I can’t comment on boot times with those on, which may have been fixed since those notes were made? I believe some of those boot problems too are related to PCIe vid cards, as some MFRs did not have UEFI options in their cards, only BIOS boot options, which made machines take forever to boot. (I don’t remember exactly: long ago there was something about boot time problems in the past with one of the HP SFF series, and it may have been related to a video card driver too, where a driver update + BIOS updated fixed it. I seem to remember people putting in a PCIe vid card to get around the prob to fix it with the updates.)
I don’t think you would see boot time issues in a Linux environment using the onboard video. And for booting a test machine, you’re probably not going to reboot often anyway if the WoL works.
Either way, I would not let those supposed ‘boot time issues’ stop me from upgrading to 2.33. My machine has never crashed or been problematic thus far with the 2.33 BIOS.
Maybe you want to back up your 2.15 version with flashrom before you do anything, once you figure out what flashrom IC you have.
Definitely listen to those warnings about downgrading the BIOS. They are no joke. That kind of thing is how I pooched my 8300 originally, rolling back the BIOS to a previous version. The machine was bricked, you could not get it to come up, or get it to enter any kind a of BIOS recovery mode. It was SOL.
Yeah these machines are great for low power use. I hooked my 6200 up to a killawatt style meter. from what I saw, it only uses 60-70 kW AC power from the wall socket.
I wish I had more time to try it out the NVMe mod. It’s probably possible to flash the 6200, definitely make a few bios backup bin files just in case. I think you just need the latest HP bios, the flashrom IC info, plus the location to drop the dxe file in the UEFI tool.
I have yet to find any windows utils or powershell commands to pull the BIOS IC info, only stuff that pulls the bios version. If you find something for Linux, let us know.
If your 6200 Pro is is a SFF model, then the BIOS flashrom should be near the 2 black power connectors on the board (they are for drive power cables), right next to a white DDR3 slot IIRC. Do some googling and you probably will find the chip info needed for flashrom. I think mine was a winbond, similar to the one I listed in an earlier post on this article. Yours might be different.
In the UEFI tool, there is probably a ‘similar looking’ line of code to what @Paulie listed here for the 8300, where the dxe should be dropped right in after it. I would see if you can find that. It was similar on the 600 G1 vs 800 G1, but those two were similar models. Whereas the 8300/6300 and 8200/6200 are not. I’d bet they are the same for this part anyway…
Definitely let us know how it goes. 🙂
-Jim
Mitchell says
Hey Jim
Notes were great for steering me in the right direction (thanks ) and I have tumbled down a rabbit hole of note with this … so so different than just downloading a modded flash image and hoping it’s not carrying some malware…. with regard to the really slow boot up times, it seems that most of the folks who suffered were booting win 10 and the management engine took ages to hook up the TPM as the firmware was win 7 spec, and TPM win10.
I was able to use SystemRescue’s flashrom app to find the bios details, there are 5 chips in total (they may all be on 1 bit of silicon), and there was only 1 that was writable, all were on the “known” list in flashrom (Marconix if i remember correctly) . I was able to pull a binfile from that one part of the chip? but could not seem to load UefiTool on the bootable USB i was using (it’s Arch linux and I’m not sure it has a package manager on the bootable disk)… I tried to download it on the machine but the kernel is so out of date that i couldn’t install it there either… my other machine did have it installed and i opened it there.
My initial plan was to drop the NVMe.dxf into the latest bios update and then see if i could flash that, and while reading up on the NVMe driver i discovered that there is a danger in putting it above any padding while i could see areas of the bios were padded the very last .dxf has a compressed section, the last dxf is CsplibDxe (a C dependency library?), this is a stark difference to the other output’s ive seen on @Paulie’s tutorials and on winraid but should work, whether updating first or using the modded update i’m still unsure about.
However i did come across something that may interest you as this got me rethinking the whole plan… LireBoot is an open source uefi boot solution, mostly used by people who want completly open sofware, you can use it with seabios and coreboot… i’ve wanted a Starlabs laptop since i saw them and they use coreboot on their machines, the beauty being that they strip most of the IME out. While going through all this i found a download for the J01 chipset it was aproved by lireboot and done on a 8200, looking at the history download of the VERSION: 00.02.33 REV: A ,update it does confirm that they share that update for that chipset… any way our washing machine threw a bearing and i have spent most of my time since attempting to get that sorted… I hope to have more soon!
cheers
Mihaly says
Hello,
Thank you for the tutorial, I have a HP Compaq Elite 8300 CMT.
I looked everywhere, but I didnt find an FDO pin on the motherboard.
Therefore, I cannot create the backup.bin.
Could someone please suggest a workaround or a solution to this?
Thank you in advance.
Jim G. says
@Mitchell I think you need the letters and numbers off the Flash ROM IC itself and google them, they should be in flashrom switches somewhere. I don’t know how to pull up a list for that tool. I can check mine on the board in a couple of weeks, though yours might be different.
@Mihaly I am not seeing it listed in the manual either for the CMT tower. Check the bottom of the board next to the last pci slot, above the slot in white letters it sys PCI 3. To the right of this slot and below the chip near the U500 letters, it looks like it says FDO there along the bottom. Is that a jumper? It looks like it is right there…
Jim G. says
Hi. For anyone interested, currently there is someone local to me in the US that has about 100 of the HP 8300 SFF units for sale at $29 each + tax, for local pickup. The 8300’s have an i5 3470 3.2ghz cpu (can do the pci 3.0 speeds for the SSD speeds as seen here), 4gb ram (2x2gb), dvd, no hdd. Looks like they have the 3.06 bios, so an upgrade to 3.08 before the mod is needed… typical used condition B or C grade or so for the cases. Definitely not pristine perfect.
Also, some HP 8200 Elite SFF Desktops Intel Core i5-2500 3.3GHz 4GB Ram as well for $19 each + tax. These would be in line with the HP 6200 @Mitchell and I have been talking about. These would work with clover USB boot, there is no known working NVMe mod yet for these…
Both are units only, no accessories, just the ‘bare bones’ computers.
Shipping of course would be extra, and getting them to you might tricky with the extra cost, and it would definitely take time doing this myself. Maybe the deal breaker is the shipping, but I have yet to see these kind of machines for under this price, with that nice of a processor already in them.
If any interest, drop me an email at [email protected]. If we can get enough people together who can have some patience, maybe I can look into this…
flywire says
Started with Win 10 in MBR format on a HP 8200 SFF days ago. It wouldn’t convert to GPT and after endless tries to reinstall Win 10 it eventually ended up with bad sectors. I’m really reconsidering Linux.
I installed a new mechanical main drive with GPT and Win 10. Strange thing is the v02.33 bios recognises the main drive and dvd drive but when I start Win 10 it only recognises the main drive and the mechanical data drive, no DVD. WTF?
I’d like to fix that before moving to the M2 out of a WD_Black P50 and clover.
Jim G. says
@flywire
Do you have an internal M.2 ssd to use on a PCIe card? From the sounds of things, you’re going to need one of those for the clover boot to work right.
WD Black P50 appears to be an external USB 3.2 drive. I don’t think that is going to work for what you want it to do.
Maybe you can get it replaced under manufacturer warranty. Sounds like it went bad from getting too hot with all the install throttling…
What version of Windows 10 are you installing? Are you using a DVD or a USB to install Windows? 22H2 is the last installer MS is making for Win 10. My HP 6200 is running the 2.33 bios right now on a 10tb mechanical drive and it detects the DVD just fine. The DVD also detected just fine with clover and a 1tb wd sn 730 internal SSD (basically an older WD black NVMe M.2 drive) when I tested it.
To avoid headaches, I always disconnect the DVD and just have the install media and OS drive attached during install. It’s not necessary, but with these NVMe mods and such, it does help with the drive ordering. The mechanical drive will always be disk 0, even after cloning it over to the SSD (Even my i5 10th gen machine with native NVMe support has the HDD as disk 0, this is normal). To fix this, the SSD has to be booted by itself first (plus the clover usb, if using clover), then the HDD can be added back into the setup and any DVD drive, once the SSD boots correctly.
I wouldn’t bother with MBR disks anymore, GPT is the way to go to avoid this exact issue you are dealing with. And it is needed for any disk above 2tb anyway. MBR is only needed for legacy windows and dos stuff. I guess Linux has GPT support, I have seen it in gparted before.
Lesson learned: Always google your partition types before installing windows, to make sure it will work right… Windows does NOT like converting from MBR to GPT after install, period. There is some registry entry stuff and things that are configured during the install specific to GPT or MBR. A convert powershell command exists, but I never got it to work to convert MBR to GPT.
The best option is to go straight GPT. To do that, Make the Rufus Windows installer USB as UEFI only. This forces windows to install in GPT only mode, and you CAN install Win 10/11 on any smaller SSD or HDD as well in this mode, it will be just fine. Anything of the core series should have a UEFI bios, at least from gen 2 up they do.
I would suggest making the rufus usb this way, and do one more install with your dvd drive disconnected. Make sure your bios is set to uefi boot, disable any legacy boot stuff at least during the windows install. Hope this helps.
flywire says
My internal M.2 SSD was destructively removed from an external WD Black P50 and installed on a PCI-E X1 Adapter Card. I eventually reinstalled Win Pro 10 V10.0.19045 Build 19045 on a GPT mechanical drive as shown below from a USB drive created using the Microsoft installation media process. It seems after much activity Windows eventually recognised the DVD drive. I changed the drive letters to C:, D:, and E: for OS, DVD, and Data drives respectively. I was expecting to see the data drive under Device configuration but it is not shown.
Specs and BIOS settings:
System Model HP Compaq 8200 Elite SFF PC
Processor Intel(R) Core(TM) i7-2600 CPU @ 3.40GHz, 3401 Mhz
Installed Physical Memory (RAM) 8.00 GB
BIOS Version/Date Hewlett-Packard J01 v02.33, 12/04/2019
BIOS Mode was Legacy, now UEFI
BIOS Settings:
Device configuration
Hard Disk: SATA0 3.00 TB, ST3000DM001-1ER166
CD-ROM: SATA2 hp DVD-RAM GH80N
Storage Options
eSATA Port Enabled
SATA Emulation AHCI Mode
Removable Media Boot Enabled
Max eSATA Speed 1.5Gbps
Hard Drive Boot Order No Change
DPS Self-Test
SATA0 3.00 TB, ST3000DM001-1ER166 (New OS Drive)
SATA4 500.1 GB, ST3500413AS (My data drive)
I cloned my old OS drive to the M.2 drive before the old drive failed. I’ll back it up and proceed to install it as a clone of the new OS drive with clover.
BTW, I also have a similar barebones HP8300 i5 which I’d like to try the original BIOS mod on.
Martin L says
Thank you for the tutorial. I have an 8300MT and eventually everything proceeded to opening the bios dump but in the Messages section I get
parsefile: invalid data checksum 5Ah, should be AAh
parsefile: invalid data checksum 5Ah, should be AAh
parsefile: invalid data checksum 5Ah, should be AAh
parsefile: non-empty pad-file contents will be destroyed after volume modifications
I can perform the driver injection and save the modified bios, but I’m not about to flash a bios with checksum errors!
It is the K01 3.08 latest bios
Are these error messages normal and can be ignored, or has something gone wrong?
Also 3 points that initially confused me
1) when in service mode you have to use the VGA video socket, display port is no signal.
2) you have to UEFI boot the USB stick.
3) there can’t be any expansion cards or disc drives plugged in or the linux wont boot, I kept getting a AHCI controller unavailable error until I removed and unplugged everything.
4) it didn’t seem to load the UK keyboard map, it took some finding of the characters!
Paulie says
A few people have had those checksum errors and continued. Double check the comments as there are a few different bios chips in the 8300. You may need to use a slightly different command.
Mihaly says
@Jim G.
Thank you for your response, the FDO pin was in fact there and I shorted it.
Unfortunately I still have issues with the flashrom bit.
When I include the -c MT25Q128 parameter, it says
No EEPROM/flash device found.
Note: flashrom can never write if the flash chip isn’t found automatically.
This made me think that I have a different chip, so I started looking and sure enough, the parameter -c W25Q128.V worked, backup.bin was created.
I inserted the NVMe driver after the final DXE driver (HpDigitalSignatureVerification). Everything went okay.
Trouble began when I attempted to flash the chip with the nvme.bin file.
See below
Found Winbond flash chip “W25Q128.V” (16384 kB, SPI) mapped at physical address 0x00000000ff000000.
Reading old flash chip contents… done.
Erasing and writing flash chip… Transaction error!
spi_write_cmd failed during command execution at address 0xff0000
Reading current flash chip contents… done. Looking for another erase function.
spi_write_cmd failed during command execution at address 0xff0000
Reading current flash chip contents… done. Looking for another erase function.
spi_write_cmd failed during command execution at address 0xff0000
Reading current flash chip contents… done. Looking for another erase function.
spi_simple_write_cmd failed during command execution
Reading current flash chip contents… done. Looking for another erase function.
spi_simple_write_cmd failed during command execution
Reading current flash chip contents… done. Looking for another erase function.
Looking for another erase function.
Looking for another erase function.
No usable erase functions left.
FAILED!
Uh oh. Erase/write failed. Checking if anything has changed.
Reading current flash chip contents… done.
Apparently at least some data has changed.
Your flash chip is in an unknown state.
Get help on IRC at chat.freenode.net (channel #flashrom) or
mail [email protected] with the subject “FAILED: “!
——————————————————————————-
DO NOT REBOOT OR POWEROFF!
So I’m keeping this PC running. However I wish to receive some sort of solution for this. I feel unsafe rebooting my system.
Thank you all in advance
Jim G. says
Hi. @Mihaly
You’re welcome. Hopefully it did read the backup.bin properly anyway. Looks like you are going to need it.
Honestly I don’t know what to do to porperly fix that, and I don’t want to give bad advice. How about waiting a few days and see if @Paulie or anyone else has some better ideas. It is possible flashrom was trying to write to areas of the chip where it cannot. I don’t know for sure, I’m no expert with BIOS programming.
If no one responds for some time and if it were my machine: you can try this at your own risk, if you want.
First, you need to definitely make sure you are using the right chip with flashrom, and the FDO jumper needs to stay on the whole time for any reads or writes with flashrom. It sounds like you have a winbond chip since W25Q128.V read ok.
Still, you definitely want to verify the chip type on the mainboard itself. You may need to use a flashlight or phone light to be able to read the chip info. Take a look at the small chip to the right of the battery that is just above the first white PCI slot and below the PAR header. Or, it might be the chip above the sata ports. I can’t tell very well from this picture.
You can always google your part info once you find it, verify it lines up with the W25Q128.V type that flashrom reported before. If not, you might need to use something else for that with flashrom.
Once you verify what kind of chip you have for flashrom: I would try writing the backup.bin back to the chip, in the same way you are trying to write the nvme.bin to the chip.
My guess is that this should work, provided you are using the right flash chip type with flashrom.
IF the backup.bin writes ok without errors, then we know it is a problem with how the NVMe dxe was inserted into the chip.
The other thing I’d look at is maybe re-flashing the chip inside of windows, but this would require you to have a HDD already connected to the machine. If there is not, then this will not work without a power down
Last possibility is maybe use another machine to make a flash usb stick inside of windows for your HP 8300, and just reboot and use that to fix it. The reboot is also a risk, but I have no other ideas.
There should be some way to get flashrom to fix this using the backup. If no one else responds, your best bet probably is to start with that.
Mihály says
@Jim G.
Well this is embarrassing, but my BIOS wasn’t the latest (3.08) version.
I have updated it, but it failed (even though the HPQFlash reported that it was successful).
Just so others can learn from my mistake,
if you have 2.xx (other than 2.99) version BIOS on your machine, it won’t let you upgrade directly to 3.08, I first had to get 2.99, then 3.02, then 3.08.
After upgrading, everything went ok. Flashrom correctly indentified my chip, which was infact a Winbond W25Q128.V. I modified the .bin file and wrote it to the chip no problem.
My machine now succesfully boots from my Kingston A2000 NVMe SSD (500 GB)!
Thank you Paulie for the detailed article and thank you Jim for helping me out.
Mitchell says
Hey @flywire and @Jim G
found this from libreBoot
https://libreboot.org/docs/hardware/hp8200sff.html
it is doable and is tested on the chips listed….(8200&6200)
I’m still keen to try this out on the 6200 using @Paulie’s method
but I’ll have to do the update’s first going by what @Mihály has posted
Paulie says
Ooohh, that’s very interesting – I will check that out for sure
jebo says
Trying to do this on my elite 8300 ultra slim desktop. Get the following error when trying to boot into system rescue. Getting the following error: failed to find /sbin/init on any block device, cannot continue sh: can’t access tty; job control turned off
any idea?
Jim G. says
@jebo
I don’t recall if booting in legacy mode makes a diff or not, may want to check that first.
How did you make your system rescue usb flash drive?
Maybe the format is the problem? Mine is a Fat32 drive. I think I made it with rufus. Something like passmark image usb (free), rawrite, or dd image should also work. Or try another disk.
jebo says
@Jim G
used rufus as well, tryed a second flash drive that I created with balena etcher on a mac, same problem. bios is in legacy mode.. I’ll try it again and format the drive in fat32
antero_h__ says
Thank you for this fabulous guide! Following a recent eBay purchase of an 8300 SFF for €61.10 (w/postage) and figuring out how to fit two 3.5″ drives in it I ended on path to install a “spare” NVMe m.2 for OS using 1x adapter – only to discover that accomplishing boot was to be non-trivial. This guide made the process simple enough that there is now boot to OS!
As a personally new experience I used the following guide https://blog.fpmurphy.com/2017/10/installing-and-configuring-udk2017-on-fedora-26.html for compiling a UDK2017 (https://github.com/tianocore/edk2/tree/vUDK2017 but with BaseTools/Source/C/Makefiles/header.makefile patched with -Wno-error=stringop-truncation additional flag in BUILD_CFLAGS) NvmExpressDxe.efi driver on Ubuntu 22.04 (Getting Python 2.7 posed some challenges) and then wrapped it into the corresponding .ffs module using the UDK2017 GenSec and GenFfs tools, approximating steps outlined in the following README: https://github.com/pbatard/ffs#creating-a-driver-uefi-firmware-module . The resulting .ffs file was considerably bigger and had some other apparent differences from the NvmExpressDxe_Small.ffs file linked in this post, but using an Ubuntu 22.04 live USB + uefitool and flashrom, both from the universe repo, it still fit a copy of the BIOS backup binary and subsequent flashing resulted in the system booting to the m.2 drive OS.
Othello C says
I have three HP 8300 I did this mod on. Thanks!
It should be noted that the commands shown in the guide worked as expected on two machines, but it seems one of my 8300 SFF’s actually had a Winbond W25Q128.V instead of the expected MT25QL128. However, everything worked once I specified the proper chip.
Alex says
Thank you for your guide! Worked as a charm on my HP SFF 6300. The only problem is with the reboot – the machine has 3 HDD+nvme drive. When i try to reboot the Ubuntu, booting doent start. If i turn the power off, then on – HP boots normally. Does anyone have such a problem?
Jim G. says
@Alex I don’t know about Linux, but I have seen this with windows, because the nvme wasn’t booted as the only disk in the system. After windows is booted once with just the nvme and shut down properly, it works fine with the other disks added back in. Windows boot manager at the top of the uefi boot order.
Try this. If it doesn’t work maybe you need a boot loader or some kind of boot configuration change in Ubuntu, which someone else might know more about.
Eason says
BIOS region SMM protection is enabled.
I am getting this error , Please help me. I am searching for fix about 1 day done
Alex says
I had the dame problem. Using a correct jumper instead of pin helped me and everything wrnt smoothly
Eason says
PCIe Card HP Turbo Z G2
I tried all things and it successfully installed but drive is not showing on disk management .I am using same nvme but this card I mentioned upper.Please let me know it works or not.
Eason says
My process is i5 3rd generation
Eason says
Also tell me how to know that pc now supports nvme, So I can understand the problem if is in the pcie card or in pc
Paulie says
If it doesn’t show up in disk manager then the system isn’t seeing it at all.
Eason says
Please tell me solution for it
Eason says
I got error after running this command.
No DMI table found
My output:
[root@sysrescue ~]# flashrom -p internal -c MT25QL128 -r /mnt/usb/backup.bin
flashrom v1.2 on Linux 6.1.53-1-lts (x86_64)
flashrom is free software, get the source code at https://flashrom.org
Using clock_gettime for delay loops (clk_id: 1, resolution: 1ns).
No DMI table found.
Found chipset “Intel Q77”.
This chipset is marked as untested. If you are using an up-to-date version
of flashrom *and* were (not) able to successfully update your firmware with it,
then please email a report to [email protected] including a verbose (-V) log.
Thank you!
Enabling flash write… The Flash Descriptor Override Strap-Pin is set. Restrictions implied by
the Master Section of the flash descriptor are NOT in effect. Please note
that Protected Range (PR) restrictions still apply.
OK.
Found Micron flash chip “MT25QL128” (16384 kB, SPI) mapped at physical address 0x00000000ff000000.
===
This flash part has status UNTESTED for operations: PROBE READ ERASE WRITE
The test status of this chip may have been updated in the latest development
version of flashrom. If you are running the latest development version,
please email a report to [email protected] if any of the above operations
work correctly for you with this flash chip. Please include the flashrom log
file for all operations you tested (see the man page for details), and mention
which mainboard or programmer you tested in the subject line.
Thanks for your help!
Reading flash… done.
Jim G. says
@Eason what is the make and model of the nvme drive? What form factor is your 8300?
The drive should show up in disk manager, even without the mod. This sounds like a hardware problem.
Rados?aw Staniszewski says
Hello
Is it possible to change speed of first slot PCie x4 to x 16, or maybe switch this two?
If use a graphic card in slot Pcie x16 for GPU ther is no place for M2 adapter at 8300 elite.
JeffreyJames j halvorson says
this process did not work on windows 7 because rufus did not7, and systemrestore did not seem to have a download link anywhere and it looked like a project website , there is simply got to be an easier way to update the bios for hp 8300 elite.
Paulie says
It wouldn’t work on Windows 7 anyway as it does not support NVMe
JeffreyJames j halvorson says
i am able to use the nvme as a second storage hard drive in win 7 , i just cant boot from it ,
Paulie says
That’s because windows 7 does not support booting from NVMe. It doesn’t matter if you have successfully modified the BIOS. You also need to use a supported operating system.
Jim G. says
Someone else was trying to do Win 7 with NVMe boot in one of the other posts, I think it was the 800 G1.
I don’t think Win 7 works either since there is no native NVMe support, but that person trying it shared this article:
https://www.ubackup.com/windows-7/install-windows-7-to-nvme-4348.html
Though the screen shot for method 2 is wrong, that’s not inside the windows installer. One would need to do method 2 and method 3 as steps, that is, if this would even work.
Win 7 doesn’t have NVMe drivers. Maybe it might work if the NVMe drivers are either: properly loaded into the Windows installer image or loaded inside the Windows OS first for a disk clone. Either way, Win 7 is out of scope of the article.
I would just go with Windows 10. Win 7 OS hasn’t gotten security updates in a few years now. It’s unsafe to use online for any reason. I don’t get why people want to use an insecure OS in todays times, unless they are using it for a CNC machine controller or something like that in an offline state.
Windows 10 might still be a free upgrade from 7, if not you can search for things like hwidgen so you can get the Win 10 upgrade done correctly based on your hardware.
Jim G. says
@Paulie @Mitchell
So I played around with the HP 6200 Pro again a bit recently.
Trying to figure out some way to skip the need for a USB Clover disk to boot the machine with an NVMe.
I need more time in a day to read and research things. 🙁
Possible option?
Install clover to SATA drive as a bootloader, and then force it to boot NVMe from there. Is this possible?
I’m assuming this can be done similar to how LILO could dual boot windows and linux
Intel tools from 800 G1 post and FDO jumper enabled result in this:
Error 201: [FPTw64.exe] cannot be run on the current platform. Please contact your vendor.
Also getting problems with SPI being locked using flashrom with system rescue cd from the 8300 post.
Found this, I think THIS is the missing piece to it all:
https://winraid.level1techs.com/t/guide-unlock-intel-flash-descriptor-read-write-access-permissions-for-spi-servicing/32449/1
A quick look and many ICs on the mainboard are really small. I have no magnifying glass. I have no clue how small the audio chip is for this machine or the location for it. This will take time.
Any input on this? Maybe I need some proper IC probes to attempt this? Suggestions? Even a small and thin paperclip is probably too big to short the pins like they are talking about. And quite a risk to damage the audio chip as well.
Interestingly the Libreboot has no fan speed control for the 6200/8200. I have noticed my fan DOES speed up at times while the pc is under load, so this is a big enough issue for me to not to go this route (unless it can be made to boot windows, like clover). No parallel port support yet either, but not really an issue for most.
Assiming this pin jumper enabling works, in theory it seems the 800 G1 method could be used to update the 6200, provided the flashrom type for the 6200 is known. Is there a way to probe or autodetect what kind of flashrom a mainboard has with windows or linux?
Thanks.
Paulie says
The tools won’t work on an 8200, you need an earlier version that matches the chipset.
Gobban says
I can’t seem to get this to work, I follow all the steps with no error. But when I reboot my pc windows won’t boot, and my pc is trying to “auto repair” without success.
My ssd does show up in bios under boot order though. But I cannot boot my pc from either HDD or nvme ssd
Jim G. says
@Gobban
The NVMe drive is never going to show up in the bios, so I assume you are talking about a SATA SSD showing up there.
What operating system were you using on the original SATA drive?
If your original SATA drive was Windows 7 or formatted MBR, this will not work. You need UEFI and GPT partition to boot an NVMe drive. You cannot use Legacy BIOS and MBR partitioning. My guess is you have an MBR formatted hard disk.
With the PCIe NVMe drive + the original SATA SSD or HDD installed: you need to boot from your SATA drive at least once to Windows 10, so windows sets up the drivers accordingly for the NVMe. Once this is done, you should be able to clone the disk over and boot from the NVMe, provided it is formatted GPT.
Jim G. says
Hi All.
Some of my posts are awaiting moderation
Do NOT try to do this with the 6200 using the Win ME tools and flashrom. Using the right v2 ME tools for this machine, eventually the BIOS did read in and I added the NVMe DXE changes and saved a new bin file, but the problem is writing that updated bin file back to the BIOS.
Using the right bios chip type W25Q64.V and with the FDO pin jumpered for writing: the problem is flashrom cannot unlock the SPI and other areas it needs access to for writing the new bios, and so the bios gets corrupted when writing it back. My machine powers on and does nothing but spin the fans high, so don’t try this method. It renders your machine inoperable.
Hopefully this bios chip is only 8 pins. Looks like I will have to go the SOIC route to repair this one (if I even can), or get another board.
If you have a 6200 or 8200, use the clover stuff I mentioned above in an earlier post. I did manage to get the 6200 to boot an NVMe using clover from a sata hdd (so no clover USB stick is needed now). But it does require EasyUEFI to modify the 100mb windows system partition, where the uEFI boot information is located. And it needs the NVMe DXE file you would use to make the bios changes listed in the article. The DXE gets added to the clover drivers folder.
Diego says
Hola Paulie, te felicito muchas gracias por compartir esta actualizacion para PC viejas pero poderosas eres un campeon, me gustaria saber si esto mismo lo puedo implementar en una Board Intel® DZ77GA-70K o si hay que cambiar algunos datos, me gustaria revivir a mi viejita le puse un m2 con adaptador y con arranque modificado eFi y es lo mismo que tener un SSD sata, espero tu respuesta gracias
Scott says
I second what others have said about “L” being missing from the “MT25QL128” in the walk through above if you copy and paste it. Couldn’t figure it out for couple hours but some one else said it and I realized what I was missing.
Maghsood says
In one of my Desktop pc, the chip is 25q128bvfg and the command does not detect it if i specify it, removing “-c xxxxxx(chip part number)” helps the command itself detect it , it detects
`ound Winbond flash chip “W25Q128.V” (16384 kB, SPI) `
so we can use W25Q128.V , at least for reading it is not necessary, but to write since it was risky i did not test without specifying, but it worked for me as below:
flashrom -p internal -c W25Q128.V -w /mnt/usb/backup_nvme.bin
Jim G. says
Googling 25q128bvfg should have gotten you the answer needed that it is a winbond chip compatible with the line you used.
I always Google first if I don’t know something, before I do something like this.
You could also Google flashrom list of supported eeprom chips too. And one of the flashrom switches also will show this list.
Jim G. says
@Paulie I have a question.
Take a look at this chip listing:
10pieces W25Q128BVFIG 25Q128BVFG Genuine Winbond SOP-16
https://www.ebay.com/itm/186310936086
Say the this flash chip model numbers match the chips for an 8300 (or whatever is needed for other PCs) is it possible to simply piggyback and maybe flash two chips? if the connections are all the same, the flashrom should be able to flash the pair? right? or I guess one could flash a ‘loose one’ with the SOIC16 you had from earlier?
I am wondering if using one of these kind of chips ‘properly programmed’, could resurrect a bad flash by simply piggybacking it: just laying it on top of the bad one, and then try to get the system to post. As long as all the pins are properly lined up, I would think this might work? Your thoughts?
Paulie says
I think it would work (and it wouldn’t need to be the exact same model). Or you could desolder the original chip.
Jim G. says
Thanks @Paulie. I may try this later out of curiousity.
Jim G. says
@Paulie
Did the mod on two HP 8300 CMTs recently, forgot to take a flashrom backup of the second machine. Both now have the same modded nvme bios, but both also have the same UUID, MAC address and serial number. 🙁
UEFITool can find the UUID, but I cannot get the app to go to the location where it is at to change it.
Tried HP tools too and no luck, it goes through the motions properly, but does not save the changes, this is with FDO jumpered and not jumpered too, it makes no difference.
https://ftp.ext.hp.com/pub/caps-softpaq/cmit/HP_BCU.html
Any ideas how update these things? Everything I find online says it has to be redone at an HP service center. There has to be some kind of bios editing tool out there to fix this.
MAC address is the biggest issue- since we can’t have two same MAC addresses on the same local network.
Thanks.
tim says
thanks man, also got the Winbond flash chip “W25Q128.V”
Got it working, this adds a lot of value to the system, sadly if you use a GPU it will take the 3.0 slot, the nvme will top at pcie 2.0 speeds of 1500mb, anyway its another drive bay and x3 bump compared to SATA ssd.
Downside is that pci adaptors that will go in the x4 slot restict airflow of the LP gpus
Jim G. says
Hi. Have any of you had any problems switching the 8300 machines from RAID to AHCI mode, before OR after making this mod?
I seem to have found a flaw in the BIOS. My true image software was not booting after a successful flash. The machine was in raid mode. I flipped it to AHCI, it tried to boot once and just a black screen. Power off and back on, and now- nothing, fans spin high similar to a bad bios flash.
This is with the CMT version I am seeing this, twice within last 2 weeks. Really strange.
That said, it is probably best to clone drives within windows, or just do a fresh install after the mod is completed. Something is definitely bad with the BIOS, that a simple switch of disk controller modes renders the machine inoperable.
https://h30434.www3.hp.com/t5/Desktop-Boot-and-Lockup/HP-8300-SFF-no-POST-after-restart-fan-speed-up/td-p/7006069
Jim G. says
Can someone clear their bios and let me know what the defaults are? I am pretty sure these default to raid, just want to be sure, as going forward, I will not switch modes anymore. I will clone some other way.
I don’t think this flaw I encountered is specific to the mod, though I am curious if any of you have encountered this. Really bad of HP to allow this kind of thing to happen to their machines. It was on the latest 3.08 bios, which may of you probably are using. So beware of this issue…
Juande says
Many thanks for your great work!!, works like a charm in a Compaq Pro 6300 MT. I changed the nvme disk of my laptop for a new one and plug in the old nvme in the PCIe card, a few minutes to update devices while is booting and Windows 11 working with TPM chip 1.2 😉
Roman says
Thank you! I was able to enable boot from NVMe on my hp compaq elite 8300 (https://support.hp.com/us-en/drivers/hp-compaq-elite-8300-convertible-minitower-pc/model/5232850?sku=B0F36EA)
I also met the “invalid data checksum” warning but when I tried to load the non-modified bios v3.08 to the UEFI tool 0.28 — it showed the same errors. So I deciced to proceed and flash the image with checksum warnings. Everything is working, machine is not bricked.
UEFI Tool 0.28 is the only version which allows to rebuild images, so do not try to use newer versions.
My BIOS version was 2.05, so I had to upgrade to 2.99 first and then 2.99 -> 3.08.
When I tried to flash 3.08 on top of 2.05 from Win7x64 I did not get any warning in GUI, but the .log file had a failure record.
HPQflash windows tool from HP which comes with bios 2.99 does not work in Win7x64, complaining about “WMI support”. I had to replace it with HPQflash from the 3.08 package and it worked.
Jim G. says
@Roman
Sounds like you have the CMT tower, right?
Can you or @Paulie or someone who is willing, do me a favor:
1. Tell me the ME version that your machine has.
2. try flipping from RAID to ACHI, boot off a UEFI USB drive some tool like sys rescue cd or something else…
3. flip back to RAID and try boot UEFI USB again?
I honestly am starting to wonder if that checksum error actually IS a problem. Either that or the latest ME firmware is? Not sure.
Doing steps 2 and 3 above after a proper flash with the mod, I have inadvertently killed two HP 8300 CMT towers and 1 SFF recently. All just trying to revert back to ahci to boot a trueimage usb disk, and the problem is NOT the usb disk, because it works fine in other machines.
I posted a link awhile back about the problem too… it does look like this HP 8300 BIOS does have a problem or two in it. And not mod related:
https://h30434.www3.hp.com/t5/Desktop-Boot-and-Lockup/HP-8300-SFF-no-POST-after-restart-fan-speed-up/td-p/7006069
As for flashing, maybe right click an run as admin? I always do with those bios installers. I think I did all my flashing in Win 10, I don’t remember. I go from 7 to Win 10 immediately with new machines, simply because of all the security probs now with 7.
If you go to the 3.08 download page it has a section for prerequisite or other related files- the 2.99 bios IS in there and the instructions do say to install it before going to 3.08.
On a couple of these I actually went from default 2.05 it came with, to 2.57 > 2.90 > 2.99 > 2017 ME Firmware update > 3.08 but it probably was not necessary. Sometimes I wonder if 2.99 is truly inclusive of ALL the previous versions, because none of these include the ME firmware for sure. And we do have to have the AMT drivers loaded in windows to actually update the ME firmware. Took me a day to figure that one out. Just odd that a driver is needed to do that one, because you don’t need drivers to update the BIOS…
Roman says
@Jim G.
> Sounds like you have the CMT tower, right?
yes
> Doing steps 2 and 3 above after a proper flash with the mod, I have inadvertently killed two HP 8300 CMT towers and 1 SFF recently.
Sorry, but no 🙂 I can’t afford to brick the machine now.
Jim G. says
Hi all. Can anyone out there help me to find the right CH341a clip for reprogramming the 8300? I think my problem with CH341a is that I don’t have the right kind of clamp. And I have looked everyone online that I know of.
I have tried an 8 pin to 16 pin clip but the cable wires do not line up to the right pins! This apparently is why I have never been able to flash with CH341a!!!
I need something to match this:
IDC 8 Cable from CH341a to 16pin BIOS clamp
CH341a side HP 8300 BIOS (Winbond, etc) side
DIP 8 SOP 16
1 /CS 7 /CS
8 VCC 3.3v 2 VCC
2 DO (IO-1) 8 DO (IO-1)
7 /HOLD (IO-3) 1 /HOLD (IO-3)
3 /WP (IO-2) 9 /WP (IO-2)
6 CLK 16 CLK
4 GND 10 GND
5 DI (IO-0) 15 DI (IO-0)
@Paulie can you send a link to the cable you bought for this? It is a real trick to find the right one.
Thanks all.
Jim G. says
hmmm I hope these work These should mate up with the DIP 8 board for the CH341a. Going to try these unless someone else has some other suggestions???
https://www.amazon.com/dp/B07ZCZPWHL?psc=1&ref=ppx_yo2ov_dt_b_product_details
https://www.amazon.com/dp/B0B1ZWDQLP?psc=1&ref=ppx_yo2ov_dt_b_product_details
Paulie says
I just use DuPont wires now with little mini grabbers – easier but not as convenient
Jim G. says
Paulie do you have a link for the mini grabbers?
Mark says
Interesting to read this , so I have part investigated the process on my HP Compaq Pro 6300 SFF
Intel© Core™ i3-3220 CPU @ 3.30GHz × 2
BIOS: K01 v03.08 Release Date: 04/10/2019
Motherboard : 339A
I’m running Linux Mint 21.3 and using it as my main PC using a SATA SSD. I’m planning to install a second disk for testing purposes, so want a bootable second SSD. If I run either of the commands below, I’m able to read OK . The “bin” hashes match if I compare them . UEFITool is able to view them .
sudo flashrom -p internal -c MX25L12835F/MX25L12845E/MX25L12865E -r mybios.bin
sudo flashrom -p internal -c MX25L12805D -r mybios1.bin
Although I’m confused by the multiple flash chip definitions when I ran “flashrom -p internal”.
As this is my main PC and I have no external clip on programmer should I “brick” the BIOS, I’ve decided to just buy another regular SATA SSD for now. This was a preliminary investigation , so I’ve yet to buy a NVMe SSD and adapter .
I leave this Terminal dump just in case it’s of use to others.
sudo flashrom -p internal
flashrom v1.2 on Linux 5.15.0-119-generic (x86_64)
flashrom is free software, get the source code at https://flashrom.org
Using clock_gettime for delay loops (clk_id: 1, resolution: 1ns).
No DMI table found.
Found chipset “Intel Q75”.
Enabling flash write… The Flash Descriptor Override Strap-Pin is set. Restrictions implied by
the Master Section of the flash descriptor are NOT in effect. Please note
that Protected Range (PR) restrictions still apply.
OK.
Found Macronix flash chip “MX25L12805D” (16384 kB, SPI) mapped at physical address 0x00000000ff000000.
Found Macronix flash chip “MX25L12835F/MX25L12845E/MX25L12865E” (16384 kB, SPI) mapped at physical address 0x00000000ff000000.
Error accessing MT25QL02G, 0x10000000 bytes at 0x00000000f0000000
/dev/mem mmap failed: Operation not permitted
Could not map flash chip MT25QL02G at 0x00000000f0000000.
Error accessing MT25QU02G, 0x10000000 bytes at 0x00000000f0000000
/dev/mem mmap failed: Operation not permitted
Could not map flash chip MT25QU02G at 0x00000000f0000000.
Multiple flash chip definitions match the detected chip(s): “MX25L12805D”, “MX25L12835F/MX25L12845E/MX25L12865E”
Please specify which chip definition to use with the -c option.
Jim G. says
Hi @Mark
Take a look at the physical BIOS chip itself as shown in the pictures here. Use the markings on the chip, these machines have at least 3-4 different BIOS MFRs that HP used. I have seen mostly one winbond and 1 macronix as well.
Also, be advised the i3 3220 is only PCIe 2.0, which means you will top out at 1600MB/sec and not the 3200 or so you see in the article.
https://www.intel.com/content/www/us/en/products/sku/65693/intel-core-i33220-processor-3m-cache-3-30-ghz/specifications.html
You need an i5 3470 or better CPU to get the results Paulie has posted.
Still, this will make a nice upgrade over regular SATA drives.
Mark says
Hi @ Jim G.
Thanks for the additional information .
I have had a look inside the case and located the BIOS chip next to the DIMM slots. In my case it reads MX25L12835E
flashrom -p internal -c MX25L12835E -r mybioschip.bin
Which gives
Error: Unknown chip ‘MX25L12835E’ specified.
I also get this if I individually specify MX25L12835F rather than
MX25L12835F/MX25L12845E/MX25L12865E
The “No DMI table found” ,which I get with a successful read, is also a concern .
Maybe it would work if I gave it a go but as it’s my main PC for now, it’s not worth the risk in my particular case.
Thanks again.
Jim G. says
@Mark
Sure thing. I am wondering maybe it is the version of sysrescuecd and the flashrom you are using. I went to either v10 or v11 whatever it was of sysrescuecd and had nothing but problems. Go back to 9.05 I think is what the article was written for.
That one worked for me.
I think one of my CMTs has the macronix, I will try to look some time when I can.
The other option is to make a UEFI clover usb stick and just use it to boot the NVMe instead of this mod, basically that one is universal for UEFI machines. The only thing it needs is the dxe file that is in this article. It has to be added somewhere in the EFI structure for drivers.
Jim G. says
Mark, one more thing. You may need to pull up the flashrom switch that shows all thesupported flashroms and match their lingo with what is on your chip. Sone of the modules are not an alphanumeric match in flashrom. I think there’s a website that may have a list too.
Jim G. says
@Mark. Found this, it worked for my 8300 CMT that has the Macronix chip:
Gio says
JUNE 2, 2023 AT 5:59 PM
Hi,
Great guide. 100% success
Only 1 note; read and write commands:
“flashrom -p internal -c MT25QL128 -r /mnt/usb/backup.bin” were throwing the “No EEPROM/flash device found ” message.
it is because not all chips are called the same..
you need to identify what chip you actually have in order to make the backup and then modifications.. To show what chip you have; use:
“flashrom -p internal:boardenable=force”
“Found Macronix flash chip “MX25L12805D” (16384 kB, SPI) mapped at physical address 0x00000000ff000000.”
now just use replace as needed. in my case the chipset was MX25L12805D so I needed to run:
“flashrom -p internal -c MX25L12805D -r /mnt/usb/backup.bin”
maybe this may help also
https://wiki.flashrom.org/Supported_hardware
Mark says
@Jim G. See the Terminal results with the command referenced .
It reports finding “MX25L12805D” and “MX25L12835F/MX25L12845E/MX25L12865E” .
Maybe it shows two chips, when in realty Flashrom gets a response when probing with two separate commands. Looking a the list of supported chips on the website , these are two consecutive entries of the MX25L128 supported chips. The one inside my machine is, as written on the chip itself ” MX25L12835E1M – 10G”. The chip before the slightly improved F suffix version, after some more searching.
https://www.mxic.com.tw/Lists/ApplicationNote/Attachments/2028/AN0592V4-The%20Comparison%20of%20MX25L12835E_36E_45E%20and%20MX25L12835F_33F(JUL10).pdf
Probably close enough to work, but this is my only PC at home. Not having an external programmer setup and the exact version not being listed as being supported makes me cautious . If it were a spare I were tinkering around with then fine, but caution I feel is sensible in this instance, in my case . Thanks again.
sudo flashrom -p internal:boardenable=force
flashrom v1.2 on Linux 5.15.0-119-generic (x86_64)
flashrom is free software, get the source code at https://flashrom.org
Using clock_gettime for delay loops (clk_id: 1, resolution: 1ns).
No DMI table found.
Found chipset “Intel Q75”.
Enabling flash write… The Flash Descriptor Override Strap-Pin is set. Restrictions implied by
the Master Section of the flash descriptor are NOT in effect. Please note
that Protected Range (PR) restrictions still apply.
OK.
Found Macronix flash chip “MX25L12805D” (16384 kB, SPI) mapped at physical address 0x00000000ff000000.
Found Macronix flash chip “MX25L12835F/MX25L12845E/MX25L12865E” (16384 kB, SPI) mapped at physical address 0x00000000ff000000.
Error accessing MT25QL02G, 0x10000000 bytes at 0x00000000f0000000
/dev/mem mmap failed: Operation not permitted
Could not map flash chip MT25QL02G at 0x00000000f0000000.
Error accessing MT25QU02G, 0x10000000 bytes at 0x00000000f0000000
/dev/mem mmap failed: Operation not permitted
Could not map flash chip MT25QU02G at 0x00000000f0000000.
Multiple flash chip definitions match the detected chip(s): “MX25L12805D”, “MX25L12835F/MX25L12845E/MX25L12865E”
Please specify which chip definition to use with the -c option.
Mark says
@Jim G.
Thanks for the information. I did reply , but it must have been moderated out. In short though, thanks for the assistance. My chip MX25L12835E isn’t listed as being directly supported on the Flashrom web page. This may be covered by MX25L12835F, which is. However, for me , without greater certainty and a separate programmer , it’s not worth the risk personally. I’m sure the information will be useful to others.
Jim G. says
@Paulie two things:
1. I just noticed something, that the insertion points of the dxe are very different between the 8300 and the 800G1
Can you explain more how you determined where they are located, and why they are so different? I am wondering if this has something to do with the problems I had flipping between RAID and AHCI to boot cloning software…
8300:
Scroll to the bottom of this section until the final DXE driver, which should be HpDigitalSignatureVerification.
800 G1:
Next, right click on item with the name CspLibDxe (CD8462C-6864-40A3-A081-C8D35E82B920) and choose Insert After.
2. In prepping to fix my bricked 8300 CMT machines with a CH341a:
I finally got my programmer working to read in the 6200, it successfully read it in 4 times with 4 identical checksums…
Do you think you could help figure out what the correct dxe insertion point is for that one? I’d be happy to send you the bios file and test any changes you come up with.
The problem I ran into before with the 6200 was a flashrom incompatibility, so CH341a is only way, provided the dxe can be inserted in the right spot. Else I will keep using Clover for that one…
Good thing the 6200 bios is only 8 pins, the clips work really well for that one. I’m impressed this one actually read and verified so well.
Jim G. says
Also, for everyone else: I did find a handy way to check the checksum of your bios reads within windows, and you can do this even for the files you are bringing in with via the linux flashrom tool for your 8300, or with the Intel ME tool for the 800 G1, etc:
For the 8300: you’d have to flip the files over to a windows pc or reboot into windows to do this prior to re-flashing:
https://www.geeksforgeeks.org/verify-checksum-of-a-file-in-windows/
powershell
go to file path you want the checksum for
SHA 256 default
Get-FileHash bios file
MD5
Get-FileHash HP6200SFF-test1-new-programmer -Algorithm MD5
SHA1
Get-FileHash HP6200SFF-test1-new-programmer -Algorithm SHA1
Example output:
Algorithm Hash Path
——— —- —-
SHA256 CC46191BB787DA2A64C52342C676606AD05C387FA0821A91AFAFF359055C8855 D:\Downloads\HP 8300 CMT\NVMe…
Jim G. says
Hi @Paulie
Sorry for so many posts.
As for #2, I am happy to say I just got NVMe boot to work for the 6200. Though I am concerned a little about the dxe entry point.
The 6200 BIOS came up just fine and the NVMe booted directly from the BIOS to Win 11, no Clover USB.
But the only way to do this one, is with the CH341a because flashrom doesn’t work right for the Winbond 25Q64CV chip.
For the UEFI tool:
The first AppleFSO name is different for the 6200
7A9354D9-0468-444A-81CE-0BF617D890DF
but the insertion point I used is exactly the same as the 800 G1
CD84562C-6864-40A3-A081-C8D35E82B920 CspLibDxe
Any thoughts on this? Think this should be fine?
Thanks for all your help and ideas, amazing how the programmer finally did something right. 😀
Jim G. says
Hi @Paulie
What software did you use to clone your drive over? Did you clone the inside windows?
Can you take a look some time and try to boot a legacy usb boot disk? Myself and some others have found that this NVMe mod seems to kill all legacy boot support on the 8300.
In part, I think that had part to do with what happened with 2 of my 8300 CMT machines + the SFF.
I’m glad to say the CH341a has recently brought them all back to life, so thanks for that earlier post. It indeed does work (turns out my programmer was bad, got a new one + made a wiring harness to convert from 16pin to the 8pin dip board, and all worked great with the clamp after that. amazing!)
——————–
I’m posting this so others are aware that this problem can happen, and to be super extremely careful when cloning.
Here’s what happened:
—–
What did not work initially:
-I could not get true image USB drive to boot after this mod is done. The True Image USB stick is boots to either legacy or UEFI depending on the BIOS mode of the PC. This did not work period, first time this has ever happened. I have used it with all kinds of BIOS and UEFI systems, without issue, the Modded 8300 does not like it. But pre mod, this stick DOES work in both legacy AND UEFI modes.
-any other legacy bios usb boot sticks like E2B, etc will not boot either
What did work, after re-flash and some tinkering:
-Acronis True Image Windows RE media, that was forced to UEFI via rufus and it includes the needed Intel RAID drivers, so the clone was successful that way to clone Win 11 Raid install from SATA ssd to NVMe ssd.
—–
What I did:
CH341a works:
Got my CH341a programmer to work and fixed a couple of them that died. (Turns out I needed to get the 16 pin to 8 pin converter board to work, had a bad converter board + bad programmer, and also came up with conversion ‘wire harness’ to take the 16 pin clip to 8 pin board.)
Sure enough, erasing the EEPROM and reflashing it with the previously saved flashrom bin did work!
The 8300 CMTs apparently default to RAID, while My 8300 SFF defaults to AHCI. I say this because the chips were blank after CH341a repogramming, I do not think it saves the user settings in the bin files via flashrom, but just something to be aware of prior to cloning.
But then I manged to duplicate the problem, a second time:
After reflashing:
Connected SATA HDD, the previous Win 11 install on it is working fine in RAID mode. This install was made before the bios died originally (I wanted it in RAID anyway, as I plan to add a couple of raid drives to the CMT when all is done). The reflash contains your ‘working’ 8300 NVMe mod.
Shut down, installed NVMe into the PCIe slot, and boot into windows from SATA HDD so drivers are loaded for the NVMe.
—–
Here is where part of the problem is:
Then cloned the SATA drive over to NVMe within windows using MiniTool Partition wizard inside of Win 11
(this minitool clone is not working right for some reason, it is not setting up the partitions to boot correctly, which is why I asked what you did)
Reboot with both the SATA drive and the NVMe hooked up- it will not boot the NVMe (and it should, it works fine this way with the SFF), it just boots to the SATA SSD.
So I shut down and reboot with just the NVMe in the system
1. inaccessible boot device while in RAID mode
2. Flip bios to AHCI
boot NVMe, Inaccessible boot device
reboot, Inaccessible boot device again
(So definitely the minitool clone did not work, switching raid modes proved that out, because that mode doesn’t matter once NVMe drivers are loaded)
shut down
pull NVMe
install a blank SATA SSD
Started a clean install win 11, booting from the USB flash drive
first phase completes
reboot
system runs fans high again and is stuck
Something about this bios, it does freeze up after two inaccessible boot device in a row from NVMe. Something is throwing it off to where it is not booting off NVMe at all.
End result dead machine:
After the two inaccessible boot device, the fans just run high and the machine is dead.
The only way to revive it is to wipe the bios and reflash it with the programmer.
If one looks at the bios settings on something like a newer HP G9 or Dell Insprion 3880, there’s something about error levels when windows boots. I think what is happening is Windows is trying to throw something like that in the BIOS, which renders the 8300 dead.
—–
reflash second time and reinstall works:
powered down, remove battery, and reflashed with CH341a, a second time…
Got the system to book correctly again, and did a clean install of Win 11 on a SATA SSD.
This time I created the True Image Windows PE media and rufus created the ISO as a UEFI boot, and success, got the machine to clone.
End result: problems noted with legacy boot + inaccessible boot device problems
The 8300 SFF and CMT don’t seem to be too happy with this mod for legacy boot mode of anything, and I guess it really matters what cloning software is used and how it is done.
For the others reading, please be aware the Minitool Parititon Wizard clone did not work for me, but TrueImage does. IDK what free software is out there that works.
Going forward I am just going to do clean installs of Win 11 or whatever OS directly to the NVMe, since cloning can throw these kind of problems.
onoffre says
Muchas gracias.
Acabo de actualizar mi hp8300 con un disco nvme + tarjeta pci.
Tenia miego, pero siguiendo las instrucciones todo ha ido como la seda.
Eres un crack.
Jim G. says
Hi Mark
I checked my 8300 CMT with Macronix BIOS chip the other day, it has an MXIC logo and model: MX25L12805EMI-10G
These commands from Gio I posted earlier did work with it
“flashrom -p internal -c MX25L12805D -r /mnt/usb/backup.bin”
“flashrom -p internal -c MX25L12805D -w /mnt/usb/backup.bin”
Check your chip again, I bet we do have the same markings.
to confirm try this
flashrom –programmer internal -c MX25L12805D
IF flashrom detects your chip using this line, it should work
https://www.systutorials.com/docs/linux/man/8-flashrom/
-c, –chip
Probe only for the specified flash ROM chip. This option takes the chip name as
printed by flashrom -L without the vendor name as parameter. Please note that the
chip name is case sensitive.
Otherwise, I guess just get a SATA SSD.
Maybe you can pick up something newer, even the 600/800 G3 machines have a native NVMe slot and can be had for like 50 bucks today… reasonable enough.
—–
And a note for anyone who is still running these 8300 as a daily driver pc. I do encourage you to move into something newer for a main machine, simply from a security perspective. Even the 800 G3 got a bios update as recently as 2022.
The reason being, the ME firmware still can be accessed from the outside, even if it is disabled by you in the BIOS. It doesn’t matter if you run Linux or Windows, or have it turned on or turned off in the bios. The ME simply being present as part of the 8300 system hardware, is a security risk. ME is something that is not dependent on the OS at all.
Be sure you have some decent firewalls and security in place, I’m not saying anyone is going to get hacked. But at the same time, the 8300 machines I have, I do not use them for anything super mission critical. Your systems are only as secure as your weakest link is. No different than your car is only as stable as its worst working part in it…
more info, and just an FYI, these 8300 systems are susceptible to this 2020 attack and anything newer than the 2017 ME update intel released.
https://www.csoonline.com/article/572885/cybercriminals-look-to-exploit-intel-me-vulnerabilities-for-highly-persistent-implants.html
Briann Brown PhD says
I don’t think that is an image of a HP/Compaq Elite 8300 SFF.
The correct image showing FDO is here: https://av.libreboot.org/hp8300usdt/jumper_to_fdo.jpg
Text at: https://libreboot.org/docs/install/hp8300usdt.html
Brian Brown PhD says
for a USDT/SFF
Jim G. says
@Briann
That picture you shared is NOT a SFF.
That is a USDT, I can tell by the ram alone, that’s SODIMM laptop ram. The libreboot link even shows the fule is hp8300usdt.html
The pictures in @Paulie’s article ARE indeed a SFF
Have a look at these as well…
SFF uses desktop dimm memory
https://vestadeal.com/wp-content/uploads/2022/01/dmb10623-w1711-1.jpg
https://support.hp.com/us-en/drivers/hp-compaq-elite-8300-small-form-factor-pc/5232852
USDT uses laptop sodimm memory
https://www.empowerlaptop.com/p/656939-001/
https://support.hp.com/us-en/drivers/hp-compaq-elite-8300-ultra-slim-pc/model/5232869?sku=C6Q28US
Jim G. says
@Briann That picture you shared is NOT a SFF.
That is a USDT, I can tell by the ram alone, that’s SODIMM laptop ram. The libreboot link even shows the fule is hp8300usdt.html
The pictures in @Paulie’s article ARE indeed a SFF
The USDT and SFF have completely different boards. I tried to post links to pictures, but they await moderation.
SFF uses Desktop DIMM memory
USDT uses laptop SODIMM memory
Jim G. says
Hey Folks just a quick PSA for those in the US and in need of any of the NVMe PCIe adapters.
4 bucks a piece right now shipped from Amazon, and has both the NVMe + SATA M2 slots, and a SATA cable, so you can basically hook up your NVMe + an M2 SATA to your machine for this mod.
GELRHONR M.2 NVMe SSD to PCIe Adapter Card,M.2 NVME(M-Key) +SATA (B-Key) SSD PCIe 3.0 x4 x8 x16 Controller Expansion Card for 2230 2242 2260 2280 22110 Size M.2 SSD
https://www.amazon.com/gp/product/B0B3DSHPKC/ref=ppx_yo_dt_b_asin_title_o00_s00?ie=UTF8&psc=1
Manuel del Rey says
Dear Paulie, First of all thanks a lot for sharing your knowledge and making posdible for non IT experts to achieve turning our old machines into powerfull PCs. I own an HP Compaq 8300 Elite MT and tried to follow the steps descrived but failed in the very last step. Whe I tried to flash the nvme.bin and remplace my BIOS I’ve got the following error messague:’Unknown chip ‘MT25Q128′ specified.’ Do I need to update the repository of the sustem rescue? Preious messagues suguest that BIOS was on Read Write mode and that the Chipset was found. Thanks a lot.
hugo says
I bought one HP EliteDesk 8300 CMT like 1 year and some months ago, and it’s still fine. Still has a kingston A400 120gb sata ssd, win11 24h2, upgraded to 32gb of RAM. It does boot fine and I personally don’t feel the need to use nvme.
Months later after the 8300, I purchased the HP 6300 SFF, which got upgraded to 16GB, 8GB came from the 8300. This machine also works fine, except the PSU’s fan is a little louder.
Last Xmas 2024, the Dec 19th, I finally purchased the final piece to my HP 8300 CMT… an ASUS Geforce GT 1030 2GB GDDR5… I wanted the model without a small fan but the stupid computer store took 3 days to tell me that they didn’t have such product.. so they sold me a gfx card with fan..
So before I installed the ASUS Geforce GT 1030 with fan, I was using the i7 3770’s built-in gfx.
I opened the PC case, pressed the 2 plastic things, removed the metal protection and installed the card to the 2nd slot counting from top, or the first pci express “x16″ 3.0, removed the plastic thing that protects the HDMI 2.0b port, connected the HDMI cable (thick cable, this cable is probably over 13 years old) to an ACER EK240Y, closed the metal thing that prevents the cards from moving, conntected the power cord, booted up, HP logo, Windows logo, lockscreen.. the card seems to work, then logged in, Windows Update downloaded the drivers dated last Summer 2024, it installed the driver but….. I don’t know… The text that appears on the desktop, windows, menus… they do not show love like intel gfx did.
I usually use Windows Magnifier because my eyes are no longer as good as they used to be and I can clearly see that the text is a little pixelated like there isn’t enough pixels there.
I tried a few things like using other HDMI cable, change cleartype settings, enable smooth under magnifier’s settings, reset cleartype, download the latest nvidia drivers and choosing reset all settings, deactivate the intel hd from device manager and bios, messing with resolution making sure that 1920×1080 was set… but I do find the 2D.. not as good as the intel one.
2 days later, the fan itself.. started making noise.. I usually use PC all day. There is no control for the fan, always on 12v.
AIDA64 says the nividia gfx is indeed using PCIe 3.0 but at 4x. I can see also that there is some kind of management regulating the pcie bus speed, it goes from 3.0 x4 to 2.0 x4 and 1.1 x4.
After the HP 8300 and HP 6300, I bought a Lenovo M700 tiny. I am using it right now when I’m in bed and it’s connected to a 24” HD TV but it is capable of FullHD, I do really love how text appears on the screen. I am using Firefox and “File Edit View..” menu strip text seems more pixel full and the one from gt 1030.
Maybe later, I get a RX 550 for the 8300 and the 6300 will get the 1030. The RX 550 is a little power hungrier than the GT 1030.
Has anyone had the same problem I described above? When I meant pixelated, I meant the text itself is a mixed too much with the background color.
Jim G. says
@Manuel del Rey
First off, please clarify what you mean by MT, Mini Tower or Micro Tower. There is a difference. CMT is the Convertible Mini Tower with 6 drive bays. Micro Tower has an external power supply and no big bays for a 3.5 drive.
in system rescue terminal window:
type flashrom -p internal
this will probe for what flash rom chips are in the 8300 pc.
it should detect at least one or more flash chips
post your results of the probe please
There are at least 3 or more types of flash rom BIOS chips HP used for the various 8300 form factors.
I have seen both macronix and micron in the CMTs for the BIOS chips.
depending what you get with the probe, it is probably one of these three. Post the probe results and we’ll double check it.
micron
flashrom -p internal -c MT25QL128 -r /mnt/usb/backup-filename.bin
macronix
flashrom -p internal -c MX25L12805D -r /mnt/usb/backup-filename.bin
winbond
flashrom -p internal -c W25Q128.V -r /mnt/usb/backup-filename.bin
Jim G. says
@Manuel del Rey
Also you probably should use the 9.0.5 version of system rescue. When I used a newer one, I had nothing but problems flashing the BIOS.
Jim G. says
@hugo turn off pcie link state management in windows
control panel > power options> select your power plan > change advanced settings
also, try the card in the 6300 to see if you get the same result.
Is the noise from the power supply fan? or is there a fan on the video card? It should go away after awhile, which indicates the fan is just uneven or a bearing is going out.
the card should go in the BLACK PCIe slot as that is pcie x16 you should see the x16 silkscreened on the mainboard I believe…
personally, I would not buy a video card this new for an old machine, I would buy a newer machine then look at a video card. what is the video card needed for? games?
Jim G. says
@hugo also the resolution may be too high to were you need to change the SCALE
right click desktop > graphics properties > SCALE it is right above the resolution. try 125% or 150%
Abderrahim Lqamar says
Many thinks.I managed to perform the upgrade and get an HP 8300 booting from an nvme drive.I m on Linuxmint 22.1.Thanks for the article and to people posting helpful comments.Thinks from Morocco.
Abhinav Sundara Raman says
Finally, this worked out fine, but not before a whole day of headache…
You have written the command, “flashrom -p internal -c MT25QL128 -r /mnt/usb/backup.bin”, but not everyone’s flash chip is of the name “MT25QL128”!
Mine was of some other name and hence this command kept failing.
After repeatedly asking Copilot for assistance, it suggested that I try running “flashrom -p internal”, after which my real chip name was shown & it luckily occured to me to try your command by replacing the chip name in your command. Then, everything was a cakewalk & my NVMe SSD is now usable alone! I feel lucky I thought of it because otherwise I’m a computer novice.
Also, if for some reason someone is not able to complete your procedure, they can still use the NVMe SSD, as their main Windows drive and use a SATA SSD (or hard disk) just for the bootloader, because NVMe SSD not recognised by the BIOS but recognised by Windows! Initially, that’s what I did & I still got near 3000 MB/s speeds!
Thanks for planting the idea in my head, of using an NVMe SSD.
Michael S. says
Thank you very much for the excellent guide, which allowed us to successfully update our 8300 CMT so that it boots from an NVMe SSD. In our case the BIOS chip was the W25Q128.V
KM Tan says
Stuck at :
“”Choose the NvmExpressDxe_Small.ffs that you just download and then save the file as nvme.bin.””
Any help from any one here will be greatly appreciated.
Thank you.
KM Tan says
Failed to proceed from at/from “”Choose the NvmExpressDxe_Small.ffs that you just download and then save the file as nvme.bin.””
Help please.
Jim G. says
@KM Tan Did you do this step?
Download this NVME Driver and save it to your machine.
What is the problem or error message? You insert the file just as shown in the picture from that step, then save it.
Jim G. says
@KM Tam
After you insert the NVMe file, be sure you are saving the new file nvme.bin to /mnt/usb
the reflash command will NOT work unless the changed file is in /mnt/usb
EMERSON LLACUNA says
Hi! Sir..? i have 2 units of HP 8300, I successfully manage to do it on one of it. But the second one can’t seem to find my BIOS chip MT25QL128 when running the command: “flashrom -p internal -c MT25QL128 -r /mnt/usb/backup.bin” why is it so? I was doing the same exact thing as I did on the first one. Hope this message reach you Sir. Thank you so much in advance..
Jim G. says
@EMERSON LLACUNA
There are 4 different BIOS chip types for the HP 8300 series. The first one is probably the Micron MT25QL128 since it worked.
What form factor are your two HP 8300 machines?
I bet the chip for the second one is not the same as your first one.
run this command on the one that is not working, and post the results. This will tell you what BIOS chips are in the pc.
flashrom -p internal
there is a text editor icon at the bottom of the sysrescuecd x windows GUI. you can save the file to your flash drive.
Abderrahim Lqamar says
For the post 181.
This step is more clear in the video expaining how to get an Hp g1 booting from nvme drive.video link is in the Paule’s blog. I hope that can help.
L says
@Martin L October 24, 2023 at 4:28 pm
Hi, folks.
This issue also occurs with my 8300 SFF with K01 3.08 / 00.03.08 Rev.A / sp95971.exe latest bios.
Power off and short the FDO jumper, then power on. A reboot is not enough.
The bios flash chip is a WINBOND 25Q128BVFG soic-16.
After dumping the flash from Linux Mint 21.3 with flashrom v1.2:
# flashrom -p internal -c W25Q128.V -r dump_backup.bin
UEFITool_0.28.0_linux_x86_64 reports:
parsefile: invalid data checksum 5Ah, should be AAh
parsefile: invalid data checksum 5Ah, should be AAh
parsefile: invalid data checksum 5Ah, should be AAh
parsefile: non-empty pad-file contents will be destroyed after volume modifications
What is confusing is that the same errors appear in the bios files directly extracted from sp95971.exe
Both Rom.bin and K01_0308.BIN are identical with MD5: 534B558572140B3A2E6E684B81BC1852
so the errors are not related to the brand of flash chip or support from the flashrom version.
These errors seem related to the pad/raw entries shown in the tree.
So, I didn’t try to write the modified image.
Note that the dump and the extracted files don’t match, in part because in the update bin the ethernet MAC is FF:FF:FF:FF:FF:FF, and I guess the Windows license or HP signatures, but there are also many other differences.
DisplayPort output works normally, although must point out that I use a DP-HDMI adapter.
Have a PCI-e sata/pata adapter and my Linux Mint booted (non-uefi legacy mode) normally from onboard sata.
Was fun to try anyway.
Jim G. says
@Martin L
If you search for
invalid data checksum 5Ah, should be AAh
in the replies, you will see a post from @Paulie, he said this error is not an issue. That you can reflash the modded BIOS back to the chip with no problems.
If you are really concerned, then I would suggest a dump using an SOIC16 clip. I see no reason for this though given the checksums match.
I have went so far as to resurrect a couple of bricked HP 8300 units using the SOIC16 clip and can tell you that flashing the base rom.bin from the 3.08 firmware update works fine, the system redetects the MAC address of the ethernet port, and you can rea-add the asset tag and other information as needed. It acts as if it is new from factory.
I say go ahead and try it, you don’t have much to lose on hardware of this age.
Just be sure you do not use legacy boot at all, two attempts with it will brick the system for sure. Disable legacy boot in the bios just the same as @Paulie has done in the screen shots.
Jim G. says
@Martin L
I also seem to remember newer versions of the sysrescuecd gave me problems.
This version was the one I used, it was out at the time this article was written.
systemrescue-9.06-amd64.iso
I still use this today, and it has always worked. I seem to remember the 5ah error still happened though, but I don’t recall where at exactly, it’s been awhile.
L says
Thanks Jim for all the feedback, I really appreciate it.
I’ll look for an SOIC16 clip to try to dump the flash and reread all the posts when have some time.
hikmet says
No DMI table found.
Found chipset “Intel Q67”.
Enabling flash write… Warning: BIOS region SMM protection is enabled!
Warning: Setting BIOS Control at 0xdc from 0x22 to 0x01 failed.
New value is 0x22.
SPI Configuration is locked down.
The Flash Descriptor Override Strap-Pin is set. Restrictions implied by
the Master Section of the flash descriptor are NOT in effect. Please note
that Protected Range (PR) restrictions still apply.
FREG0: Flash Descriptor region (0x00000000-0x00000fff) is read-write.
FREG1: BIOS region (0x00510000-0x007fffff) is read-write.
FREG2: Management Engine region (0x00003000-0x0050ffff) is read-write.
FREG3: Gigabit Ethernet region (0x00001000-0x00002fff) is read-write.
PR0: Warning: 0x007f0000-0x007fffff is read-only.
At least some flash regions are write protected. For write operations,
you should use a flash layout and include only writable regions. See
manpage for more details.
OK.
No EEPROM/flash device found.
Note: flashrom can never write if the flash chip isn’t found automatically.
Jim G. says
@hikmet
Wrong computer. Intel Q67 chips etc is for HP8200. This mod will not work for that pc.
hikmet says
flashrom -p internal:boardenable=force
flashrom v1.6.0 (git:v1.6.0) on Linux 6.12.61-1-lts (x86_64)
flashrom is free software, get the source code at https://flashrom.org
No DMI table found.
Found chipset “Intel Q67”.
Enabling flash write… Warning: BIOS region SMM protection is enabled!
Warning: Setting BIOS Control at 0xdc from 0x22 to 0x01 failed.
New value is 0x22.
SPI Configuration is locked down.
The Flash Descriptor Override Strap-Pin is set. Restrictions implied by
the Master Section of the flash descriptor are NOT in effect. Please note
that Protected Range (PR) restrictions still apply.
FREG0: Flash Descriptor region (0x00000000-0x00000fff) is read-write.
FREG1: BIOS region (0x00510000-0x007fffff) is read-write.
FREG2: Management Engine region (0x00003000-0x0050ffff) is read-write.
FREG3: Gigabit Ethernet region (0x00001000-0x00002fff) is read-write.
PR0: Warning: 0x007f0000-0x007fffff is read-only.
At least some flash regions are write protected. For write operations,
you should use a flash layout and include only writable regions. See
manpage for more details.
OK.
Found Macronix flash chip “MX25L6405” (8192 kB, SPI) mapped at physical address 0x00000000ff800000.
Found Macronix flash chip “MX25L6405D” (8192 kB, SPI) mapped at physical address 0x00000000ff800000.
Found Macronix flash chip “MX25L6406E/MX25L6408E” (8192 kB, SPI) mapped at physical address 0x00000000ff800000.
Found Macronix flash chip “MX25L6436E/MX25L6445E/MX25L6465E” (8192 kB, SPI) mapped at physical address 0x00000000ff800000.
Found Macronix flash chip “MX25L6473E” (8192 kB, SPI) mapped at physical address 0x00000000ff800000.
Found Macronix flash chip “MX25L6473F” (8192 kB, SPI) mapped at physical address 0x00000000ff800000.
Multiple flash chip definitions match the detected chip(s): “MX25L6405”, “MX25L6405D”, “MX25L6406E/MX25L6408E”, “MX25L6436E/MX25L6445E/MX25L6465E”, “MX25L6473E”, “MX25L6473F”
Please specify which chip definition to use with the -c option.
Jim G. says
@hikmet
You do not have the right computer for this modification. You have either an hp 6200 or hp 8200
Andrew says
Hi. This worked for my Elite 8300 but now after a full power off, it no longer wants to boot from NVMe and I don’t see it listed in the BIOS options.
Andrew says
Doh!
Self-inflicted issue. I had replaced the NVMe with M.2 SATA, that’s why it stopped working!
Jim G. says
After watching a modded 800 G1 recently go belly up after simply upgrading to Windows 11 25H2 from 24H2- and not being able to reprogram the 800 G1 SFF Macronix BIOS chip with a ch341a programmer due to voltage incompatibilities (rendering the board toast, for now):
I’ll suggest that people stop using these mods and simply boot the NVMe using clover.
Reason being: when windows blows up and blue screens on boot with the Inaccessible Boot Device error (from updates, from installing new windows revisions, or from accidentally changing the HDD controller from RAID to AHCI in BIOS) windows goes into ASR (Automatic System Recovery) mode to boot, and this freaks out the modded BIOS to where the machine is bricked with fans spinning on high and no post or boot.
My Win 11 25H2 upgrade didn’t even blue screen once. On reboot the fans just spun high and never again would the machine boot. I don’t see this flaw ever being fixed unless someone else starts working on fixing the BIOS mod to remedy it (I don’t think @Paulie is working on updates to it anymore?)
It happens with both the 8300 AND 800 G1 modificaions.
Clover SATA install how to is here
https://www.easyuefi.com/resource/set-up-multi-boot-windows-linux-and-mac-using-clover-and-easyuefi.html
EasyUEFI can be found for free from the company or you can use something like Sergei Strelec Win PE 11 that has it in the PE boot image.
This does require an internal SATA HDD or SATA SSD (which most people are keeping in the PC anyway). What it does is boot to the SATA drive then brings up the clover menu, where you can boot your NVMe without BIOS flash hassles and problems.
Plus it is universal for any system that has UEFI but doesn’t have NVMe boot capability natively. And doesn’t require modding a BIOS at all.
Otherwise I think the NVMe mod has worked well, but boy windows really can be picky with it at times. I’ve blown up a couple of 8300s and this 800 G1 really bugs me, considering I can’t unbrick it because of the voltage problem with the Macronix BIOS chip.