
In this post I will show you how you can modify the BIOS of a Dell OptiPlex 3010, 7010 or 9010 so that it can support an NVMe SSD drive as a boot device. This is a follow up to a post I did on how boot a Dell OptiPlex 7020 with an NVMe drive.
I also wrote an upgrade guide for the Dell OptiPlex 7010 which showed how to use Boot Disk Utility to boot from an NVMe drive by using a USB Stick. The method described in this post will allow the machine to boot natively without the need for any additional hardware.
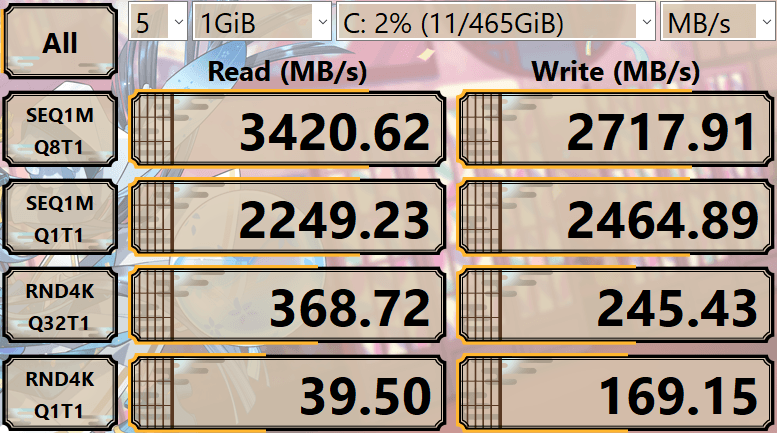
Although these machines have a UEFI BIOS, they do not contain the NVMe driver. By adding the driver into the BIOS you can boot from a PCIe NVMe SSD. I managed to achieve these speeds with a Samsung 970 EVO Plus from Amazon:

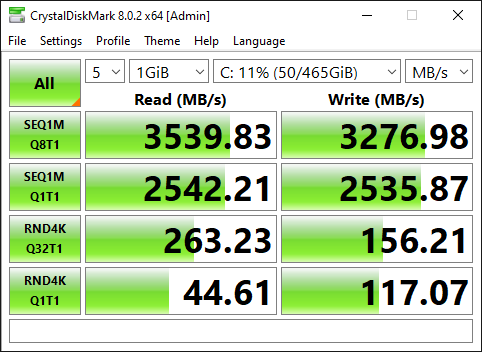
This is the same drive that I put into an OptiPlex 7020, but for reasons that I do not understand, the same drive is even faster in the 7010.
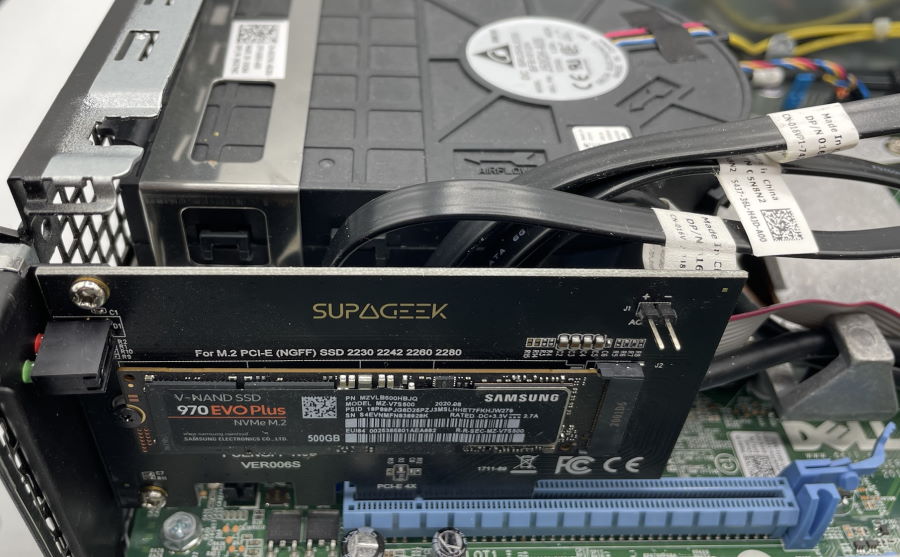
Here is the PCI adapter and the Samsung NVMe SSD installed in an OptiPlex 7010 Small Form Factor:
Warning
This blog post contains instructions on how to modify your BIOS.
You could easily break your machine. Proceed at your own risk!
Table of contents
Required Hardware
In order to carry out this upgrade, you will need a few things:
- An NVMe SSD. I used a 512Gb Samsung 970 EVOPlus
- An NVMe to PCIe Adapter, I used this one from Amazon.
- A Dell OptiPlex 3010, 7010 or 9010 to upgrade.
The procedure is slightly different depending on the model and form factor, but mostly the same.
Procedure Overview
This process involves the following steps:
- Upgrade to the most recent BIOS from Dell:
- Installing Required Software and drivers.
- Backing up your current BIOS.
- Adding NVMe driver support into the BIOS backup.
- Writing the modified BIOS back to the system.
- Optimising BIOS settings.
Install the Required Drivers and Software
Before being able to read from or write to the BIOS, you need to install the Intel Management Engine Components from Dell.
Download the Intel Management Engine System Tools v8 r3, which contains the tools required to flash the new bios.
Also download the NVME Driver which will be injected into the BIOS Image.
Finally you will need UEFI Tool 0.28 to make the actual BIOS modification. Here is a direct link to that version.
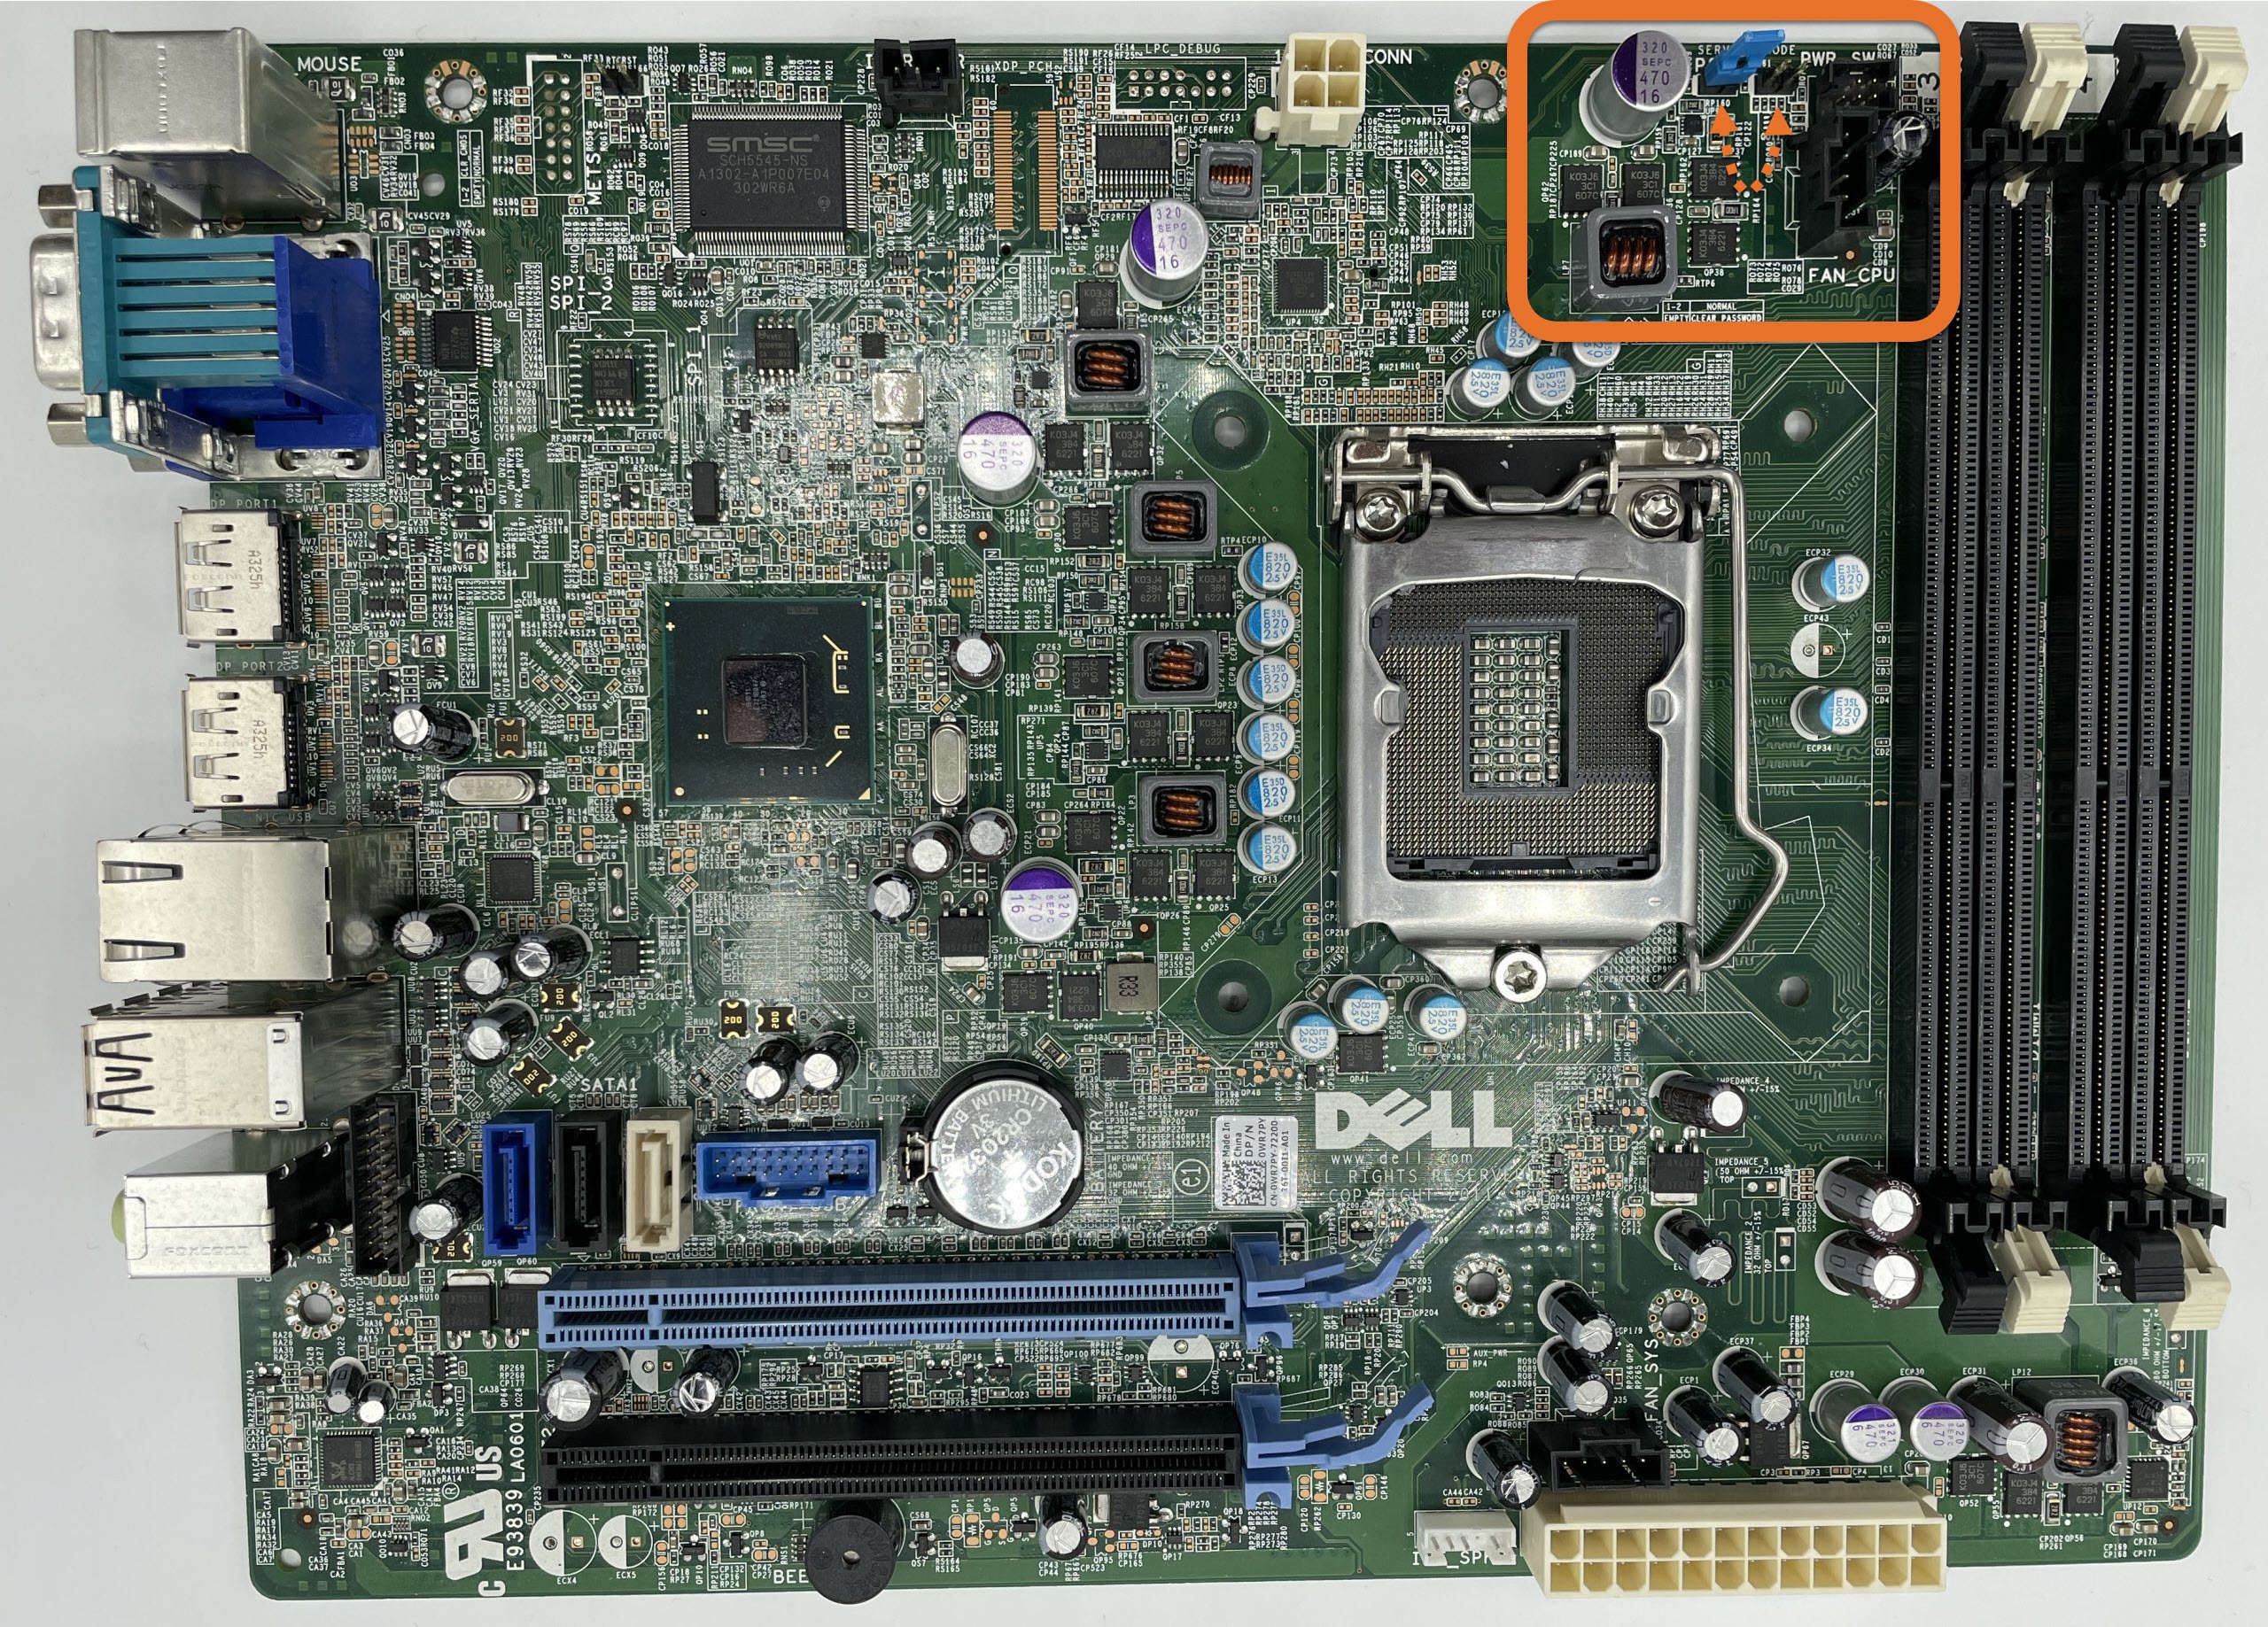
Put the machine into Service Mode
Now that you have the machine prepared, you need to put the machine into service mode before you can proceed:
- Shut the machine down.
- Remove the mains power supply.
- Locate the two pin service connector and put a jumper on it.
If you are upgrading a Small Form Factor machine, the service jumper is in an awkward position which will require you to remove the Optical Drive and Hard Drive cage to access it. Once those are out of the way, you can find it just above, and to the right of the RAM slots. Here is an image from a 7010 SFF:
If, like me, you do not have a spare jumper, you can borrow the one from the Password reset jumper.
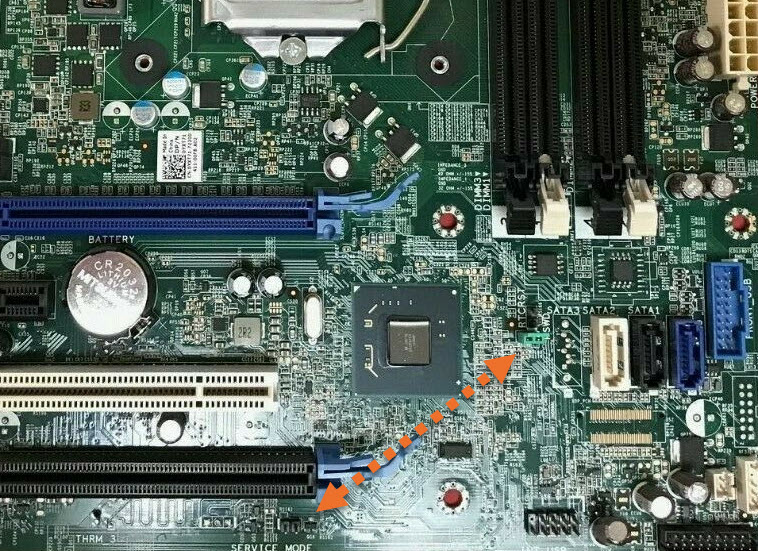
On a Mini Tower – the jumper is in a different position and easier to access:

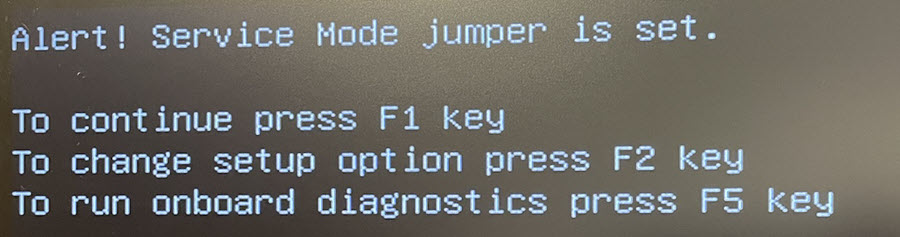
You can now boot the machine again in service mode, but you will receive a couple of warning messages:

You will then receive a message informing you that the machine is in Service Mode:

If you do not put the machine into service mode you will not be able to backup or update the BIOS properly.
Modify and Upgrade the BIOS
Now that you are in service mode, you can continue with the modification. I’ve also made a video that shows how to insert the NVMe driver into the BIOS:
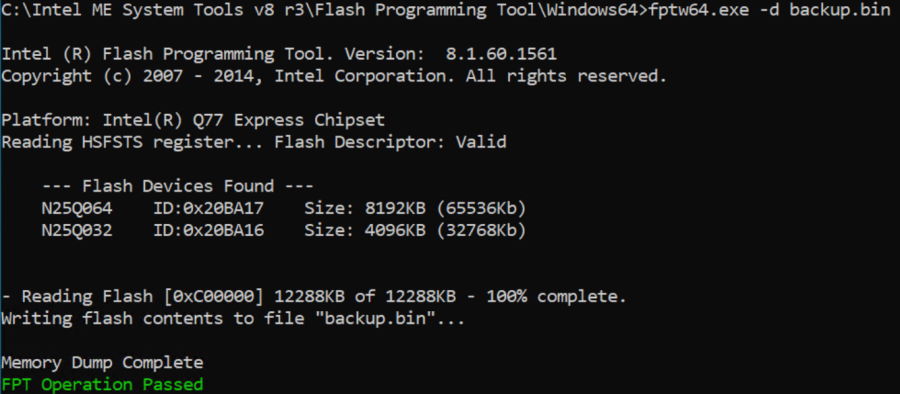
Backup the existing BIOS
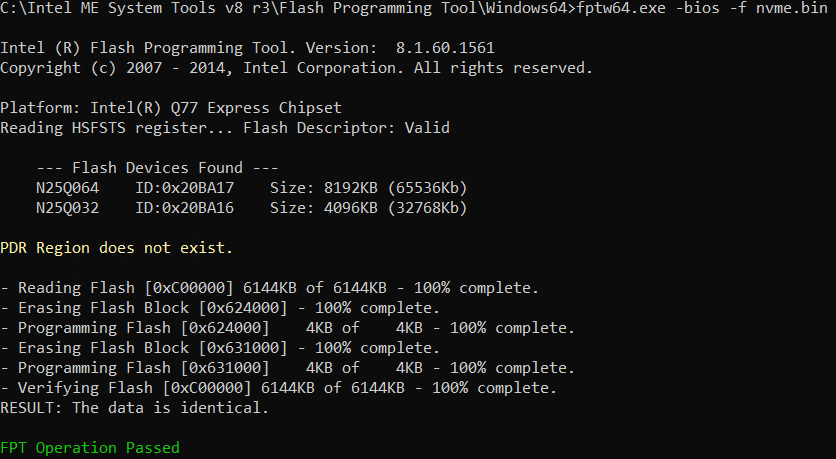
Open a command prompt as an administrator and change to the directory where you extracted the Intel ME System Tools. Then navigate to the subdirectory \Flash Programming Tool\Windows64 (or Windows if you are on 32-Bit installation).
Within that directly use the command:
fptw64.exe -d backup.bin

Modify the BIOS and Inject the NVMe Driver
Next, open UEFI Tool and open the backup.bin file. Expand the sections as per the following screenshot:

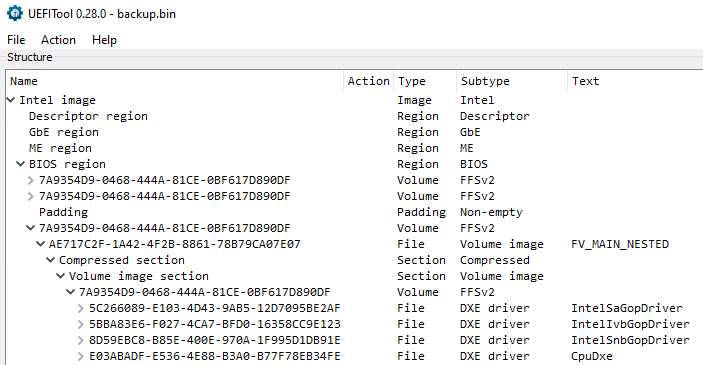
Scroll to the bottom of this section and you should see an area that looks like this:

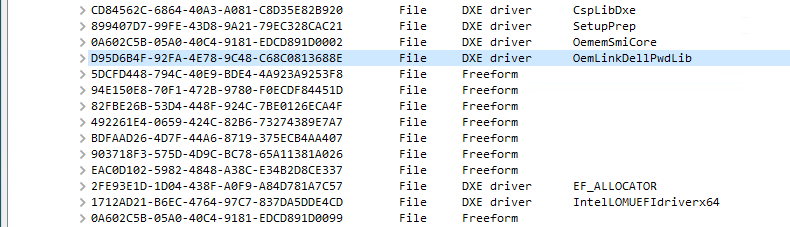
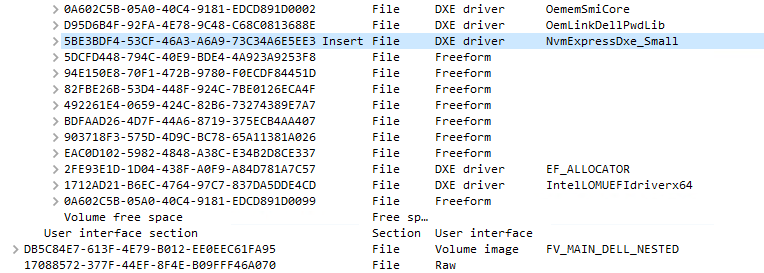
Next, right click on item with the name D95D6B4F-92FA-4E78-9C48-C68C0813688E and choose Insert After.
Choose the file NvmExpressDxe_Small.ffs that you just downloaded earlier and you will see it appear right after the OemLinkDELLPwdLib section:

Now go to File -> Save Image File and save the file in the same location as the flash tool as NVME.bin. Go back to your command prompt and run the command:
fptw64.exe -bios -f nvme.bin

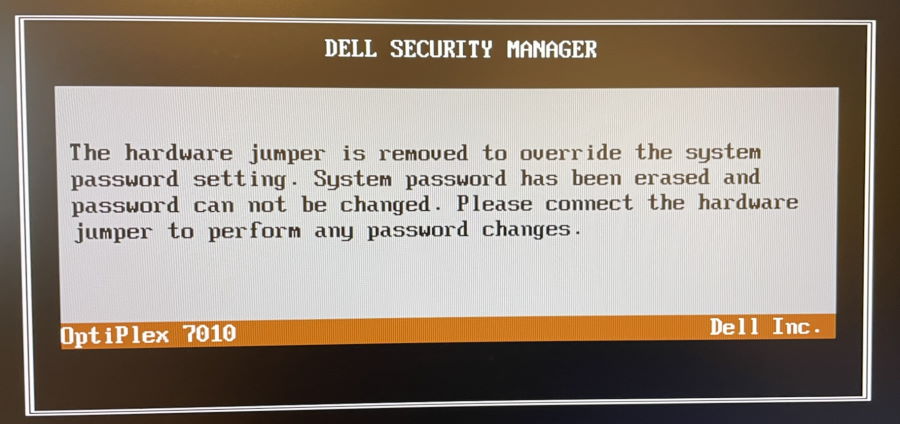
Shut down the machine and remove the jumper from the service pins and move it back to the password reset pins if you took it from there.
The BIOS modification is complete!
Install the PCI NVMe SSD
If you have not yet installed your SSD into the machine, you can do it now. If possible use the Blue X16 PCI slot, it is much faster than smaller black one.
Optimise BIOS Settings
Now that you have written the new BIOS, restart the machine. If you do not have any SATA drives connected you will receive a warning on start-up that says:
Alert! Hard Drive not found
You can fix this by going into the BIOS Setup and then System Configuration -> Drives. Untick all the SATA ports which do not have drives connected.
Finally, if you want the maximum possible speed from your new drive, consider disabling C-States in the BIOS. This makes it marginally faster, but I doubt you would notice much difference.
Conclusion
Now you can install an operating system of your choice or clone one of your existing drives to your new NVMe drive and enjoy a decent performance increase.
Upgrading the Dell Optiplex 7010 with PCI NVMe Solid State drive is a brilliant value upgrade, and completely transforms the machine. Especially if you are upgrading from a hard drive.
Again, here is the PCI adapter that I used:


- 512Gb Samsung 970 EVOPlus
- NVMe to PCI Adapter (The adapter comes with a heatsink also)
If you try it, I would love to know how you got on and what your results were.
Support This Website
Thank you for visiting. It’s because of readers like you that I continue to write on this blog.
If you found value in what I share, I’ve set up a ‘Buy Me a Coffee’ page as a way to show your support.
Tony says
I will try to follow this post step by step tomorrow on my Dell 7010 and let you know. But How can I clone the existing hard drive to the NVME Samsung 970 EVOPlus SSD card after I finish ? Please advise! Thanks!
Paulie says
Suggest you follow the video instructions on this page:
Dell Optiplex 7010 Upgrade Guide. But as you have a Samsung SSD you could also use the Samsung Magician software to migrate your data, it is really good. Don’t forget if you are not already using UEFI/GPT boot it won’t work on the NVMe SSD without some additional effort.
Maybe you want to try a fresh install of Windows on to the NVMe first to confirm boot is all working as expected and then clone your existing drive.
Tony says
My problem is that the Win 10 is pre-installed by DELL. I do not have any Win 10 disc for fresh installation after I finish the procedure here in my Dell 7010. I wish that I can clone my hard drive to the NVME SSD . Any advice? I get stuck! Thanks for your prompt reply!
Paulie says
As long as your current system is booting via UEFI boot and not legacy, I think you should be fine. Samsung Magician software I think will take care of the rest for you. It is dead easy to use. If you manage to successfully mod the BIOS, then you’re halfway there.
Tony says
Dear Paul, By following your instructions in this post, I successfully upgraded two Dell OptiPlex 7010 computers with WD BLACK 500G SN750 NVME SSD. They are running much faster than my Dell 5050 which comes with Dell’s NVME SSD. They are running very close to the max official speed of 3430 Mb/s. I am surprised. You are my hero! I am working on the next upgrade project, my Dell 3020. I will let you know my result. Thanks!

Minkwon says
Very surprise news, Paulie !
Thank you for your efforts. Can I ask something about ?
I have a optiplex 7010 MT (not SFF) and I would like to try your creative trial.
Is there any problem for application ?
please advise. thank you.
trs96 says
@Minkwon it makes no difference which form factor you have. They both use the exact same 7010 A18 BIOS.
trs96 says
Meant to say the A29 BIOS. The 7020 models use the A18.
Guy says
Hello Paul, would there be an issue to do this upgrade with adding a single slot graphics card in the blue PCIe and the NVMe PCIe adapter in the black slot. Thanks in advance.
Paulie says
Hi Guy, no problem to do that. It will work fine, just at a slower speed.
Tony says
Hi Pual,
I successfully upgrade my Dell 9010 with 500G WD Black SN750 NVME SSD.
The write speed is faster than the Dell 7010 that I upgraded earlier with the same 500G WD Black SN750 NVME SSD .
I am impressed!
My next project is Dell 3010
Thanks!
glnz says
Tony – I would very much like to know your results with a 3010, and — very important — which files you used that are different from this article’s links and references for the 7010.
Paulie – as I said elsewhere, your careful, well-organized explanation here is one of the best how-to articles for adventurous non-tech people I have ever read on any computer subject.. I wish you would just write computer articles non-stop!
Paulie says
Really appreciate your kind words! It’s a lot of work to write it all up but very satisfying seeing so many people having good results.
Paulie says
Glnz – I have all the details of the differences for the 3010 and 9010 and the procedure is near identical – I will add the details for those machines.
glnz says
Paulie (and fans) – a few technical questions.
1) Your starting point includes
a) installing the Intel Management Engine Components from Dell.
b) downloading the Intel Management Engine System Tools v8 r3, which contains the tools required to flash the new bios.
My concern – My 7010 has always had the MEBx feature from Intel, which I have never used. Unfortunately, however, I set its password years ago and have forgotten it. I have read that I can reset its password by removing the CMOS battery and replacing it with a new one.
So — i) given your reference to the Intel Management Engine Components and System Tools V8 r3, should I first take out the CMOS battery and replace it? Then should I reset the MEBx password to something I can remember?
ii) And if I remove and replace the CMOS battery, what other things will happen? For example. will my BIOS be set back from the last A28 version to something earlier? Will I lose other presets I’ve forgotten about, maybe like UEFI?
2) Your list also includes downloading the NVME Driver from your link, which will be injected into the BIOS Image.
Question – is that file good for any NVMe M.2 I might buy, or is it good only for the model NVMe you bought, the Samsung 970 EVO Plus? If I buy a different NVMe, should I then get its own driver file for this step?
3) If I’m not mistaken, our 7010s have only PCIe 3, yes? So maybe we should stick with an NVME that is good for PCIe3 and not waste money on a newer and more expensive NVMe that would also be good for PCIe 4? Do I have that right?
Thanks!
Paulie says
I don’t think the password will matter, because if you read on to the next step, it involves triggering the password reset anyway – so the password will be wiped out in any case. You don’t need the password to install the Intel Management tools.
The driver will work with any NVMe drive.
glnz says
Paulie –
1) I hope to do the BIOS mod on a second (extra) test 7010 this weekend (or soon). My plan is to do the mod only before I buy the SSD or the adapter card – to see first whether the machine will reboot into its normal HDD after the mod. Please let me know if that is not a good plan.
2) Question – somewhere I read that before doing anything like this, I should first replace my CMOS battery with a new one, just in case the workload here kills an old CMOS battery. After all, most 7010s and 3010s are 8 years old or older. Do you think that is advisable, and what happens when one replaces the CMOS?
Thanks again.
Paulie says
1) you can modify and boot from your existing HDD. The Modification adds NVMe support / it’s takes nothing away.
2) it certainly won’t do any harm to replace the battery. You’ll lose your existing bios settings – but it’s no big deal to put them back..
cypek80 says
Hello !
Encouraged by the article.
I was able to modify the BIOS on my Dell 7010.
I am waiting for a PCI adapter
and Samsung 970 EVO Plus 500GB Sata M.2
I’ll let you know how it went.
Thanks for the advice!
trs96 says
“Somewhere I read that before doing anything like this, I should first replace my CMOS battery with a new one, just in case the workload here kills an old CMOS battery. After all, most 7010s and 3010s are 8 years old or older. Do you think that is advisable, and what happens when one replaces the CMOS? ” @ginz
Yes, replace the battery if it’s still the original. Once you remove it, reboot into the BIOS (F2) and change the BIOS settings back to what you want. You will lose any changes you’ve made to BIOS settings after the battery is pulled and replaced.
gerry says
Hello. great work! I did it like that and i see the drive in the boot options now, but is have the problem on installing windows 10, if i am installing it from USB drive i see the SSD but i get the message that it is not able to install windows on it because it is not a bootable drive in bios… hope you can help me, are there some settings in bios to do? Thanks
Paulie says
@gerry – this means you have booted in BIOS mode, not UEFI mode. You must boot in UEFI mode and then run the windows install.
Sevlor says
I followed all the steps listed above got success with the bios upload after the driver import, but I am unable to boot from an NVMe, I don’t see it in the bios anywhere, and if I modify or even just go into the bios with the NVMe installed into the system and exit out the system just comes back with the power led flashing amber. I unplug mains until it stops flashing and plug it back in, I am able to power on the system but still same result, no boot from nvme.
gerry says
@Paulie Thanks for you fast and helpful answer and also thank you for the great desciption to upgrade the optiplex!!! Now everything works fine… It helps a lot if you know what UEFI is and how it works 🙂 and i learned a lot about this the last night.
@ Selvor i did it yesterday the first time but maybe it helps if i tell you what i learned: You must change the boot mode in UEFI.
In UEFI Boot mode you don´t see any HDD drive or USB Drive, you have to make a bootable UEFI win image on the USB stick to install windows. I used Rufus for that. After the Stick is prepared in UEFI (i also set GPT) mode then you see the Stick in the bootable drives and you can start the Installation.
In UEFI mode you don´t see the drive.. you only see the operationg system…
I am also a beginner but i hope i could help you
Harjeet Singh says
This was a random upgrade I thought I would do to my OptiPlex 3010 and that too after ordering Samsung 970 EVO Plus NVMe M.2 from Amazon. It became quite a challenge for me to find out that there is no NVMe M.2 Slot on the motherboard. After searching a lot for a solution, I was almost at the verge of returning the SSD and instead ordering a SATA SSD for upgrade. and then I hit this blog on Google. Ah! What I relief I had to know that there is a hope.
Then I came to know PCIe slot, I honestly had no idea about it and how it works. Searched a lot about it n YouTube and got familiar with various versions and slots for PCIe. This was the moment I thought that this upgrade may work. Although a challenge but this was quite an interesting one to accept and worked for.
Downloaded all the required drivers, flashed BIOS from A13 to A22, had a hard time putting the machine to Service Mode since the jumper was different but I figured out. Edited BIOS with NVMe driver and flashed successfully but even then could not find NVMe SSD to boot from under BIOS. I searched a lot about it and figured out this article which really helped with remaining steps: https://www.dell.com/support/kbdoc/en-in/000132410/what-are-pcie-ssds-and-how-to-use-them-as-a-boot-drive-for-a-dell-pc\
IMPORTANT: To make it work with Windows 8.1 or later, you need to enabled UEFI BIOS with Secure Boot OFF, format the drive using GPT disk type. Also make your bootable installation media to boot as UEFI mode, NOT MBR else it will not work. Install the Windows normally and choose the SSD from install options. Once the Windows is installed successfully, There will be a Windows Boot Manager option that will appear under UEFI Boot options under BIOS and THAT IS your NVMe SSD and this will work normal going forward. You don’t need clover or anything else to make it work, just a NVMe to PCIe adapter, appropriate BIOS flash and UEFI mode to boot from and it should all work fine to give your 10 years old PC a new life.
I’m sorry that for a long answer but I hope it helps someone to proceed with if they’re stuck anywhere in the process.
Once again, thanks a lot Paul for this article.
cypek80 says
Thank you very much for this article.
Everything works.
I used the cheapest PCI-E X4 M2-SSD NVME MODEL EM2-5001 adapter and NVME M.2 SSD 970 EVO Plus disk.
On the Dell 7010 and 9010 I have very good speed results
Regards Cypek80.
OptiPlex 7010 Speed Results
Optiplex 9010 Speed Results
glnz says
Haven’t modded my BIOS yet, but in getting ready, I discovered something on my 7010, and maybe this will help others.
It turned out my 7010 had a PCI Simple Communication Controller Driver error. I discovered it only by chance and fixed it quickly per this Dell article and its recommendation for a download from Dell Drivers & Updates:
https://www.dell.com/support/kbdoc/en-us/000132422/how-to-fix-pci-simple-communication-controller-driver-error
I think the moral of this story is this: before running Paulie’s BIOS mod steps, check your Device Manager, and if anything has a yellow ! or other warning, you might want to attend to it first.
Thanks, and stay tuned for when I finally have a chance to do this.
cmaciel63 says
Dear all,
Just a quick stop to say that I did all the steps and it’s working like a charm. In my first attempt I got a wrong version of Intel-ME-System-Tools-v8-r3 and it didn’t work. In my second attempt I got the right one and everything went smoothly. I also had previously updated to Win 10 Pro so I had do use the Intel-Management-Engine-Components-Installer_C3VMM_WIN_11.0.6.1194_A02 version.
Thank you Paul, you really rock!
glnz says
With my usual clumsiness, I have added the NvmExpressDxe_Small line to the BIOS in my Optiplex 7010 Mini-Tower (Win 10 64-bit v21H2), and it has indeed rebooted!
(I mistyped fpt as ftp, and I moved my jumper to some wrong pins right next to its original location instead of across the motherboard to the correct location, but then corrected those errors. Happily, I didn’t burn down the house.)
By the way, on the final reboot, I checked again that my BIOS settings are UEFI only, without Legacy ROMs.
So Phase 1 is done.
Now on to Phase 2 – buying the NVME M.2 SSD and the adapter card.
But questions:
1) I’m going to go for the Samsung 970 Evo Plus, which is Paulie’s selection, but I will probably go for the 2TB model, as this jet-fueled hotrod 7010 will become the new Win 10 production machine in my wife’s mini-office — a dramatic upgrade from an old Optiplex 980 running Win 7 Pro — and I have also read that SSDs with greater capacity tend to last longer.
? So, is there any reason to avoid the 2TB model and stick with 1TB?
2) Paulie’s link to an adapter card is to a model by the MHQJRH brand that uses flat rubber bands to hold the NVME to the heat sink materials A number of Amazon comments say that these rubber bands disintegrate quickly, which is not surprising given the heat. At the same time, Paulie’s photo is of a different brand, Supageek, which maybe sells only in the UK.
? So, does anyone have a strong recommendation for a good adapter card with heat sink but maybe not with rubber bands?
3) I see that some adapter cards have relatively few teeth that fit into the PCIe slot, and others have many teeth. I am guessing that the few teeth will connect to x4 only, but the many teeth could also do x16. Both Paulie’s linked MHQJRH brand and his photo of Supageek are few teeth.
Also, my 7010 does not currently have a video card, so all its PCIe slots are available.
? So, are Paulie’s suggested models with few teeth (maybe x4 only?) good enough, or should I try to find an adapter card with many teeth?
Paulie – How did you ever find that needle in that haystack? Is that a thing in the UK? You are amazing! If I ever get to London, I’m buying you a pint.
Paulie says
Ha ha – thanks for the comment. You can buy me a pint from the link on this page without having to visit the Uk.
Using a 2Tb drive is no problem. The adapter linked seems to update often.
I don’t know the answer to the question about the number of teeth. I’ve used plenty of them with the very low number of teeth, they all worked fine.
glnz says
Paulie – I have just contributed to your pub fund!
But please let me know about my Q above.
Cheers, and thanks!
glnz says
Many thanks. If you’re in Barcelona, I suggest the wonderful book The Shadow of the Wind by Carlos Ruiz Zafón. Follow the map in the book while you’re there, and then it is a great read.
Tom says
Thanks Paulie,
I have successfully upgrade my 2nd PC, an Optiplex 9010 MT. It runs like new now. With this machine I use the new NVMe SSD as boot drive and 2 SATA 3 as RAID 1 for my data. It works so great now. The other one is Optiplex 9020 MT, they are almost the same PC.
Paulie says
Great news Tom – well done. I hope it runs much better than new! When it was new it would have had a hard drive ?
Tom says
Yes, you’re right. It had HD but I did change for SATA3 SSD since long time. Now with NVMe SSD it runs even better. With the Samsung 970 Evo Plus I get 3424/3270 MBS. It’s so amazing.
matt says
No service jumper on the 3010..I see people say they figured it out, none have said what it is…so what is it?
charlie says
I wondering what happens in terms of running hotter at NVME speeds in an Optiplex 7010. Could I expect more heat and more fan noise after the upgrade? thanks!
Mendoza says
Does this work also if I install the adapter in the PCIe x16 2.0 slot? The 3.0 slot is currently being used for a graphic card.
Paulie says
Yes, but it is not as fast.
glnz says
Having a problem. On my Optiplex 7010 Mini-Tower, I have cloned my old HDD to the Samsung 970 EVO Plus 2TB SSD in the PCIe x4 slot using Macrium Reflect Free 8’s clone feature, but on all reboots, I get an early error message (white letters on black background after the first Dell logo but not yet the spinning golf balls) of “Alert! Hard Drive not found. To continue press F1 key. To change setup option press F2 key. To run onboard diagnostics press F5 key.”
If I press F1, i do boot into the SSD, and it’s much faster than the old HDD. But I can’t seem to avoid the initial error message and the need to press F1 to continue.
If I press F2 and go into the BIOS settings and look at “Boot Sequence”, It shows Windows Boot Manager checked and no other options, and the Boot List Options below is set to UEFI.
I have also run Macrium’s “Fix boot problem” option in the Macrium Reflect Free a few times now, but no luck.
If I reconnect the HDD (which still has the OS), the machine boots into the SSD without the error message! But then, after a few reboots, the SSD goes from “Disk 0” to “Disk 1” and the HDD becomes “Disk 0”, although the SSD remains the C:\ drive and it is booting!
If I disconnect the HDD again, after a while (and with another shot of Macrium’s Fix Boot Problems), the SSD becomes Disk 0 again, but I get the error message on every reboot and need to hit F1 to continue.
FWIW, my new CrystalDiskMark score (upper left) has gone from 195 to 1650, but not the 3,500 you all are seeing.
Any suggestions? Should I start over from scratch? Is there a specific Samsung driver I need to add somewhere?
Thanks.
glnz says
One more clue to my problem directly above: If I plug in the Macrium Reflect USB stick and reboot to go into it and hit F12 on the reboot to get the boot option to select it, I get the “Alert! Hard Drive not found. To continue press F1 key. …” error message before I have an opportunity to hit F12 to select that USB stick with Macrium, Does that tell us anything?
Paulie says
Read the section of the blog post with the heading “Optimise BIOS Settings”
glnz says
Paulie – that did it, and I just made another donation to your pub fund! Many thanks!!!
I should have re-read your full article after these weeks. Not for the first time, I serve as a negative example.
A few things:
— For later readers, the following video (link below) is very good — at almost your level — for showing how to use Macrium Reflect Free to do the clone AND expand the cloned C:\ partition (as my SSD is larger than my original HDD). I did not implement the next-to-last part about wiping the original HDD, but at the end it also shows how to use Macrium’s “Fix boot problems” option: (To use this option, one must run Macrium Reflect from its Rescue Media on a USB stick, which I would also advise for the clone )
https://www.youtube.com/watch?v=CHCENfs87F4
— While my CrystalDiskMark speeds for the Samsung SSD are eight times higher than my speeds for the old HDD, I am sad to report that they are only half what you and others get. (My first two Read speeds are 1665.39 and 1286.73; my first two Write speeds are 1493.42 and 1149.61.) Any thoughts? Maybe because this PC is an Intel i3 and not an i5? But I wouldn’t have thought that would make a difference. Maybe because I haven’t put the heat sink stickers on the SSD yet?
— Apparently, the Samsung SSD does not report temperature. At least, there is no temperature indicator in Speccy, while the old HDD showed a temperature indicator in Speccy. Is there a way to monitor the SSD’s temperature?
Thanks, Paulie !!
glnz says
Paulie – you might delete my three posts above because they don’t add much, except for the Youtube link about Macrium reflect cloning.
I have discovered that the various Intel CPUs for the Optiplex 7010 might not all have PCIe 3.0. My test 7010 has an i3 3220 CPU, and Intel’s specs for that CPU say it has only PCI 2.0, which is probably why my new NVMe M.2 SSD speeds are initially 1,700 GBs rather than 3,500.
a) Would be curious to know what your and others’ CPUs are (and what speeds you’re getting).
b) My OTHER 7010 machine has an i5 3470 CPU, and the Intel specs say it can handle PCIe 3.0. But I can’t tell for sure that its PCIe slots would actually provide 3.0. (Nothing is in those slots yet.) What do you all think?
c) After the x010 models from Dell, what is the next Optiplex family that definitely has PCI 3.0 for both its x16 PCIe slot and its x4 slot? 3020, 5020, 7020 and 9020? This will guide my strategy of buying used machines and modding them for the family business.
d) Maybe my NVMe M.2 speeds of 1,700 ± aren’t bad for my wife’s mini-office. Wouldn’t that keep the heat down? Samsung Magician indicates that the SSD hit only 56 C (“good”) during the CrystalDiskMark tests. Do your SSDs get hotter during those tests?
Thanks
Charlie says
Bought the Samsung EVO and the adapter and installed it in my 7010 MT. After sweating bullets, mumbling do you have to type so fast and squinting at the screen I was amazed that I had actually modded the bios. Then the process of cloning the drive kept failing with the Samsung software, so I grabbed a program and managed to finally get a clone, Then the time it took to remove cables to the C drive and then eventually having to uncheck SATA connections in the bios, the nvme drive did boot, but the partition was tiny, so I eventually figured out how to use the software and it was done. In my case, I’m running a GTX 1050 ti card that takes up to two spaces, so the best I could get with my EVO is 1600. Only! I would have to give up my card to get the 3500 MBS potential. This is something for people to consider. I’m a little let down, but from 550 to 1600 reads is pretty sweet.
glnz says
Charlie – what is your Intel CPU, and which slot did you finally use for your Samsung EVO?
For example, my Intel CPU is i3 3220, I discovered it supports only PCIe Gen 2.0 and not 3.0, and so I also am getting only 1500 – 1700 (in the x4 or x16 PCIe slots, respectively), not the hoped-for 3,500.
Curious to know your situation.
Charlie says
My CPU is the i5 3570. I am forced use the 4 times lane as I indicated. I have since pulled the graphics card just to check and ran the nvme adapter in the 16 times slot and got the promised 3560/3404. I could put in one my GT710’s but game play would be really limited compared to the GTX 1050 ti.
Charlie says
Not that Intel will be issuing any bios updates any time soon, but what would happen to the hack if I were to update my bios?
Charlie says
Made the modification to my Optiplex 9010 DT and the second time around is was a little easier. The Samsung migration tool failed again. I won’t try that again. This time my machine has a TV beside it, so it was easier to see the text of the the video tutorial while I paused it about 200 times. This machine has the i5 3470 CPU and running the nvme SSD in the times 16 PCIe slot I am getting the promised speeds of 3500+ MBPS. I moved the little GT 710 card to the times 4 PCIe slot, where I expect very little loss of function.
Paulie says
Nice one Charlie. Always good to hear the success stories!
glnz says
Hey, Charlie – feel like experimenting more? In your second PC, the 9010 DT with the i5 3470, what happens if you move the NVMe M.2 SSD to the x4 slot? Do you still get 3500± MBs?
And I found that Macrium Reflect Free (running from its PE Rescue Media on a USB stick) clones very nicely and has a built-in function to fix the EFI startup as well. There’s a very good YouTube at

Charlie says
Maybe I’ll check it out at some point. I’m certain that slot is only times 4, so it won’t work. I have actually used Reflect Free in both instances. When the Samsung migration tool failed for me. I just downloaded it and ran the app from the desktop. Worked easily. I was using another free one that only allowed minimal cloning options and only the pro version would allow for extending or shrinking when cloning mix-matched drives.
glnz says
New small issue: My 7010 MT’s DVD-RW drive (formerly D:) no longer shows in Explorer – This PC. If you look at Paulie’s advice above for “Alert! Hard Drive not found”, that’s logical because all the SATA boxes in my BIOS’s System Configuration –> Drives are now UNchecked. If I recheck the box for SATA-1 (my DVD’s connection), I then get the “Alert! Hard Drive not found” error message on reboot, which in my setup I cannot permit (because I will want remote control of this PC with problem-free rebooting).
– Is there a solution?
– If I put a non-bootable hard drive into the PC and connect it to a SATA slot that I then recheck, will the “Alert! Hard Drive not found” problem go away? (I intend to add such a hard drive anyway to have a target for automatic nightly backups. But it will be non-bootable.)
Thanks.
trs96 says
Is there a solution? Connect up any old HDD or SSD with a Linux distro on it to one of the sata ports. Then the “no hard drive” alert should go away.
Paulie says
I just created the same configuration on my system. No hard drives, but DVD write connected and only that option enabled in the BIOS. No hard drive error message.
glnz says
Paulie – thanks for your test. Unfortunately, I continue to get the “Alert! Hard Drive not found … push F1 to continue” when the box for the SATA socket that has my DVD-RW drive connected is checked in the BIOS. And I have now confirmed that the DVD-RW drive works — I just used it to boot up a Macrium Reflect Free Rescue Media PE Environment CD which I had made in 2016. (That is, it works after I press F1.)
I wonder why you and I are seeing something different. Could the reason be that my test 7010 Mini-Tower has an i3 CPU that offers only PCIe Gen 2 ? Does anyone else have such a 7010 and i3, and could you advise whether leaving the DVD-RW’s SATA box checked gets you the F1 error on reboot?
I’d love to fix this only because my wife will complain again about my using dusty old beat up junk computers in her employee’s mini-office if I install this test 7010 without a fix and — for the first time in years — someone tries to “play” a CD only to find the DVD-RW isn’t working. If that happens, I will have to hide out in your pub for a looooong time.
Thanks.
Gary says
Paul, Just did the bios update on my 7010, works great. I had a few issues, I had to use an earlier release of the Intel Management Engine Component (A0). Yours stated it could install on this platform. I have another 7010 to update when the PCIe stuff gets here. Cheers.
glnz says
For the issue I’m having – that on boot I get “Alert! Hard Drive not found … push F1 to continue” if SATA-3 is checked in my BIOS because it connects to the CD-DVD-RW drive — maybe there’s a clue.
When SATA-3 is NOT checked in my BIOS (and so my CD-DVD drive does not work), the Device Manager entry “Standard SATA AHCI Controller” has a yellow ! triangle and the Device Status is “This device cannot start. (Code 10) an I/O adapter hardware error has occurred.”
When SATA-3 IS checked in my BIOS (and I need to press F1 to continue my bootup but my CD-DVD drive works), this Device Manager entry is NOT there and there is no yellow ! triangle,
Does this have any bearing on my issue? Those of you enjoying Paulie’s mod here, if you have all your SATA boxes UNchecked in BIOS, what do you see in Device Manager?
Thanks.
pop says
I wish these Bios mod could work on the USFF (ultra small form factor) 7010 or the 9020 which use the mini pcie slot. The nvme card on the mini pcie dapter produce no post and orange light with beebs. When removed, the system post and says no memory was found on previous attempt. strangely these variants use the same BIOS as their bigger brothers, which aren’t producing these symptoms according to many owners.
Ron says
So, how do you enable service mode on the 3010 SFF? I don’t see a service mode jumper on this motherboard.
Paulie says
I’d be interested to try this on an USFF model. But I don’t have one to hand. What model specifically are you trying it on?
pop says
@paulie i tried both, the 7010 usff and the 9020 usff both with the same behavior…I have been troubleshooting this for a long time and so far still no success. Very good size machines. When the nvme drive is inserted into the adapter, the system doesn’t boot. when removed, the system boot but saying no memory was found on previous boot so the NVME making the memory to disappear.
trs96 says
“When the nvme drive is inserted into the adapter, the system doesn’t boot. when removed, the system boot but saying no memory was found on previous boot so the NVME making the memory to disappear.”
I believe that Dell intended that these mPCIe slots be used only for mSata SSDs not NVMe. The models that are a few years newer from 2016 on, probably suppurt NVMe but I haven’t bought any of those to test. So don’t attempt to get faster read/write speeds by using an NVMe drive in that slot, even with an adapter. It just won’t work.
trs96 says
Here’s an article that may help to clear things up a bit.
What is the difference between NVMe and M2
The best way to go with a Dell ’10 or ’20 USFF model is to use the fastest 2.5″ Sata SSD you can afford. Those give you good boot times and with enough ram the system shouldn’t lag at all.
Greg G says
On the 3010 you need to jumper “Clear CMOS” to get the system into service mode. I added the driver at the end of DXE driver..And it worked.
Leo says
Greetings from Ecuador excellent information and I appreciate the fact that you share it. My question is whether this procedure can be applied to a DELL Optiplex 980 since this model’s BIOS is not UEFI. Please help
Anonymous says
Thanks a bunch for the write-up, still works on my Dell 7010 SFF. For any non-Windows users wondering, the BIOS update and flashing tools work in live-bootable FreeDOS as “ftp -d backup.bin” and “ftp -bios -f nvme.bin” respectively. UEFITool does have a Linux release as well, but be sure to grab a non-“NE” build.
glnz says
This technique is great. My only half-problem is that, on my 7010 Mini-Tower, I’m getting only 1,700 Mbps instead of the hoped-for 3,500 Mbps.
Did some digging in other forums, and the consensus is that, in my 7010 Mini-Tower, my Q77 chipset will provide only PCI-E Gen 2 no matter which CPU I have, and it will make no difference whether or not I replace my i3 CPU with an i5 or an i7.
I’m beginning to wonder whether my new Samsung NVMe M.2 is not as good as everyone else’s.
Those of you who have 7010s and are getting close to 3,500 Mbps – please advise what are your CPUs and what are your chipsets. Please then also run Speccy and CPU-Z. In CPU-Z, on the Mainboard tab, it might give you “Bus Spec”, which might say what CPI-E Gen you have.
Thanks.
freddy says
buenos dias soy de lima peru deseo hacer esa modificacion para mi placa gigagyte GA-F2A88XM-HD3, GA G41M-ES2L, GA-F2A55M-HD2 PUEDES AYUDARME TE LO AGRADACERE MUCHISIMO
trs96 says
@freddy Ninguna de sus placas base tiene UEFI BIOS Desea usar algo de al menos 2012 o posterior que sea compatible con UEFI.
Erik Miller says
Want to thank you for writing up this process and making it available. I have an Optiplex 7010 i7-3770 that I use for digital audio workstation and video editing chores, so every bit of performance I can pull from it counts. I’d been booting using the Clover-on-thumbdrive method, which always bothered me because I didn’t like having the thumb drive sticking out, and it also makes for a slightly longer boot. This BIOS patch, however, let my system fully recognize the drive, as it should. There was a snag because I somehow got hold og the Intel System Management Tools v. 9 instead of v. 8, but then I read the comments and that happened with someone else. Changed versions and it worked like a charm!
Peter says
Hello from Germany!
The following machines have been successfully updated and booting from NVMe:
– 790 > 25 units
– 990 > 60 units
– 3010 > 30 units
– 3020 > 30 units
– 7010 > 100 units
– 7020 > 100 units
– 9010 > 80 units
– 9020 > 250 units
not a single problem with all those machines. Just follow the steps and you will geht the best result!
Feel free to get in touch, if you need further assistance.
Best regards
Peter
Paulie says
Wow Peter – You have been busy! Incredible amount of upgrades you have done. I guess it is a business environment, are the users of the machines happier now?
glnz says
Peter – on the 7010s, what CrystalDiskMark speeds are you getting, what model NVMe M.2 did you use (and size), and what model CPUs do they have?
(I ask because I’m getting only 1,700 Mbps, not the hoped-for 3,500 Mbps, and I have some other PCs to mod.)
Thanks.
trs96 says
Booting from an NVMe drive makes Windows 10 much faster.
Here’s another way to make Windows 10 even faster than that. Debloat Windows 10.
Before you run this script, make sure you know what you are removing. Everything it does can be easily reversed so there is not much risk but be careful with it nonetheless.
Jim B says
glnz – I too have a 7010 with only SATA-3 enable for the optical drive and still getting the “No Hard Drive Found” at bboot. Did you find a fix other than adding a dummy drive or disabling the optical drive?
Thanks
Jim
glnz says
Jim B – no I have not. I disabled my optical drive – have not yet tried a dummy drive with (for example) Linux.
But please advise –
1) What numbers are you getting with CrystaDiskMark? (Mine are only ~ 1,700 ± MBps, not the hoped-for 3,500)
2) What brand/model NVMe M.2 did you buy?
3) What is your CPU?
Thanks.
John says
Thanks. Got it working from your very detailed instructions.
I did have the “No Hard Drive Found” at boot message. That was my mistake I had booted my USB stick in BIOS mode and inadvertently installed the OS in BIOS mode rather that UEFI. I had to boot the USB stick in UEFI mode and then re-install the OS.
I. M. Fletcher says
Paulie! Wow! Thank you so much for putting this together for the 7010. You really know your business. I tried your other instructions I think for the 7020 and nothing would work, but these worked well. However, after inserting the new driver and loading the bios with no issues, it still doesn’t boot from the drive. I can read/write to the drive, but just cannot boot. Looking in the comments, I see another user with the same issue. I just get no drives message and then it tries to boot from the NIC. If I go into bios and switch to UEFI mode, it also just goes to the NIC. If I click ADD in the UEFI dialog, it says “No Filesystem”. It’s very interesting. I’ve been working with computers for 40 years and there is always something new. The only differences I see in my installation is (1) I have a video card in the blue slot, (2) I don’t have your same card. Now, there are comments that say they switched to UEFI mode and THEN installed the OS, so maybe I might have to do something like that. Right now, I used Macrium to clone the hard drive to the nvme drive and then I’m trying to work with it. Maybe this requires a UEFI install?
I. M. Fletcher says
A quick follow-up. I read through all of the comments, and I think I have new info that explains what’s going on. In order to boot in UEFI mode, I have to have a GPT disk, which I don’t. I’m working on converting it. After I finish, I’ll post an update. Right now, it’s MBR mode.
Jim B says
glnz-
Thanks for your quick reply, I apologize for my late reply. I was not able to get it to boot free of the message unless I either turned off all the SATA ports. I tried switching the optical drive to different ports without success. I was able get rid of the message by connecting a hard drive to SATA_0 and leaving the drive unformatted so it didn’t show a drive letter but that was too messy for my standards. Since this was for a customer, I opted to pull the NVME/adapter out and use a SATA SSD. In my 40 years of being a computer tech I am still as curious as the first day so I plan to try again with a test machine. The one variable in my case was before cloning, I converted the old drive from MBR to GPT and didn’t do a clean UEFI install. I used Acronis to clone the drives. I didn’t have time to experiment with this machine.
The system was a 7010, I5-3470, SSD is a WD SN570, and the adapter was the one linked in the article. I was using the Blue slot. It booted fine and was definitely faster but the ALERT message was a deal-breaker. Below is the results of the performance test. I’ll post again if I have better luck.
Seq Read was 3439
Seq Write was 1878
Jim B
glnz says
Jim B – thanks for your info. It’s still a mystery to me why my 7010 is getting Reads of only 1,700 MBps ±.
Could it be because I have an i3 and not and i5 or i7? So maybe the i3 delivers only PCi-E Gen 2 and not Gen 3?
Or maybe I have a defective Samsung 970 EVO Plus (but then would it just not work at all)?
Jim B says
glnz – I’m not an expert but I would bet that the PCI-e version has a lot to do with your speed difference. As you might already know, V2 is half the bandwidth of V3 so it stands to reason. You should be able to quickly mod your other machine to find out for sure. Or, just swap CPU’s as a test.
Good luck and let us know the outcome
Jim B
David Herring says
Upgraded dell 7010S –
1768 is the read speen in KdiskMark (Ubuntu equivalent of CrystalDiskMark ) – impressive but not the 3500 number others seem to have got ?
Thanks for the brilliant write up !
glnz says
David Herring – I also have only 1,700 MBps ± in my 7010.
What CPU do you have? (I have n i3.)
And others with 7010s getting 3,500, what CPUs do you have?
Thanks to Paulie and all here..
I. M. Fletcher says
Just a quick follow-up, and thanks again, Paulie for this EXCELLENT write up. I’ve learned so much from this experience. So switching the drive to GPT did the trick! The 7010 found the drive and I was able to install Windows on it without issue. Boots fast (after turning off the SATA drives) and Windows works great. I never thought I’d ever be editing a BIOS image. Almost like being back on the old IBM 9121. Thanks again!
Paulie says
It’s really great to see so many people having success with this. Keep the success stories coming!
Timothy Hudgins says
Will this upgrade work on Dell 9020? Worked great on my 7010, thanks.
Paulie says
No, but I have a separate guide for that machine which will work.
Timothy Hudgins says
Do you have a link on that one?
trs96 says
It’s under recent posts on the home page. Right above recent comments.
https://www.tachytelic.net/
Stu says
Created a Clover Boot Disk on a flash drive using Samsung 970 EVOPlus with adapter you recommended. I am using the Optiplex 7010 SFF. I disabled SATA 0. It does boot successfully, but when I did a benchmark test using CrstalDiskMark, I am getting no difference in speed from the original SATA SSD installed. The directions seemed plain enough, but am I missing something you see? Thank you.
Phillip May says
There’s nothing showing up under pci ports in bios. Could this be due to the sata ports both being enabled? I only have the hdd and DVD drive working currently.
glnz says
Update – In my test Dell Optiplex 7010 Mini-Tower:
– I have FINALLY replaced the original i3 processor with a used i7-3770 that I bought on eBay,
– it IS providing PCI-E 3.0 in the x16 PCI-E slot, and
– my NVMe M.2 is now showing the full expected speed of 3,400 MBps per this article.
It’s alive !!!
This is on my TEST used Optiplex 7010 Mini-Tower, which might become a fourth computer in my wife’s mini-office.
Now, my PERSONAL computer is also an Optiplex 7010 Mini-Tower with its original i5-3470 and HDD. According to responses in other forums, this i5 should also provide PCI-E 3.0 in the x16 slot, so I should be able to convert my PERSONAL 7010 to NVMe M.2 pursuant to this article without the half-speed issue.
Final issue is that (with the BIOS mods in this article) the PC will not connect to its DVD unit unless the PC also has a SATA drive with something bootable, as outlined in the comments above. i created a new partition on the original SATA HDD and installed a bootable Macrium Reflect Rescue in it. That works, but on reeboot, Windows always asks whether I want Win 10 or “Other”. Ideally, the reboot would always go directly to my Win 10 and I would only see this alternate bootable Macrium Reflect Rescue option if I hit F12 on the rebeoot for the one-time boot option menu. But I haven’t found yet how to do that. Please point me to any links that you think will help me fix this “no connection to your DVD without extra bootable SATA drive” problem.
Paul, many thanks, and God Save the King!
Asmir says
Hello,
thank you for this HOWTO. I made all steps without errors but on first boot after flöashing modyfied Bios Computer wants boot at all. No Bios acces and Orange Power Button flash. (Corrupt Bios??)
After reflashing Backup.bin everything fine again.
What i did false.
Best regards
Asmir
Miguel Camilo says
I have a Optiplex 7010 MT one of the slots is using a GPU that should be the top one pci express x16 and i only have one slot left available and that’s the bottom one PCI-e x16 (wire x4) could i still be able to use the NVMe M.2 on the slot but both GPU and NVMe been used at the same time?
Robert P says
This is a fantastic upgrade.
Your instructions on how to modify the BIOS in order to achieve UEFI boot worked a charm. Thanks Paul.
For me (as a novice in these matters) the biggest challenge became getting from MBR to GPT. My starting point was a mechanical hard drive with Windows 10 Pro Enterprise preinstalled in MBR format. Being reluctant to reinstall Windows I first cloned this to a Kingston SATA SSD. The free cloning software that I used would not do the MBR to UEFI/GPT conversion. I don’t think any do (but others may know better). As mentioned above, UEFI boot must have GPT style format. I got in a right mess while comprehending this. However I had also already cloned to the NVMe M.2 SSD having made it MBR(!) and of course it would not boot! After pausing to ask the right question I then discovered the following sites that describe clearly how to perform a free conversion from within Windows 10 using MBR2GPT: https://www.makeuseof.com/tag/convert-mbr-gpt-windows/ https://www.youtube.com/watch?v=2ZY42_Dl0ck I used my legacy Windows 10 installation on the Kingston SATA SSD to perform the conversion on the NVMe M.2 SSD. With that done and the BIOS switched to UEFI rather than legacy boot mode my Optiplex 7010 now boots in UEFI from the NVMe PCIe M.2 SSD. Additionally, during the process I noticed that if I had no SATA hard drive connected then the system would report “No Hard Drive found” However by pressing “F1” the system would nonetheless boot in UEFI. This “F1” step disappears if a SATA hard drive is reconnected. Also I found that it took the system another restart for all the drives to be recognised in Disk Manager. So if in doubt about any step it seems to be worth trying again with another restart! I have since partitioned the drive and made the system dual bootable with Ubuntu.
Thanks again Paul.
Here are the results that I achieved on my Dell Optiplex 7010 SSF i7:
Before: using SATA Kingston SSD Performance after upgrade
These tutorials may also be of interest:
Converting MBR to GPT without data loss:-
https://www.makeuseof.com/tag/convert-mbr-gpt-windows/
Using Macrium Reflect Free to Clone Windows to a bootable M.2 SSD:-
https://www.youtube.com/watch?v=CHCENfs87F4
includes using Administrator Command Prompt – DISKPART to clean disks.
How to Clone Windows 10:-
https://www.youtube.com/watch?v=jZBDluCITmE
Making a dual boot system:-
https://dronebotworkshop.com/dual-boot/#AOMEI_Backerupper_Standard
Robert P says
Summary of my CrystalDiskMark 8.0.2 x64 [Admin] Results
before
Kingston SATA SSD Performance, legacy boot (MBR):
SEQ1M/Q8T1, SEQ1M/Q1T1, RND4K/Q32T1, RND4K/Q1T1 *
Read 561.57, 528.67, 203.29, 30.56
Write 506.57, 470.49,19.54, 19.18
after
With Crucial NVMe PCIe M.2 on glotrends adapter (GPT):
SEQ1M/Q8T1, SEQ128K/Q32T1, RND4K/Q32T16, RND4K/Q1T1 *
Read 2450.32, 2495.27, 1099.53, 37.94
Write 2056.82, 2065.01, 873.43, 135.96
* I do not know why the parameters in the second and third rows, first column have changed between the tests or what the significance of this is.
Paulie says
Great results Robert. Must have given the machine a significant boost in responsiveness.
David Morrison says
you keep saying it will be slower if you dont use the graphics card slot, not true if you have the 7010 DT or MT it has 2 16x slots
3rd is for wifi , not use that one,
other 2 are 16x and the black one is 16x wired as 4, which is all you need for nvme
nvme ssd only uses 4 lanes, so if you put it in the graphics slot it will be 16x running at 4 anyways, unless it is gen 2 not gen 3, but what i see they are both gen 3 pcie slots. so do not use your graphics slot, it will make no difference ,
https://dl.dell.com/manuals/all-products/esuprt_desktop/esuprt_optiplex_desktop/optiplex-7010_owner's%20manual4_en-us.pdf
Paulie says
Hi David, thank you for the useful clarification.
Larry D. says
GREAT Tutorial! But I have one question. Would I be able to use the NVME driver to flash the BIOS on an Optiplex 3040 SFF with a BIOS dated August of this year (2022) version 1.20.1 which I have updated.
I tried to use the fptw64 tool to make the backup and got THIS error:
Error 318: The host CPU does not have read access to the target flash area. To enable read access for this operation you must modify the descriptor settings to give host access to this region.
FPT Operation Failed.
I DID manage to get a backup made using this command:
FPTW64.exe -bios -d dump.bin but I am worried as to whether or not the NvmExpressDxe_Small.ffs will be able to be injected. Last thing I need is to brick this Optiplex since it is my main computer right now.
Thanks for any help you can give!
Paulie says
I would have thought the 3040 would have NVMe support natively. So I don’t think you need to mess with the firmware at all!
Larry D. says
No, it does not. The BIOS sees my NVME as Mass Storage but not as a bootable drive, although I am thinking I MIGHT be able to make it bootable by adding an extra entry under Windows Manager. Problem is I need to figure out what the exact parameters are.
I’ll keep plugging at it
Vivek says
Dear Paul,
Thanks a lot for taking time to write this article. Because of this only, layman like me was able to use the NVME as OS disk which otherwise i was planning to add as additional disk with sata SSD as bootable. Your very clear step by step instructions with screenshot were very helpful.
I added the NVME to my optiplex 9020 and there were few steps which i had to do in addition. May be you can add those steps in your nice article. These are:
First convert HDD from MBR to GPT to enable UEFI :
– My HDD was MBR disk and bios was setup as legacy. Thus first i had to convert my HDD to GTP disk
– Good article on this is https://www.windowscentral.com/how-convert-mbr-disk-gpt-move-bios-uefi-windows-10 and online conversion works fine.
– However the conversion failed and this is well addressed in https://community.spiceworks.com/topic/2218500-mbr2gpt-conversion-0x00000000-error. One should read all the comments first before applying the fix for DELL PC as that leads to problem when disk is not identified as basic disk. Thus users should be careful to apply the correct command which I guess would be mbr2gpt.exe /convert /disk:0 /map:222=ebd0a0a2-b9e5-4433-87c0-68b6b72699c7 /allowFullOS . I applied the first command then had to convert the disk to basic disk and reapply this command did not worked later on. But i had no follow up problems afterwards so i left it here only.
Move Legacy Boot to UEFI in ROM
– Ensure your HDD boots fine with UEFI
Clone HDD to NVME ssd
Remove all unused SATA disks from ROM and move to ACHI ?
– You have mentioned this adequately but i missed it and only reading your article again, the NVMe booted correctly. May be you can highlight that in bold red as this is also crucial step i guess.
– Also may be you can add point to move from SATA interface to ACHI alongwith as that is better i guess ?
Thanks again!
Vivek
Sorin says
Thank you so much for this tutorial! I managed to make my Dell optiplex 7010 a real rocket! I really appreciate your work that you shared with us too. You are a genius!
Larry says
Hi Paul;
Well I guess this ISN’T going to work for the OptiPlex 3040 SFF with the A 1.20 BIOS. I cannot find where to insert the code for the FFS file, and I did several searches for key phrases such as OemLinkDellPwdLib. I would have torn out my hair on this but I have little enough as it is.
I guess I am going to have to bite the bullet on this, and either accept the fact that my SSD drive is NOT going to be bootable or buy a newer model that does have M.2 compatibility such as an on the mobo M.2 slot or is able to boot from PCIe.
If you have any further suggestions it would be greatly appreciated!
Thanks!
Paulie says
This procedure won’t work for a 3040. But if you’re 100% sure it doesn’t already support NVMe I will buy one and write up another guide for that series of machines.
Larry says
Hi Paulie!
I’ve tried everything including all the methods listed in this article from Dell:
https://www.dell.com/support/kbdoc/en-us/000132410/what-are-pcie-ssds-and-how-to-use-them-as-a-boot-drive-for-a-dell-pc
NOTHING has worked. I even tried Clover and that didn’t work either. Although I do realize that Clover is more geared to Hackintosh I still could not get it to boot.
If you can find a way, PLEASE let me know.
Thanks for your help!
Eugene says
Dear Paul,
Thank you for your detailed instruction. I could upgrade to a 2TB M.2 Samsung Evo Plus card in my 2013 Optiplex 9010 SFF. Initially, I cloned my windows 10 system disk (MBR) to this drive (formatted as GPT) but could not boot under UEFI. However, I installed a fresh win 10 pro installation on the drive and booted from this new drive. Read speed is 3372 MB/s, and write speed is 3358 MB/s. Five years ago, I got this machine free from surplus and installed a 500 GB Samsung 860 EVO. The read and write speeds before the upgrade were around 550 MB/s. The performance improvement is amazing, and I hope to use this computer for another 5 years.
Thank you so much,
Eugene
Larry says
Hi Paul;
I was wondering. Instead of you having to buy an Optiplex 3040 machine, would you just need the BIOS image that I have extracted, (I did several copies in case I fubared one) for the Optiplex 3040?
If so, let me know and I will upload the file to either Dropbox or Google Files.
Thanks again!
Larry
Paulie says
I have a 3040 now. I will check it out and come back to you soonest.
Ben says
Hello Paul,
I just followed this to my old Dell OptiPlex 7010, but it still won’t let me boot from it. Under the UEFI menu, I cannot add any boot options, it gives me a warning saying “No file system”, and under legacy, it doesn’t recognize it as a bootable drive either. Any solutions to fix this problem?
I tried cloning my original drive using Macrium reflect off of an old Samsung Drive onto my Crucial P2 NVMe M.2 drive via an adapter similar tp the one you used.
Thank you,
-Ben
Joseph says
I’m trying to update my 7010 according to this procedure but when I switched the jumper for service mode and I restarted it. It didn’t boot for about 10 mins and then it’s no longer showing the Boot option or boot menu. And getting straight into windows is taking forever everytime I restart. Have put back the jumper in it’s original position but no boot menu and it’s still taking forever to load. Stuck on this for hours. Any leads
glnz says
Paulie – Happy New Year!
Some time soon I will convert my second 7010 MT per your article here. (I converted my first in September and left some notes above).
Question: my existing second 7010 dual boots Win 7 Pro and Win 10 Pro, both 64-bit. The current default OS is the Win 10 per my settings in the very useful dual-booting apps iReboot and EasyBCD. I’m already UEFI but with SecureBoot off and no sign-on password needed to boot.
— If I upgrade it per your article here, do you think I’ll have any snags due to the dual-booting?
Thanks again!
DDE12 says
How is the Dell 3010 SFF put into service mode?
Paulie says
I am not sure, I’ve never used those boot tools before. Sorry.
Please let us know how you get on!
DDE12 says
On the Dell 3010 SFF, Service Mode is enabled by moving the jumper from pins 2+3 on the MECLR pins to pins 1+2. The pins are located next to the CMOSCLR pins which are all under the heatsink/fan bracket (under the right side of the bracket if facing the front of the machine).
Larry Dinkoff says
Hey Paulie!
First off I hope you had a great holiday season and of course a Happy New Year ( and may you have many, many more of them. I just did my 72nd New Year)
Did you ever get a chance to the directions for converting a Dell 3040?
Thanks again for all you do!
Larry
Paulie says
Hi Larry,
I purchased a 3040 and attempted to modify it but failed.
The modification part works fine – but the 3040 has some kind of bios guard. When the system detects the modified bios it just restores the original version.
Paul
Larry says
Thanks for your help, Paul. Not sure what that could be, but oh well. If nothing else I have a fast storage drive now.
Larry
glnz says
Tried to upgrade my second Opti 7010 MT but failed. (My initial effort on a different 7010 succeeded a few months ago.)
I think the Samsung NVMe starts the boot process, but the screen then shows nothing. Not sure, of course.
My 7010 dual-boots Win 7 Pro 64-bit and Win 10 Pro 64-bit, and the default is the Win 10. After running all the steps in Paulie’s article, I cloned the original HDD to the Samsung NVMe using Macrium Reflect to do the clone with Verify on.
Now, when trying to boot from the Samsung NVMe, I get the choice whether to continue into Win 10 or Win 7 (a bright blue background and large rectangle choice buttons for Win 10 or Win 7 – the “Metro” style?), but after I choose the Win 10, the screen goes dark.
Actually, the screen is ALMOST black. It’s getting some power, so it’s a very very dark blue – midnight blue – but no info. It stays dark like that.
I used Macrium Rescue Disk “Fix Windows Boot Problems” to try to fix this, but no luck.
Finally, I used the same Macrium Rescue Disk “Fix Windows Boot Problems” to boot only from the old HDD, which is how I’m connecting to this page and writing this comment now.
Any ideas?
I suppose I could start from total scratch, at the top of Paulie’s article here, but I wonder if anyone else has had the same experience.
Specifically, has anyone else had success starting with a dual-boot HDD?
Thanks, all.
glnz says
Adding to my comment above – even on my original hard disk drive (HDD), my Win 7 Pro 64-bit won’t start. It gets as far as the four glowing MS flags but gets stuck there forever. (On my original HDD, my Win Pro 64-bit does start. At this time, on the NVMe, neither OS starts.)
I’ve posted now a few times now on TenForums and SevenForums, and one of the responses is that Win 7 lacks native drivers for NVMe, and such drivers have to be added / installed.
So – question – when we add the line for NvmExpressDxe_Small to the BIOS (per Paulie’s article above) and then try to boot into Win 7 Pro 64-bit, does the BIOS expect to find NVMe drivers in Win 7 and so Win 7 hangs if such drivers aren’t there yet?
When I get a chance, I’ll revert my BIOS back to the pre-Paulie version (which I might find in backup.bin, yes?) and see if my Win 7 can then start. If yes, I’ll add the NVMe drivers suggested in some posts at TenForums and SevenForums and start all over.
Again, would love to hear from any here who have succeeded with Paulie’s technique in a dual-booting setup.
(If you want to add to my detailed posts at TenForums and SevenForums, I use the same user name glnz – search for that and recent posts. Much appreciated if you do so.)
Thanks.
glnz says
Sorry – in my post immediately above, the last two sentences in the first paragraph should be
(On my original HDD, my Win Pro 10 64-bit does start. At this time, on the NVMe, neither OS starts.)
Petter says
I have a Optiplex 7010 with A29 bios and Dell service tag 3D495Y1.
When trying to use a Intel Ethernet server adapter I350-T4 or a Intel Pro/1000 PT Dual port adapter, the onboard network adapter are no more detected by the operating system, and also the pc can suddenly freeze. I have truded bothe with Windows 10 and also Ubuntu Linus and Smoothwall firewall. All operating systems are giving similar behavior, so this must be a bios conflict issue. My reason for using the INTEL 2 and 4 port network cards is to use the 710′ as a small firewall. Do you thing or have any feedback if the BIOS can be modified so that the INTEL Network cards can be ussed, and also the onboard NIC will still be functional =
glnz says
After a lot of fussing, especially turning back on “Enable Legacy ROMs” in my BIOS, my dual-booting (Win 10 + 7) Optiplex 7010 is booting and running the Win 10 from the Samsung 970 Evo Plus with the usual 3,400 MBps in and out.
But the Win 7 side will NOT start.
Maybe, if I go back to my original dual-booting HDD, which can run both the Win 10 and the Win 7, I should add some drivers to the Win 7 side, or install specific hotfixes, that permit Win 7 to boot and start from NVMes ? What would those hotfixes, drivers or updates be, and where can I find them now?
Thanks again.
CHRISTIAN AUZEAU says
On a 3010 no way to put it in Service Mode. Only 3 jumpers from bottom side : left : Password, middle : Biosclr, Right Meclr. As from some others user I tried the middle jumper on pin 1,2. (They are all on pin 2,3 normaly). But the system doesn’t start.
Any suggestion ?
Christian Auzéau says
Well, that worked but I cannot boot from the SSD (same EVO 970). My Dell 3010 see it like a mass storage not bootable. I even cannot instrall a new window from a Usb key. Ay Idee ? Thanks. You make a great job guys !
YellowDog says
Great post. It made my OptiPlex 7010 great again.
Just want to share something here:
After putting the Optiplex 7010 into service mode, the first boot (after you press F1 to continue) might fail (For me, it always failed. I changed a few 7010s). Just turn it off and then turn on again. The second time, it will boot into windows and we can do the backup/mod/re-flash.
Igor says
Hello. Thank You for instruction. I repeat all but my dell optiplex 7010 dont recognize sata, msata or nvme drive after. Can you help me?
TechGuru says
Thanks for great tutorial. I moded OptiPlex 990, 7010, 9010 and all works super fast.
Only difference is in optiplex 990 you have to manually add UEFI device in bios to boot from NVME pci-e ssd. In 7010,9010 will detect automatic.
baba_metca says
Thank you for the great tutorial. It works great in a 9010. It works with an AXAGON PCEM2-D adapter with a Samsung 980 256GB NVME. Read 2800MB/s, Write 1200MB/s. A bit slow but it’s probbably the adapter. Still more than 40 times faster .
Thank you!
Jason says
I have been trying to get my Dell Inspiron UEFI backup up but keep getting a 201 error. Says it will not work on this platform? Intel machine running an Intel i5 processor. Have you tried to upgrade one of these?
Jason says
*Update on my last post*
My chipset is newer than this post so I downloaded a different Intel Management Engine System tool. I was able to dump the bios and add the file for NVME support. I copied the file back, restarted and verified it was still there. I ordered a drive and adapter card that will be here tomorrow.
To get the Inspiron into Service Mode you need to move the jumper MECLR1. Note: during boot up the system does not warn you that you are in Service Mode. I switched it back and tried again to dump the file. This time it was not readable. So far all is good here.
Dell Inspiron 3847 (Only one PCIe 16 port)
Intel® Core™ i5-4440 Processor
8th Generation Intel® Core™
Jason
Rob says
Greetings! I wish I have contacted Peter (MAY 9, 2022 AT 12:17 PM) before going the other route.
Optiplex 9010, W10, i5 3.20ghz, booting from PCIe NVMe M.2 adapter using a WD SN850X 1TB and a $14 PCIe adapter 3.0 that included a heat sink.
Problem:
Boot from PCIe NVMe M.2 adapter from Optiplex 9010.
Resolution:
Attempted to update BIOS using W10. Failed.
Attempted to update BIOS using FREEDOS USB. Failed. My MBE is #3 if that matter.
Created a bootable USB with Clover. It failed until I removed the HDD.
Before removing the HDD, I created a USB Windows 10 installer.
Attempted to install the W10 on NVM2 M.2 but it was partioned with the copied info from my current HDD and it was not going to install it there, W10 said.
I was already booting from Clover USB and selecting the 2nd or 3rd image (it is normally the second one, but it was reading the USB W10 installer and place it with an image of SSD on the first image/option).
I decided to remove the HDD. And let it boot the NVMe M.2. It failed and it shows a bunch of little lines horizontally, then, the DELL logo and it attempted to boot from the USB W10 installed as planned and selected from the Boot sequence.
Attempted to install W10 from zero. Failed. Didn’t like the partitions. So, I used the Problem Solver from the installer and opened the CMD symbol and used Diskpart, List Disk, Select Disk #, Clean and I let the machine reboot.
Attempted to go same route to boot from NVMe M.2 but nothing was found there (HDD cables disconnected already), so, the USB W10 installer booted and asked me to install W10. I did.
I must say that during the restarting process, I was not sure what to do, but I let it attempt to boot from the NVMe M.2 and it kept with the instalation process.
It restarted like 3 times.
Yes, I have removed the Virtualization from the Boot commands and turned of Security Boot for this purpose and allowed it to boot from Legacy ROM devices. But keeping the UEFI.
I did try to update the BIOS while using Legacy Boot mode. Failed.
Conclusion:
It is currently working. I just have to solve the reason why I cannot see my HDD when booting from NVMe M.2 SSD, but when I boot from HDD, I was able to see the NVM2 M.2, So, I started to transfer the files that were important to me.
Notes:
For some reason, the second display is kind of enlarged, when booting from NVM2, unable to fix that right now.
After I attempted to update the BIOS using W10, the internet sometimes does not work using cable for some reason. Sometimes, it reads the adapter and others it won’t. Sometimes, it shows it is desabled and I am able to enabled it. Others, it does not shows anything.
The different on the speed are day and night. I was waiting around 9 minutes to have the machine capable of doing my request.
Now, everything is ready within 1 minute.
Mark G says
Hi guys, I have modified the BIOS successfully, installed the PCI card. Cloned my OS (win7 Pro) from previous SSD to the NMVe drive – all seems good at first boot immediately after the cloning process. I tested all my applications, all seems to work just fine.
BUT FOR some unknown reason, as soon as I shut down, and restart it does not boot at all. Gives error 00000000007dx OR something along those lines.
ANY HELP? Would appreciate inputs.
(System is Dell 7010)
Paulie says
I don’t think windows 7 has NVMe support built in.
Dave says
Win 10 is free to activate with your 7 key, 10 is free on ms site, called media creation tool, 7 no support nvme
glnz says
To Mark G – if you load NVME drivers into your Win 7 while it is still booting from the old HDD and then re-clone to the NVME, does it boot?
If yes, please advise here which drivers you tried.
Dave says
I used the win 7 recovery image for the 7010 on dell site, it has uefi and nvme drivers built in, clone will be difficult. https://www.dell.com/support/kbdoc/en-ca/000123667/how-to-download-and-use-the-dell-os-recovery-image-in-microsoft-windows
Dave says
Why 7 though, win 10 free to activate with 7 key, will have so much better running system,
Ian Robson says
Hi Paul,
I have now got a Dell OptiPlex 9010 running beautifully following your instructions.
However I now find there is no ethernet available – can’t even find it in Device Manager. I have downloaded and installed the correct version but it appears nowhere.
Any ideas?
Regards
Ian
Paulie says
Perhaps the Ethernet is disabled in the BIOS by accident?
Ian Robson says
Thanks Paul,
Appears whilst disabling the PXE boot I’ve turned off the NIC.
You’re a legend!
Regards
Ian
David says
It worked for me on a 7010…steps were easy ..couldnt install the intel mange engine. None came up as compatible. I tried it anyway and it worked. Boots UEFI mode, but not legacy
Tibor Simandi-Kallay says
Two questions:
1; Does the Intel software and the BIOS update also run under Windows 11?
2; Is it possible to switch Secure Boot on again in the BIOS after this procedure, and does it then work?
The system I need this update for is a DELL Optiplex 9010.
David Morrison says
bios update and windows are not even closely related, fyi windows 11 is windows vista under the hood. , vista was the new arcitecture after xp, and it took 10,000 engineers 10 billion dollars in research and 10 years to develop ,vista design was started before xp release even, and has not changed since, it was the largest single project since the NASA shuttle. the only thing that has changed is the software and apperance, if you look through windows 11 you will still see windows 7 backup icon, thats because its the same os with a few fixes and touchups. i have this on a 7010, samsung 970 evo nvme ssd with pcie card adapter, Windows 11 pro, the only os you will run into problems is windows vista and 7, due to lack of built in drivers.
David Morrison says
After a joint I just realized how silly this question is ,
Windows 11 is designed to support new TPM 2.0 and new versions of secure boot,
So if the old version have been replace so they are problem not doing much ,
In other words it wont make a difference if your old system has it enabled or disabled,
Because virus code writers have figured out how to get past TPM 1 , that’s why they made TMP 2.0 ,
lol
Tibor Simandi-Kallay says
Thank you for your reply, Mr. Morrison! Of course, I realize that old PC systems like the Dell Optiplex series should be thrown in the dustbin when it comes to security. But I don’t work for a company and I don’t get a salary from the NSA. No worries. And I only open e-mails with attachments under Linux, if at all. I have no doubt that Windows version 11 is still as insecure as an open barn door. But even though I know that thousands of idiots drive their cars every day, I will still go out and shop. Simply because there is no action without risk. I hope you can forgive my stupidity. 😉
David Morrison says
Ya , I wish they had a better solution then new pc with tpm 2.0
And I have new pc and laptop from 2022 and the old ones work just as good for most things,
As I have windows 11 on some very old pc’s for tinkering ,got some free optiplex’s
Here there is a place sells off lease dell 5050’s ,for only $100 cad, 6th gen with nvme ssd , but power supply is a prob, as its not a standard psu but I got one anyways, put a Samsung nvme in that one
But I have 2 7010, and I like has standard power supply so the other I put in gaming 600w psu and connect gtx 3060 and works ok , get 60% of the cards capability anyways,
David Morrison says
They must have been high when dell techs came up with this one, 7010 and 9010
See here it’s the same god dang computer, lol
Dell OptiPlex 7010 MT vs. Dell OptiPlex 9010 MT Comparison (hardware-corner.net)
https://www.hardware-corner.net/compare/Dell-OptiPlex-7010-MT_vs_Dell-OptiPlex-9010-MT/
Paulie says
They are the same computer. They only have different BIOS capabilities. You can easily transform a 7010 into a 9010 with some BIOS modifications. The only difference is the remote management capabilities built into the BIOS.
Olyn says
Ok, call me late to the party! After a long computer career, retired, and really don’t do this stuff anymore. I am starting to rediscover the fun again.
Thank you, Paulie, for this upgrade instruction. So, after 6 plus hours of fighting to find the right drivers for this 7010, Intel(R) Core(TM) i5-3570 CPU @ 3.40GHz, reinstalled system. The BIOS hack was accomplished in 15 minutes reading the right instructions for the right machine, link to Intel tools version 8 made all the difference. No more error 201, can’t run on this platform. LOL. Hardware install coming soon. I wish I had really considered the UEFI connection, I would have abandoned this whole process. TOO LATE HARDWARE ORDERED.
For as Mr. Morrison, said, after a joint, he realized the truth of TODAY! I say you wasted a perfectly good joint on what we watch every day. Every thing is harder, more controlled, and need more information (phone, email, boot device) yet the experts keep finding a way to defeat the security features and all we are left with is less freedom! I chose no mac’s because they are too restrictive. Now these dopes are following the mac.
I will have to buy you a drink!!
silvio says
Perchè non riesco a fare quello che scrivi? Non riesco ad usare fptw64.exe? perchè se sono l’amministratore unico non mi fa aggiornare il bios del miei due Dell 7010?
Paulie says
Che errore hai ricevuto?
Hai messo la macchina in modalità di servizio?
Rodrigo Genuino says
thanks for sharing the knowledge, very well explained step by step, I would like to collaborate with my experience, special attention in updating the BIOS, I did it without the update and it didn’t work, when I do it, I am in an environment that guarantees that there is no lack of energy for the equipment at the time of the update.
I’m using PCI-E x1 card with m2 NVME KingSpec that way it doesn’t exceed 400 MB\s but even so, it already improves the performance of the OS and other software
dave says
whats the point then if getting 400, on my 7010 i had a sata ssd samsung 870 evo, and i am getting 560 mbs on crystaldiskmark speed test, this old post, this year i picked up a 5050 for 100 bucks, 6th gen i5, has NVME m.2 slot, so im now getting 3500mps on speed test with wd black nvme i picked up on sale, so i have no use for my old 7010,
Hung says
Hi Paulie,
I have success to install NVME M.2 1T Samsung evo plus to my PC MT7010. But I cannot be able to go to bios anymore (I use external graphics card Radion HD 6670). If I want to go to bios, I have to take out external graphics card, so I can use the built-in graphics card.
If I use the external graphic card when I power up I hit the F12 or F2 it just gives me the blank screen.
Note: You are right we need to use slot blue card I get 3550 speeds. When I install to slot black cards, I get 1600 speed.
Please let me know if you have a solution.
Thank you,
Hung
David Morrison says
Thats because your graphics card you are using does not support uefi boot, so it does not work until the driver loads, I got it to work with a Nvidia GT 1030 ,
David Morrison says
Update , forgot to add secure boot,
Thats because your graphics card you are using does not support uefi and or secure boot, so it does not work until the driver loads, I got it to work with a Nvidia GT 1030
Hung says
Hi David,
I figure out by myself I remove the battery cmos wait about 10 second and put it back in. It let me go back to bios to change the time, I have to change again uefi boot and I check the legacy rom option. I test again and it work it show the logo Dell before it boots to the windows. I have a chance to press F12
Note: if I do not check the legacy rom option, I cannot go to bios 🙂
Before if I want to go to the Bios, I have to remove the external graphics card and use the build in graphic card on board so I can be able to go to bios it is too much work. Now, I can use my external graphics card.
Michael Sandy says
Hi Paulie .. I’m a late starter with this… many thanks for your detailed notes!
how much faster would Win 10 booting be after the NVME upgrade?
ie compared with the stock SSD drive?
Dave says
After going from sata ssd to nvme, even on my newer 6th gen dell 5050 with samsung 970 evo, you will see no difference in speed , only in large file transfer, a computer is only as fast as its slowest component, notice task manager even with sata ssd it only uses small percentage of the ssd for routine operation
Olyn says
I can’t thank you enough for adding the donate link. I like to be of my word, like God. This whole project went south for me on converting the hard drive. None of that free software did what it said, once the
OS migration was done, it’s smoking!
Mike says
I successfully followed the guide and upgraded a Dell optiplex 7010 with 16Gb of additional RAM and an NVMe SSD Samsung 970 EVO Plus. This was for a dedicated Roon device that was starting to get bogged down. Difference in speed is outrageous! Achieving only slightly less than the numbers at the beginning of this article. It works like a charm.
Can’t thank you enough. Next will be an upgrade to a Dell Inspiron 580.
And will definitely buy you a coffee!
Stu Kopelman says
7010 Optiplex. It worked well. I installed Win 11. And while the read and write speeds are 7x a normal SSD SATA drive, I do not seem to experience it. It does not seem much faster. Using NVMe SSD Samsung 970 EVO Plus with 8 GB RAM. Definitely appreciate the jolt of confidence after it worked,.
Thank you.
Paulie says
What CPU do you have? It needs to be i5 or better to get maximum speed.
computerdave911 says
, normal opterations will never see a difference between sata and nvme a computer is only as fast as its slowest component , being the bus and cpu in your case, if you look at task manager say while installing updates for eg, you will see ssd using 1 or 2% so how is making this faster gonna change anything , its not , but if you have HDD its maxed out at 100%, thats why you see difference from hdd to sdd, but not so much in ssd to faster ssd, as its already going faster than needed.
computerdave911 says
waste of time to put nvme on this old cpu,, you can get over 4000mbs performace from sata ssd with samsung 870 evo and their magician software, it enables HMB wich will use your system ram as the ssd for cache, so if i run speed test with crystal disk mark it is showing over 4700 mbs read and write, and this is with sata, of course it wont keep this speed up for large file copy but for day to day performace , no human will be able to tell if running nvme or sata.
Paulie says
I disagree. Having an NVMe drive is not only faster, but has a much lower CPU overhead. So by using the NVMe drive your freeing up your older CPU to get on with other things. The latency is also much lower than SATA, which is where you will notice a difference.
Using your ram as a cache is giving your system CPU more work to do and even then it wouldn’t be as fast as native NVMe. Enough people have done this upgrade and felt the difference in system responsiveness. Not only that it gives you additional options for your internal storage.
computerdave911 says
you can disagree all day i have timed it, time your boot with sata ssd then nvme, there is NO difference,
it is your mind tricking you, there is no noticeable difference
i have a 6th gen dell, came with m.2 sata, put in nvme , no difference at all, miliseconds, unless you have a gaming pc playing call of duty, miliseconds dont mater ,
Paulie says
Timing the boot process isn’t a very interesting performance metric. People do a lot more than just boot their machines up. But having said that, I have also timed it. NVMe is faster at booting also.
Stu Kopelman says
Pauli replies, “What CPU do you have? It needs to be i5 or better to get maximum speed.”
It is an I-5-3470 CPU @ 3.20 GHz Mhz 4 Cores.
Thx for your reply.
Paulie says
Interesting, what sorts of speeds are you getting and what NVMe drive did you buy? What PCI slot did you put it into? What model do Optiplex do you have?
Stu Kopelman says
Paulie writes, “Interesting, what sorts of speeds are you getting and what NVMe drive did you buy? What PCI slot did you put it into? What model do Optiplex do you have?”
Dell Optiplex 7010, Mini Tower, Blue PCI slot, NVMe drive you advertised, Read Speed 3581 MB/s; write speed 3284 MB/s.
Thx for responding.
Gary says
This is an amazing guide for these older Dell OptiPlex’s!!! Paulie is the real MVP for bringing this info out to help the people that want to breathe new life in these perfectly good machines that software has left behind. I have a question for Paulie and Peter from Germany about the BIOS editing the 790/990 series and what Intel Management tools version are used to get NVME working on those? Really excited to get one or more of my PC’s updated to current hardware storage speeds. Many Thanks in advance if you have an answer for me.
Paulie says
I have a separate guide for that machine: Install and boot from an NVMe SSD on a Dell OptiPlex 790 or 990. Glad you were able to give your old machine a boost!
computerdave911 says
i would not bother anymore, i get dell 5050 6th gen with nvme slot, at outlet here in Toronto ,they sell them for only 100 bucks, and they have 7010 for only $60m i put my 7010 to rest ,
computerdave911 says
also like i said, you dont need it, if you get sata samsung 870 evo ssd paired with samsung magician software it will use system ram as cache , will get over 4000mps on speed test, i have tested this and with nvme then on sata, boot time was exactly the same, as it will only use about 20% off the drive during boot and even less opening apps, as the cpu will be the slowest componenent, they only time you will see a difference is in transfering large files, open task manager and watch during appinstall or updates etc you will see it only uses a small % of the drive, Better to get a good GPU ,min GT 1030 ddr5 version, to upgrade these old dell’s
computerdave911 says
my 1st computer 1985 , lots of exp, and this reminds me, in I.T we call it a waisted upgrade, when you install 16 or 32 gb of ram, and you only serf the net, and the system will never use more than 6gb or ram, lol, it is common for people to try to fix a slow pc by adding more ram, when they aready have more then they use.
Gary says
PAULIE!! You ROCK!! My 3020 is booting super fast now! Tonight I will be doing the 9010 to get the faster drive speeds. I think this is a MUST on older hardware, it keeps them running, useful and out of landfills. I love how a 10yr old PC can boot in less than 6 seconds and full reboots from desktop to desktop take around 15 seconds. Faster than new Laptops I setup here at my IT job. This is a fun and interesting mod that will definitely make your PC stand out from any that still use SSD or HDD for SURE!! @computerdave911 I still think that upgrading these older machines for around $50 or less depending on the NVME size are worth the effort and the results gained, I am doing all my Older Optiplex’s this weekend.
Michael Sandy says
Hi, after a successful install of the Nvme and bios driver thanks to the excellent advice above, I unfortunately also had a lot of problems in transferring Windows 10 to the nvme drive, and in making it the boot drive.
None of the links above including Macrium reflex (which no longer has the ‘freeware’ option ie its a 30 day trial) were helpful.
What worked was reinstalling Windows 10 from a USB installation drive, after configuring the BIOS for UEFI boot.
Fortunately Windows 10 seems to have retained its activation via my Microsoft account.
During windows installation you need to configure the NVME via diskpart (a Command line utility which you access via the Command prompt; note that the prompt is is easily accessed via Shift & F10 during Windows installation).
Use diskpart to:
1. ‘Select’ the NVME drive (it was Disk 1 in my case)
2. ‘Clean’ it
3. ‘convert GPT’ (rather than MBR, as required by Windows installation)
4. and thats all…Do Not create a partition on it, as the Windows Installer does this and will fail in my experience if you do.
Then exit the Command prompt and resume the installation with the nvme drive as the installation disk.
I did find that the 9010 boots a faster now, even though it was already on a SSD drive…possibly because it was somewhat of an ancient ssd being 118Gb only.
It was also a good opportunity to clean out the dust!
Its only running on 8Gb of RAM but with NVME this shouldn’t be an issue../
Voila!
Michael
computerdave911 says
windows 10 once you activate you never have to do it again its for life of the pc, also you dont need microsfot account for that either, it records the serial number of your motherboard on microsoft server, so when you reinstall it will auto activate, once you connect to internet, key has not been needed since Windows 7, old news from 2009, also you are repeating stuff that has been said over and over in this forum. , yes you need to reinstall windows , clone is ok when going from sata to sata , so if you clone sata and boot the nvme the drivers are not the same,
computerdave911 says
that is why there is not key on a OEM computer since 2012 (windows 8), it dont work like that anymore, lol , oem never will need the key,thats why its in bios, its auto, records you system board and links it to microsoft account if have one, no need though,.
retail key can only be tranfered to another pc,
Adnan says
Hi, thank you for a great article.
Quick question, will this procedure work with Dell Vostro 260?
Have a great day Paulie!
Paulie says
I don’t know, I haven’t tried it.
David Morrison says
i would not bother, it only has PCIe 2.0 x16; (3x) PCIe 2.0 x1; slots,
ddr3 system, why , you can get ddr4 systems for 100 bucks now that windows 10 end scare has their prices falling every day if they dont support 11, , i got a dell 5050 6th gen i5 has M.2 nvme slot, and it was 100 bucks on used very available off lease systems here in Canada , put in 970 EVO and rock the 3500mps and a GPU will have a night and day system.
Adnan says
Ok i will try this on dell optiplex 7010 tomorrow. Had a dell vostro with ssd lying around as a backup pc. So wanted to check if I download the latest bios of vostro (from web) and inject above nvme drivers(mentioned in the article) and try this method, if it work.
In any case, thanks for the writeup Paulie!
Adnan says
Things that worked:
Optiplex 7010 with Ugreen PCIe Card, Lexar 512GB NvMe.m2 worked following the process by Paul. Able to do a new install of windows 10 via CD.
Things that did not work:
Unfortunately macrium, diskgenius, OS cloning did not work.
So configured a new PC with now win 11, working perfectly fine.
I just hope someone is able to better document the process of cloning.
Once again many thanks Paulie!
David Morrison says
No you cant clone a drive with sata drivers to a nvme drive,lol
David Morrison says
You funny, it works with any nvme ssd its a industry standard and any windows 10 media ,fyi there is no such thing as a windows 10 CD, lol
David Morrison says
Lol, lexar sucks, one of the lowest quality on the market, and with win 10 and 11 its better to download it from their site, (media creation tool) if you used a dvd odds are you installed an old version,
Olyn says
I am sorry but I stated previously none of the free options to clone the OS worked! This Thread was not strong on the system cloning. I had to buy AOMEI Partition Assistant 10.2.0 for $49 1 yr subscription. Booted the legacy drive and ran Aomei, selected migrate OS , it copied and booted the new drive. Sorry I didn’t document the process. Oh, there was all sorts of tries, booting from Win Disk, booting from usb drive booted with UEFI drivers. Someone even said you have to do a new install of windows and that seemed to be the consensus view. I installed some generic M.2 NVME to PCIe 3.0 x4 Adapter with Aluminum Heatsink Solution coupled with NEMIX RAM NEMESIS Series M.2 2280 Gen4 NVMe SSD 1TB. its all working with the crazy speeds posted up front. Fastest thing I have ever had from a cold boot!
Gary says
To Adnan, Macrium definitely CAN clone a SATA SSD Windows to NVME and have it boot, the new NVME needs to be in an enclosure first though and needs to be a GPT drive, thats how i did my Optiplex 3050. Clone complete OS to external drive and after you have done the bios mod you reboot and swap from Sata SSD to NVME and PCIe card but go in bios before the next full boot and select boot from pcie nvme option and it should boot no problem. As for David Morrison, I have cloned Sata SSD OS to NVME with a hardware Sabrent Docking station with offline Cloner, that is the only way to make a 1 to 1 copy of the drive, as long as windows is present and the correct boot device with windows os is chosen it WILL work. Done it more than once now.
Adnan says
Thanks Olyn. Glad it worked for you.
For Gary, I did try Macrium, trial version. It did clone, but when I went to Bios, disabled legacy, and selected UEFI, unfortunately it did not find the OS. I must have made some mistake.
The only time I got to see the NVME drive in bios UEFI option, was after I installed the windows after booting from CD.
Anyways, I did configure it as a new PC, and it is now working fine.
Thank you for sharing that Macrium does work. I hope this helps someone who is now trying this swap.
Thanks again everyone for their insights and esp Paul for encouraging us to try these upgrades. Cheers
glnz says
Paul and fans — Dell shows a new BIOS available for the Optiplex 7010 Tower.
Dell’s notes are at:
https://www.dell.com/support/home/en-us/drivers/driversdetails?driverid=6rwp4&oscode=wt64a&productcode=optiplex-7010-desktop
Please confirm, but I understand that this surprise BIOS update fixes a material security issue.
So, since my 7010 is running off an NVMe thanks to Paul here, what should we do?
Maybe, we should take the new BIOS file, modify it per Paul’s instructions above, and then insert it into our machines?
But it would be nice to get a refresher because I haven’t done this for over a year now.
Many thanks !!!!!!!
glnz says
UPDATE to my preceding comment.
Maybe I’m wrong. The link I gave is Dell’s update list for all 7010s generically, but when I went to my own 7010 and narrowed the Dell update list to my Service Tag only, Dell does NOT show that new BIOS but shows only the 2018 version A29 BIOS we all have.
Sorry. But I’m not sure what this all means . Has Dell been recycling model numbers, and is there a different and much newer 7010 out there?
Thanks.
JohnM says
Just started to follow your instructions.
“Shut the machine down.
Remove the mains power supply.
Locate the two pin service connector and put a jumper on it.”
But, after done, the machine fails to turn on.
Anyone facing the same problem and solved it?
Thanks!
David Morrison says
No but ont time i had to power on with memory out to clear nvram, put ram back then it booted . Im done with the 7010, too old i got a 5050 for only $100 bucks ,it has nvme slot and 100x better computer, ddr4, 6th gen , use pcie slot for gpu better, like trying to reverse age a xp pc, not worth it
John says
With power turned on to take out the ram piece could potentially damage the motherboard. I am not very sure and thus hesitate to follow your steps. Please confirm.
What is the motherboard of 5050?
Olyn says
John that is not how I read him. He turned off the machine, removed ram and then booted the system. Then restored ram while off.
computerdave911 says
i used to work for Dell, some boot issues can be fixed my turning the computer on with memory out, resets the post data, so when you put the ram back in and boot all things like standby data or whatever is cleared.
André says
Hi Paul great instruction you motivated me to try same. Admire your support persistence.
Optiplex 9010mt, Bios A30 Windows 10, built 19043 Mobo 0M9KCM A02
So I followed your instructions and have my 9010 in service mode. Upon boot it shows it is in service mode (for a few seconds), only thing is, it boots windows right away without me pressing any function key. Anyway try to backup A30 bios but it shows:
error 26: the host cpu does not have read access to the target flash area. to enable read access for this operation you must modify the descriptor settings to give host access to this region.
As I mentioned am in Service mode. I am using legacy bios settings, disabled secure boot and currently booting from Samsung SATA SSD drive.
Any suggestions?
Thanks A lot!
David Morrison says
nvme does not support Legacy only UEFI
Olyn says
Andre, I don’t know what Paul’s going to tell you but when I tried I had all sorts of errors trying to back up my BIOS. All sorts of errors numbers I’m sorry I didn’t document it. But what I do know is that I was trying to load the wrong Intel tools and when I got the right ones that Paul recommended everything went right. I tried version 27, went up to 28 went to different tools but I actually had to start from the beginning and find the right link for the right version and everything just went smoothly after that. Maybe that helps you.?
Paulie says
I don’t really know what to tell you. If you follow the instructions carefully it should work. But if you have done that, perhaps there is something different with your machine.
André says
Hi David,
When I convert Windows 10 drive to UEFI with MBR2GPT tool from MS and set Bios to UEFI will that solve:
error 26: the host cpu does not have read access to the target flash area. to enable read access for this operation you must modify the descriptor settings to give host access to this region.
Without Bios bup cant rewrite bios, system wont recognize NVMe as boot device without updated Bios.
So for me is to solve error 26 in the 1st place
Thanks
André says
Hi Paulie,
I do remember that I had a whole lot of difficulty upgrading to BIOS A30 but eventually succeeded. https://www.dell.com/community/en/conversations/optiplex-desktops/optiplex-9010-tm-bios-update-fails-anyone-a-suggestion/647f826bf4ccf8a8de12168c
This system has been used in the trading room of a large Bank. Could there be some hidden safety feature stored somewhere? As mentioned did Flash the bios, replaced HDD for SSD’s, changed Gpu and Replaced Ram.
Would converting current Win10 sys disk to Efi solve error 26 as David Morrison, above suggests.
BTW reaction time of you’ll is mega, I know quite some companies that could take some lessons here.
André says
Meantime took as much hardware out as possible to ensure clean boot.
loaded default bios settings even tried Windows safe mode.
While still in service mode but error 26 remains?
David Morrison says
Its nothing to do with updateing bios, but just saying ,
Booting from an NVMe PCIe SSD is only supported on systems that support UEFI.
Google it!
after Bios update
then you have to do clean install under UEFI
Elwar says
Hi cannot proceed with fptw64.exe on Dell 9010. Getting an error
fptw64.exe -d backup.bin
Intel (R) Flash Programming Tool. Version: 9.1.10.1000
Copyright (c) 2007 – 2014, Intel Corporation. All rights reserved.
Error 201: [FPTw64.exe] cannot be run on the current platform.
Please contact your vendor.
Olyn says
I saw these type of Errors when I was trying to do it. I tried everything double check being in service mode, everything. I had accidentally downloaded the wrong version of Intel tools for the type of machine I was working on. You should go back to the right page and make sure you download it the proper tools for the machine you’re working on. So that you have the right version. Try that on for size! That’s my two cents.
John Latham says
Hello Again Paul,
I have a Dell OptiPlex 9010 with A30 BIOS.
I installed Win 10 on a spare hard drive.
I executed your instructions EXACTLY as you wrote them. I actually can send you my NVME.bin to check my work. Funny, the BIOS is the exactly the same size (12,582.912) as before I edited it.
No joy for SSD.
I booted my Linux Kubuntu where I have much better hardware analysis tools. I cannot even see the SSD hardware. I know the SSD is working, I mounted it in a laptop and installed Win 10 on it, no problems. Since the SSD is mounted in an adapter to use it in the 9010, maybe the adapter is not working. That’s my next obstacle to overcome.
Do you know if anyone who has actually done this with a 9010?
Yours Most Sincerely,
John Latham
Paulie says
Yes. I have done it myself with a 9010. Don’t expect the file to be a different size after you have edited the BIOS, it will be exactly the same.
If you can’t see the device in Windows Disk management, then something else is wrong – possibly the adapter.
Corey says
Thank you for the article. I would suggest that you retake the picture of the minitower motherboard. You cut off half the words “Service Mode” which I didn’t see and spent a long time trying to diagnose what was wrong. I finally understood the picture correctly, but it would have been helpful to have seen the words in full. Afterwards everything worked great.
Paulie says
I didn’t take that photo. The ones I took are the zoomable ones taken in the light box. A visitor to the blog took it.
Larry Elie says
I’m very impressed with what you did and the detail of the instructions. Thanks. I have a 7010 MT, and followed the instructions. Everything worked exactly as you described, until I put the M.2 NVME drive in my card. It’s not seen, not in windows or in manage storage. I tried 2 different drives, a 250Gb Toshiba and a larger no-name, both of which have been formatted in my USB3 enclosure. I’m using the lower black PCIE x16 (Dell wired as X4), and I have tried both an X16 and X4 adapter card on both drives. I know the PCIE slot still works because I put a mSATA drive in the slot and windows sees that drive. Device Manager, under storage controllers, shows the same Microsoft Storage Spaces Controller as it does with the mSATA drive, but I don’t think it should. I disabled all the unused SATA ports in BIOS, but I’m still using Legacy Boot as the OS is on a SATA drive. I suppose it’s possible that the PCIE controllers are all simply bad, but they are a pretty simple device, and I tried 2 of them. I’m very open to any suggestions at this point. Thanks.
David Morrison says
I had to change bios from legacy to uefi, and disconnect other sata drives and boot to windows on usb created using media creation to on windows 10 download page ,and install onto nvme drive fresh
David Morrison says
on intel site
Is UEFI required for NVMe?
Booting from an NVMe PCIe SSD is only supported on systems that support UEFI.
Paulie says
If you don’t see it in windows disk manager – the hardware isn’t working. It does not matter if how you booted, if you don’t see it there, it is not working (if you are using Windows 10)
David Morrison says
True, then 2 issues, adapter, try another, and mention legacy, need eufi if plan to boot from it when gets it going, i would still see if Windows setup can see it in case his current os has issue, just saying
David Morrison says
incase driver issue, switch to uefi mode then boot to windows setup usb in uefi and see if see, if not card issue compatability, what card exactly , i used this one was 10 bucks in canadian dollars, used samsung 970 evo ssd. never tryed in legacy mode so i dont know about that, i was off legacy mode since windows 8 days.
https://www.canadacomputers.com/product_info.php?cPath=48_4559&item_id=181815
David Morrison says
Why bother with legacy bios anyways, this system or any boots way faster in eufi mode with sata ssd or nvme.
Larry D Elie says
When a device is it’s not in disc manager, it can’t work. The card should appear even if there was no drive in it in Device Manager, and all I get is Microsoft Storage Spaces Controller, which I think is still there from the mSATA that was there before. I’m not trying to make it bootable at this point. One of the cards I tried was the MHQJRH that was recommended.
Could someone tell me what is under Device Manager, under storage controllers, when the thing is working? Yes, this is Windows 10-64. That may give me a clue.
I can easily leave Legacy boot, and I will try it, but at this point I don’t think it will make any difference when the card is not showing up. The only reason I haven’t yet is I have to use a cheaper keyboard to boot to BIOS (there’s an obscure old problem with my nice Logitech keyboard– F2 and del aren’t recognized at boot!) and I don’t have one handy. I think there is one in the basement.
BTW, in reading this thread, if you want to move an OS for free, use DiskGenius. It’s really free for home use, and can do pretty much all you need like changing partition sizes, cloning, or moving an OS while you are USING the OS.
Larry D Elie says
Update clue: In device manager, under hidden devices in Storage Controllers, I see a Standard NVM Express Controller, greyed out. The BIOS fix must be working.
Tomorrow, I’m going to try again, doing some removing of the Microsoft Storage Spaces Controller, and then re-detecting the
Larry D Elie says
Well, I have the a real NVM boot to Windows 10 at this point. Not exactly what I expected though. If I turn OFF Legacy Boot in BIOS, the system boots to the Toshiba M.2 drive…. the problem is that the M.2 drive is a Windows 10 boot disk, and I forgot the Windows PW for the drive… 🙁
So, I think (because I can’t use any tools after the M.2 boot) the NMV driver is ONLY loaded if you have Legacy Boot off. The only solution I see is to get another M.2 drive and load Windows to it. The problem with that is when Legacy Boot is OFF, F12 will not let me choose a SATA device to boot off of, so getting media to load the M.2 device may be tricky. I’ll probably load the M.2 drive in a USB carrier, then transfer it. I had set this computer up as a dual boot, 2 SATA drives, one with Windows 10, one with Windows 7. If I can’t choose a boot, that will mean that it will be single boot. Sort of messy.
BTW, spent some time WITHOUT the NVM card in the computer. I cannot get a boot to SATA without setting the BIOS to Legacy. I had forgotten, but that’s why I had set it to Legacy. Anyone know a reason why that should be true, or a fix for it?
Larry D Elie says
BTW also, David, your comments were spot on.
Larry D Elie says
David, you said you “had to change bios from legacy to uefi, and disconnect other sata drives and boot to windows on usb created using media creation to on windows 10 download page”
How did you boot to windows on usb, when usb is only active when booting to Legacy?
I have not got usb to boot when the system is set to uefi.
David Morrison says
No, dvd only supports legacy, usb supports uefi if you created the usb using Microsoft media creaton tool is easiest ,and sure to work, if bios is set to uefi, press f12 for boot menu, and will see usb legacy and usb uefi , select uefi, then if nvme has mbr partitions ,need to delete all partitions in win 10 setup, then click next it will automatically partition drive in eufi and install, cant boot to old drive after that sata will be for storage only
David Morrison says
If use rufus to create usb for example with iso or other app, some had to manually select uefi boot,, i woul just use Microsoft free media creation tool ,it makes the bootable usb to support both modes with more guarantee
Larry Elie says
I’m waiting on a new m.2 drive before I try again; there were problems with my old Toshiba m.2 drive. I did have an idea, but I thought I might run it out first. I have a Optiplex 7050 that already has an m.2 in it. After the (successful) change to the BIOS, could I drop the m.2 from the 7050 in the 7010? I know there will be lots of problems with the incorrect installation, but I’m just curious if it would boot.
Paulie says
You could swap it into your machine – but honestly it would be easier to just buy another one given the problems that it would cause.
Stu says
Perhaps it is the simple joy of seeing it not fail. I have had a 7010 for many years. I am not an engineer, but it is thrilling to do something I have never done before on an old PC which I did not need to expressly buy and know I followed the instructions correctly. People have different motives for doing the same task. When the 7010 cannot work any more, I can apply what I have learned to a more ‘willing’ computer.
Olyn L Cates says
Stu I’m with you in this case. The joy was in doing, learning, doing things that other people never did. That thinking lead to a successful IT career for me as a MSCE working all over the world. Keep having fun!
Boris says
Mani more likes fore article and author – congratulations – bios updated correctly!!!
David Morrison says
And now you have the knowlege that nvme on 3rd gen cpu and pcie 3.0 you wont see a difference like you could going from sata hdd to sata ssd, nice if that was brought up sooner so people are not left scratching there heads, and wondering if they can tell the difference after the major upgrade, lol, you cant, only in speed test, windows or apps though will not even come close to useing that speed, lol,, so when you hear people bragging you can ask, can you tell the difference,, really!
i even went out and bought a 7th gen intel desktop with nvme slot, did some testing , nope, still can see any noticable difference in load times. good to know!
Olyn says
David, I’m sorry I don’t get what you mean. This blog was written in 2021, it could’ve been titled “how to keep your old running with the new machines!”. point being going from HDD (sata) to SSD is like putting a jet pack on granny and trying to keep up with her in the mall. You don’t see a major change in going from SSD to SSD (different package), pretty clear if thought about. I migrated my HHD to NVMe SSD with paid version AOMEI Partition Assistant 10.2.2 worked like a champ. I have two bootable drives, legacy and UEFI. Lots of people have older hardware that this upgrade is a boon! Like Paulie said, everything is snapper!!!! 5m boot to -60sec boot
Paulie says
David – I don’t understand why you always come to this blog just to put a downer on things. What’s the purpose of it? Doing this upgrade makes people happy, can’t you be happy for them?
Larry Elie says
I can’t speak to the 7010 version, I’m still working out details, but I use multiple computers, all others with built-in m.2 support. For programs requiring heavy bandwidth, there is a difference. For example, VideoProc Converter AI on an 8core I7 running off a SATA SSD ran 7 frames per second on a resolution double of a 480P video. Same file on an m.2 (a fairly fast Samsung SSD) ran 8 frames per second. Both with Geforce RTX2060 in the same computer. So, if you are doing something heavy, for a long period, there is a very measurable difference. That difference amounted to saving almost an hour in conversion.
Will see if for launch or browsing? Never.
Larry Elie says
Since I never got finished the boot on my old Toshiba m.2 because I forgot the password, I got a new m.2 drive. So I have a new, fresh 500Gb m.2 drive. I loaded the MS media creation tool (again) on a new USB drive. I disconnected all the SATA drives. BIOS did NOT show the m.2 drive in UFEI boot, only the USB. So, I booted, and let Windows 10-64 install. On completion, BIOS showed two UFEI devices, USB first, and hard drive. That sounded promising. I re-started, and it booted to USB. I shut down and went to BIOS again. I removed the check from USB, leaving the hard drive checked. It did not boot. In fact, no combination of key presses F2, del, F12 or F11 brings up BIOS.
I’m afraid the system is bricked. Any suggestions?
Olyn says
Quick comment, LOL. BOOT in Uefi when you install and make sure you reformat m2 drive as gpt formated drive not mbt. I danced with as I did mine.
David Morrison says
do you have a video card, some do not support uefi, and you have to remove the video card to get back to the bios, if not , power on the system with memory out, fans should run and will clear the nvram, put ram back in, use sata ssd , you wasting too much time on this ,
David Morrison says
i meant some video cards no support secure boot on in uefi, make sure if adding video card on this pc , turn off secure boot and abled and check enable legacy roms in advanced. if not video card preventing entering bios, , remove ram and power on to clear system, then put back and power on , not sure what your trouble is , did you make sure your pcie adapter supports nvme, idk, and is the drive being seen in windows setup is the other thing you are not saying, and should be no other sata drive connected during the install, had no issues my self under those methods,
David Morrison says
the only way to know if bricked is remove every drive and card, from the system board , boot with only a keyboard and monitor usgin internal vga, then if cant get to bios, have a problem, next is to boot without memory in, then un plug and put ram back in, try to get to bios, again, then we go from there.
Paulie says
The thing you have to also consider is that NVMe uses less cpu than SATA transfer. So I think these older machines not only benefit from faster transfer speed, but also reduced CPU load.
Larry Elie says
It’s not bricked. I had forgotten the remove the RAM trick; haven’t done it in 10 years. It worked. Set BIOS back to legacy.
I think your idea about the video card is correct. The UFEI boot works for USB because the MS tool uses a low level of video. That’s also why my old Toshiba m.2 booted (without a known pass word…) started, low video level. I have a GTX1660 super in this (bigger power supply) and it just isn’t happy. I could go back to a GTX1650.
You are right; I’ve wasted too much time on this. The SATA SSD’s are fast enough for a 7010, even with a I7 (K). I have faster computers, and this is mostly still around because I have a ton of software on it. This is also a terminal to the machines doing video upscaling.
Larry Elie says
Out of curiosity, what is the ‘fastest’ video card anyone has used with this modification?
Paulie says
I’ve used an Nvidia 1650 Super. No problems at all.
Larry Elie says
Hmm… You have an oversize power supply too. Then I still don’t really know what happened.
Larry Elie says
BTW, in legacy, this can boot with a msata. The slot works.
Olyn says
I was starting feel old and out dated. Thank God for the digital warriors. How you choose to use you pcie slot is up to you and your wallet. Look below. Also some great articles on Tom’s hardware. $74 plus your M2 Nvme’s (wallet) lets the creative mind flow. I concluded retirement early and spent last fourteen years doing nothing. I only saw this blog (upgrade) as opening a doorway!
Once again thanks Paulie. I hope you enjoyed the coffee (pub)! ??
Gigabyte GC-4XM2G4 (AORUS Gen4 AIC Adaptor, Full PCIe 4.0, Advanced Thermal Solution for PCIe 4.0 SSD)
Brand
GIGABYTE
Hardware Interface
PCI
Style
Thermal
Item Weight
1 Kilograms
• 4 x PCIe 4 0/3 0 M 2 Slots
• Full PCI Express 4 0 Ready Design
• Advanced Thermal Solution for PCIe 4 0 SSD
• Easy Software RAID with Single Click to Get Amazing Performance With AORUS Gen4 AIC Adaptor and 4 PCIe 4.0 2TB SSD, Read/Write performance reaches amazing 15,000 MB/s.
• Custom AORUS Storage Manager
Alex Olvera says
Hello. I would like to do the same thing but in my Optiplex XE2 (2015). Is this the same tutorial that I must to follow? I don’t want to spend money and don’t get the same result.
Paulie says
It is not for an Optiplex XE2 and if you decide to proceed it should be with extreme caution. I’ve never had that machine so cannot validate. I would have thought a machine from 2015 would already support NVMe. But could be wrong.