
In this post I will show you how you can easily modify the BIOS of a HP EliteDesk 800 G1 SFF or Mini so that it can support an NVMe SSD drive as a boot device.
Although these machines have a UEFI BIOS, they do not contain the NVMe driver. By adding the driver into the BIOS you can boot from a PCIe NVMe SSD. I achieved these speeds with a Samsung 970 EVO Plus from Amazon:

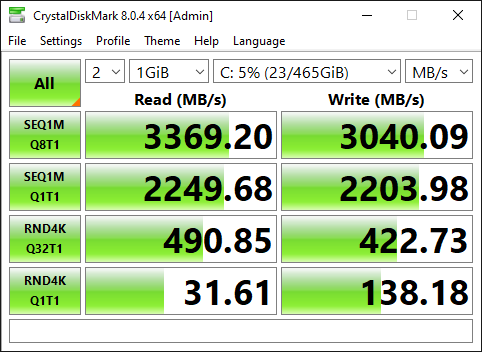
The speed result above was recorded when the machine was fitted with a Intel Core i7-4790. Originally the machine had a Pentium G3220T which was a bit slower:
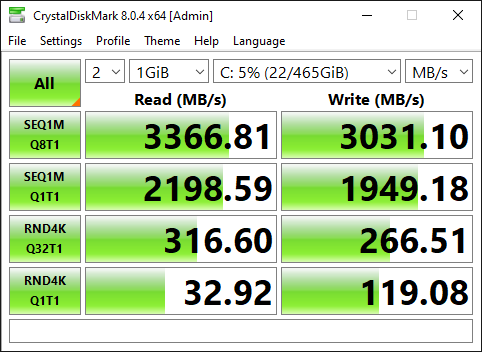
But in both cases, the speed increase is huge from either a SATA SSD or mechanical hard drive.
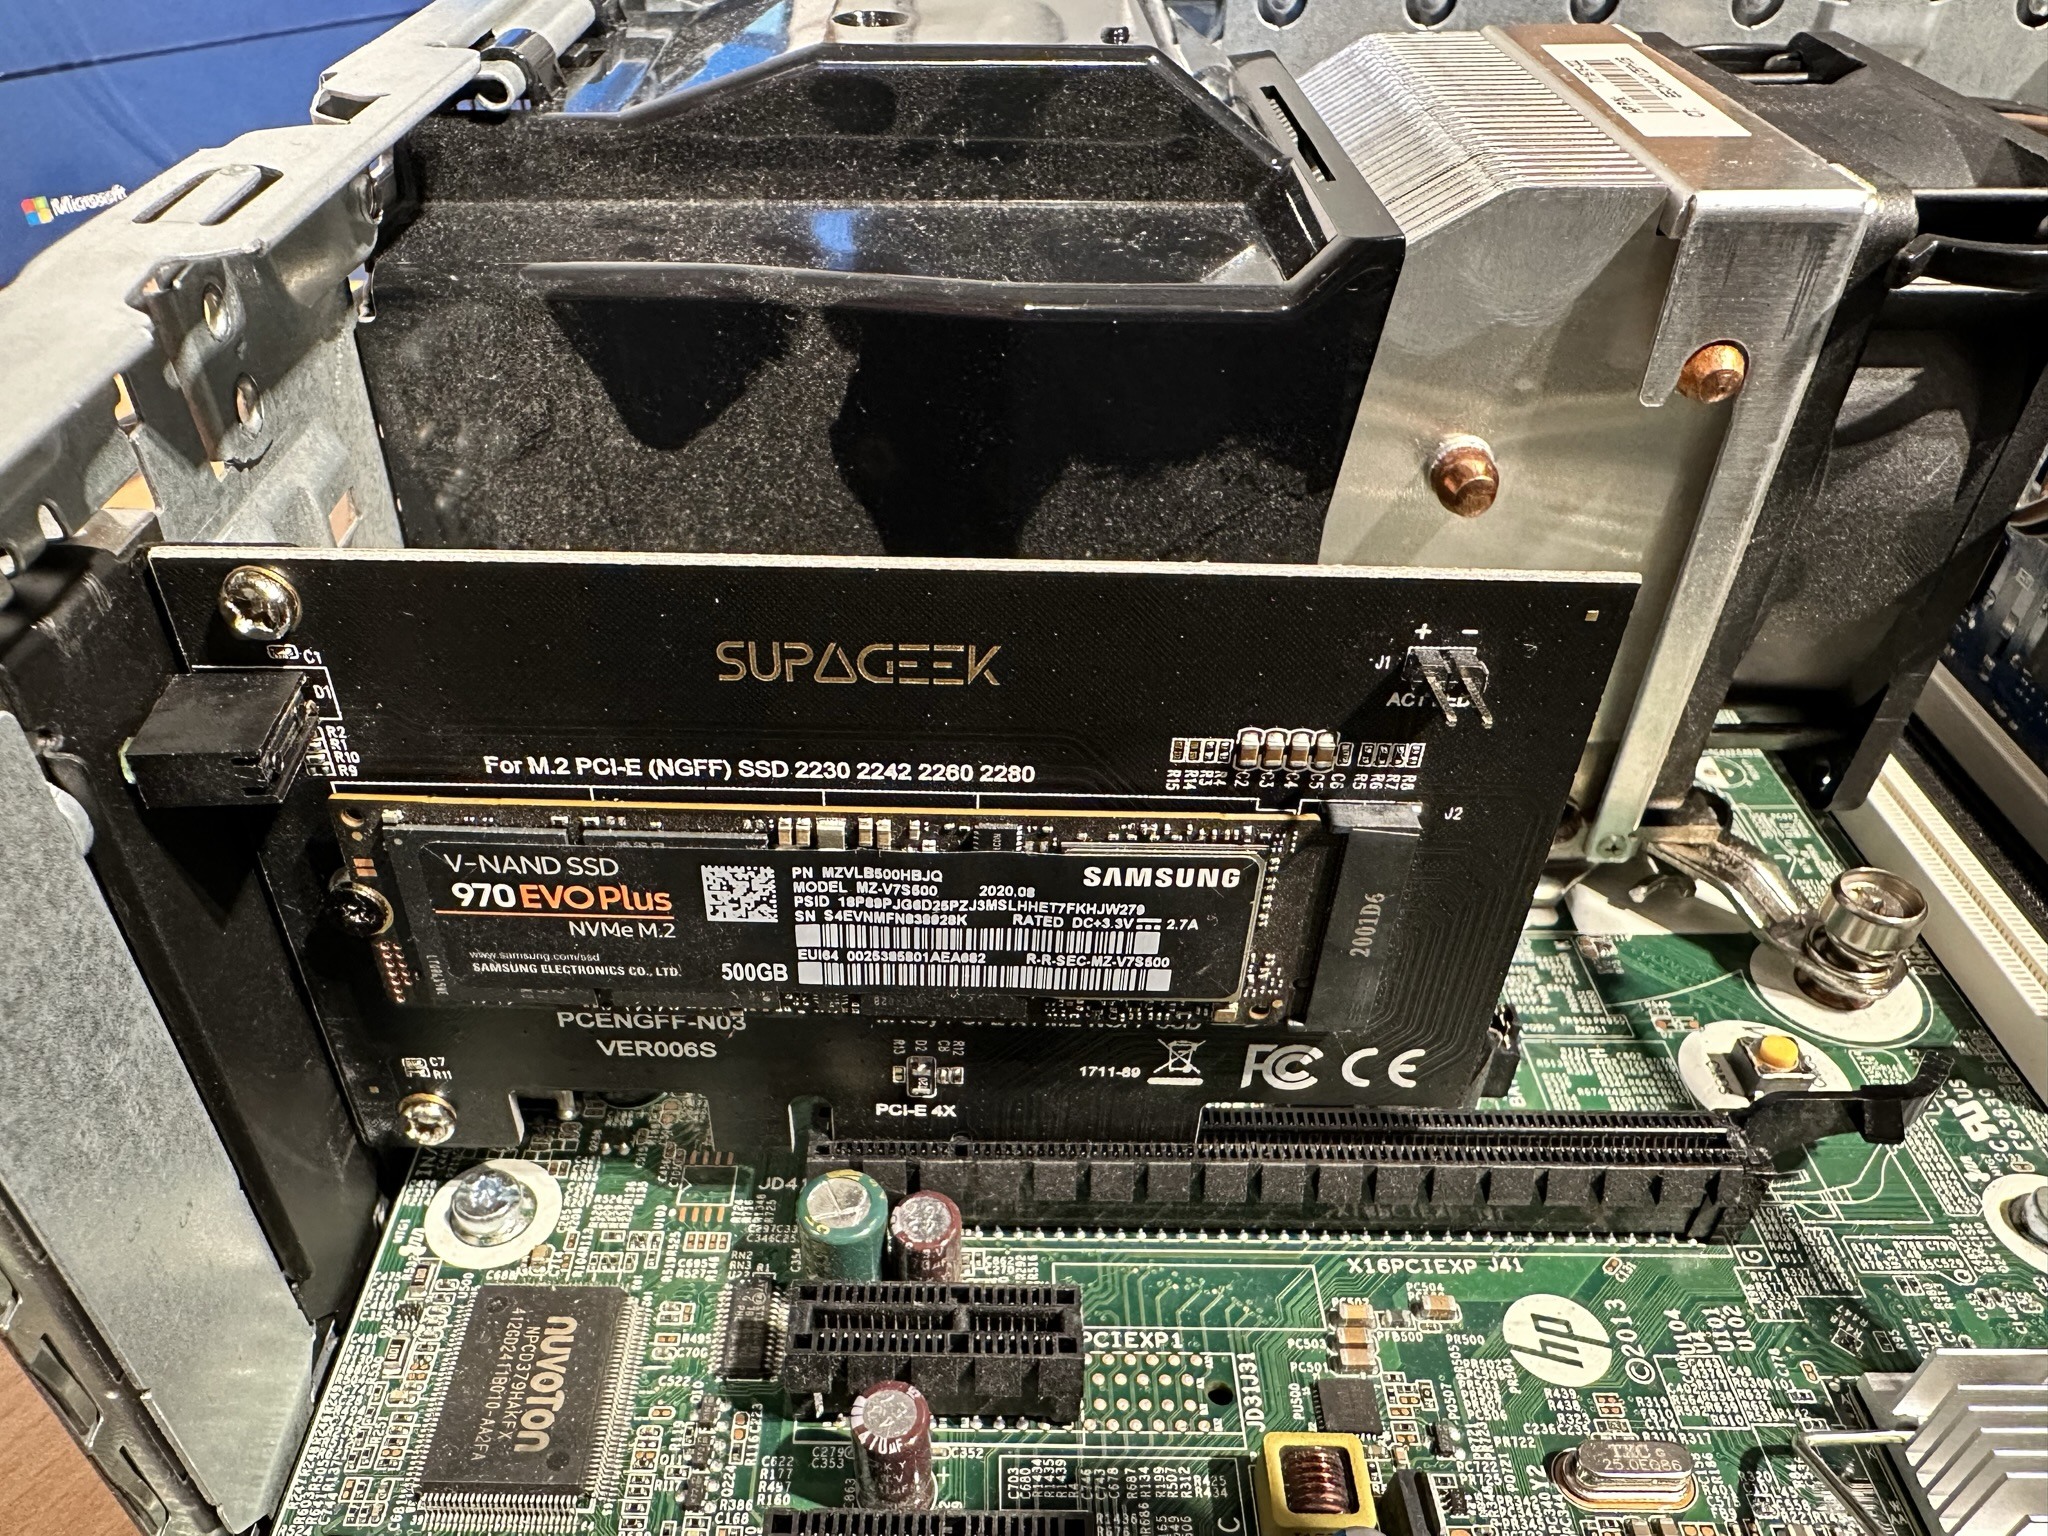
Here is the PCI adapter and the Samsung NVMe SSD from Amazon installed in the HP 800 G1 Small Form Factor:
Warning
This blog post contains instructions on how to modify your BIOS.
You could easily break your machine. Proceed at your own risk!
Table of contents
Required Hardware
In order to carry out this upgrade, you will need a few things:
- An NVMe SSD. I used a 512Gb Samsung 970 EVOPlus
- An NVMe to PCIe Adapter, I used this one from Amazon.
- A HP EliteDesk 800 G1 to upgrade.
Procedure Overview
This process involves the following steps:
- Installing Required Software and drivers.
- Backing up your current BIOS.
- Adding NVMe driver support into the BIOS backup.
- Writing the modified BIOS back to the system.
- Optimising BIOS settings.
Install the Required Drivers and Software
Before being able to read from or write to the BIOS, you need to install the Intel Management Engine Components.
Download the Intel Management Engine System Tools v9.1 r7, which contains the tools required to flash the new bios. Extract the zip file to a directory on your computer.
Also download the NVME Driver which will be injected into the BIOS Image.
Finally you will need UEFI Tool 0.28 to make the actual BIOS modification. Here is a direct link to that version.
Put the machine into Service Mode
Now that you have the machine prepared, you need to put the machine into service mode before you can proceed:
- Shut the machine down.
- Remove the mains power supply.
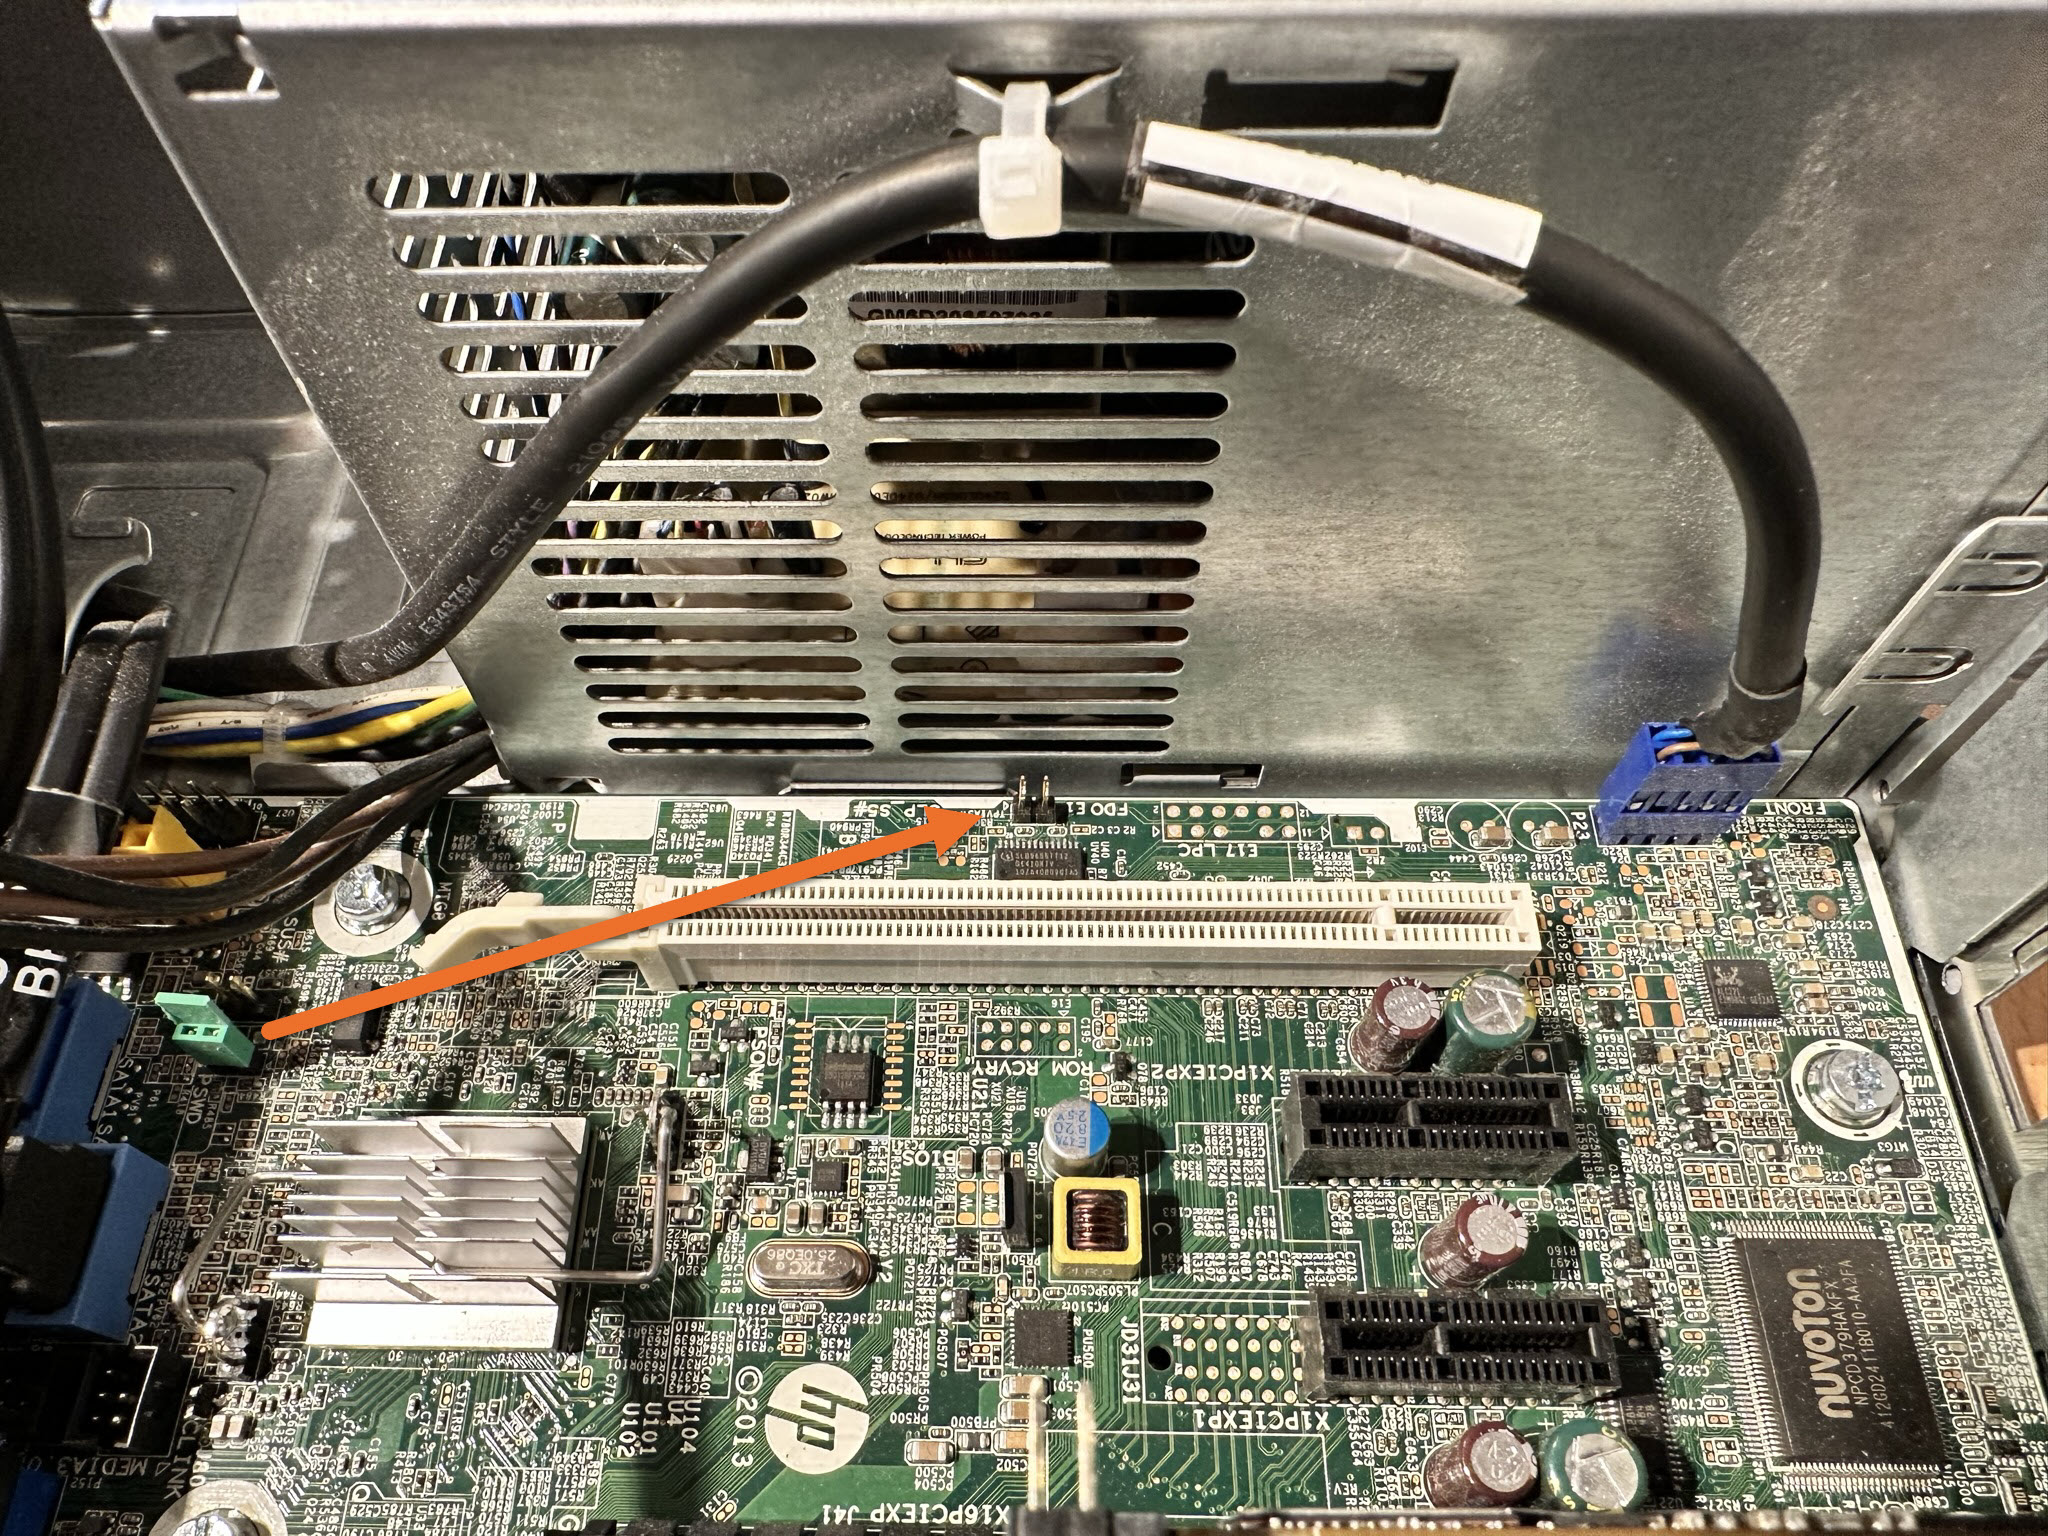
- Locate the two pin service connector and put a jumper on it.
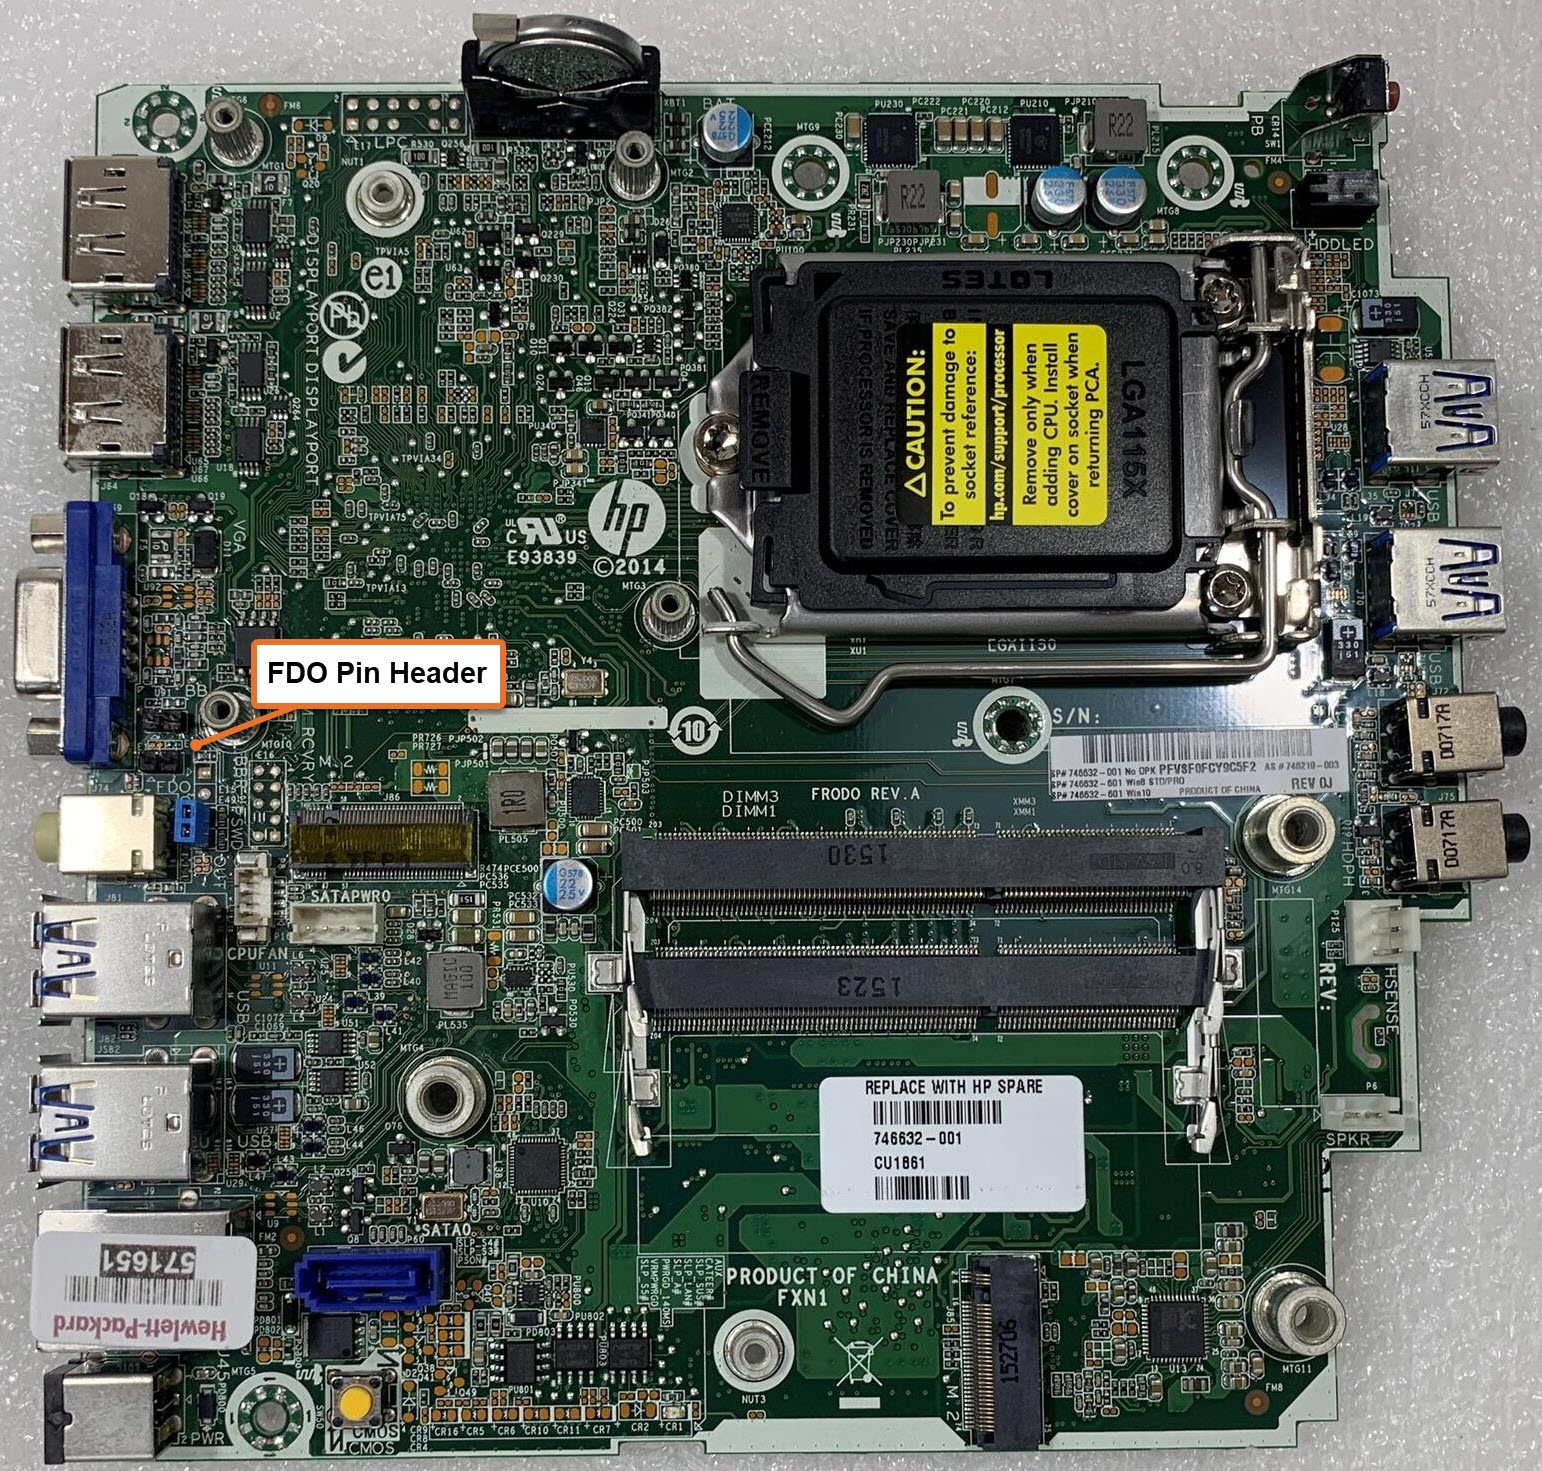
The FDO (Flash Descriptor Override) is in a different position depending on the model.
For the small form factor the jumper is between the Power Supply and the first PCI port , if you do not have a spare jumper you can borrow the jumper from the Password Header Pins:
For the mini the FDO Jumper is between the audio output and the VGA port:
Reconnect the power and boot the machine again.
Modify and Upgrade the BIOS
Now that you are in service mode, you can continue with the modification.
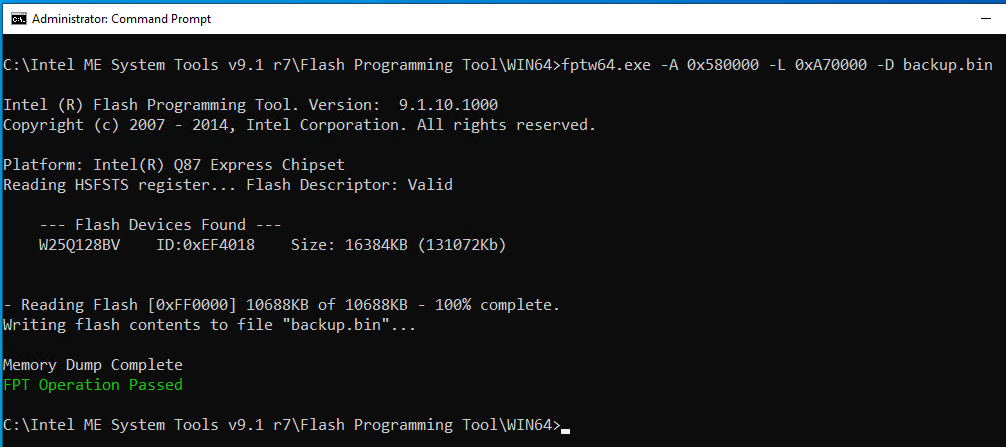
Backup the existing BIOS
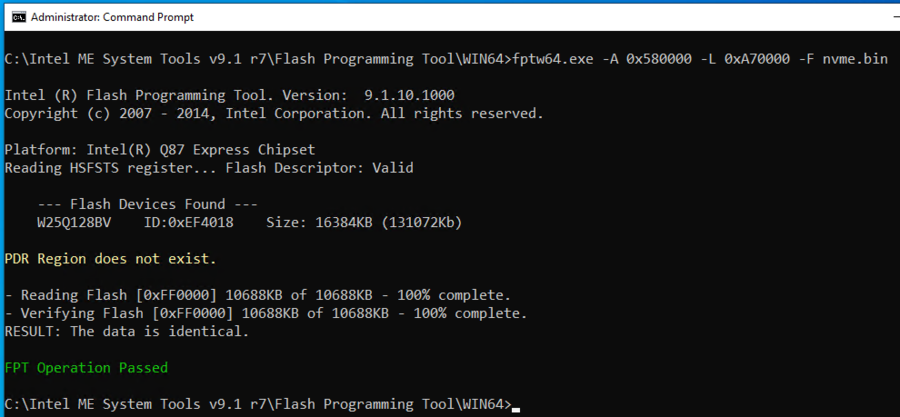
Open a command prompt as an administrator and change to the directory where you extracted the Intel ME System Tools. Then navigate to the subdirectory \Flash Programming Tool\WIN64 (or WIN32 if you are on 32-Bit installation).
Within that directly use the command:
fptw64.exe -A 0x580000 -L 0xA70000 -D backup.bin

Modify the BIOS and Inject the NVMe Driver
Next, open UEFI Tool and open the backup.bin file. Expand the sections as per the following screenshot:

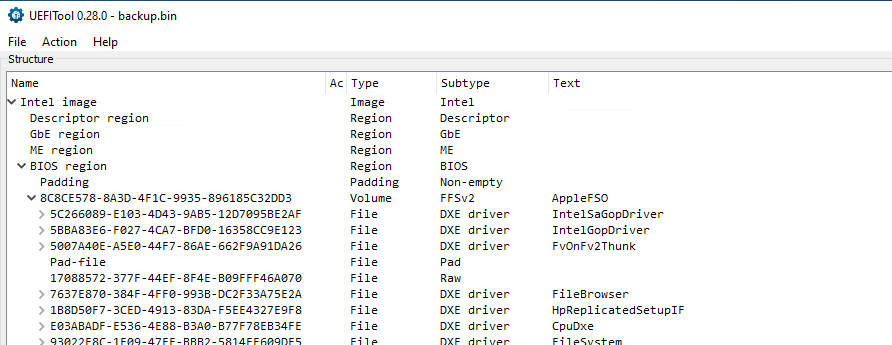
Scroll to the bottom of this section and you should see an area that looks like this:


Next, right click on item with the name CspLibDxe (CD8462C-6864-40A3-A081-C8D35E82B920) and choose Insert After.
Choose the file NvmExpressDxe_Small.ffs that you just downloaded earlier and you will see it appear right after the CspLibDxe section:


Now go to File -> Save Image File and save the file in the same location as the flash tool as nvme.bin. Go back to your command prompt and run the command:
fptw64.exe -A 0x580000 -L 0xA70000 -F nvme.bin

Shut down the machine and remove the jumper from the FDO pins and move it back to the password reset pins if you took it from there.
The BIOS modification is complete and the machine now has NVMe support.
Install the PCI NVMe SSD
If you have not yet installed your SSD into the machine, you can do it now. I used the black PCI slot.
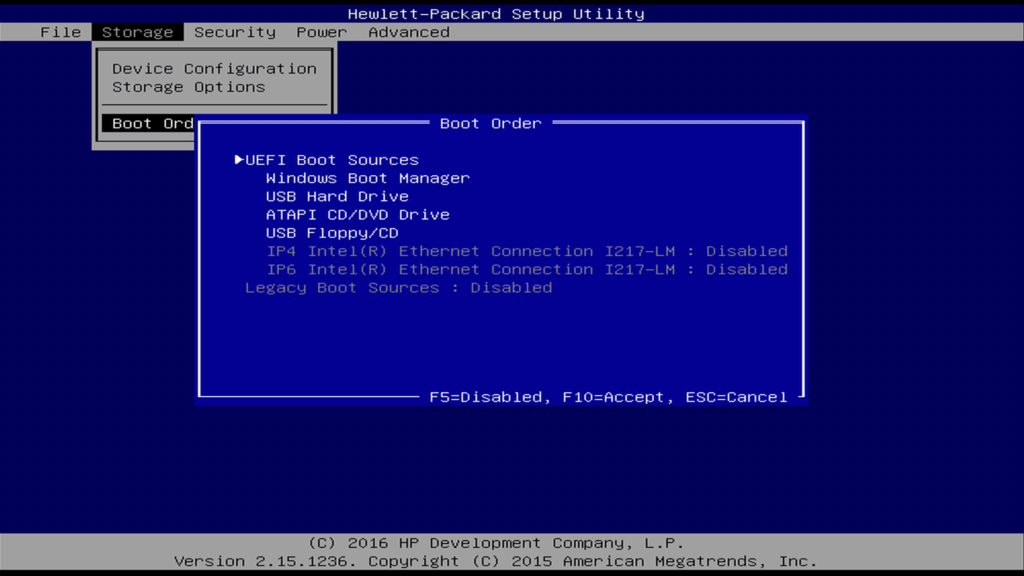
Optimise BIOS Settings
Now that you have written the new BIOS you have some choices to make. The very first thing you need to understand is that you must boot in UEFI mode if you want to use the NVMe drive.
Here are my boot settings:

And here is my Option Rom Policy:

Now you can install an operating system of your choice or clone one of your existing drives to your new NVMe drive and enjoy amazing performance. If you are cloning then you will also have make sure your cloned drive is using the GPT partition system instead of MBR.
The reason I like the Samsung Drives is the data migration software makes this very easy to do.
Conclusion
This modification will bring new life to your HP EliteDesk 800 G1, it’s brilliant value upgrade and easy to perform. Especially if you are upgrading from a mechanical hard drive. I was able to boot from cold to a Windows 10 Desktop in 14 seconds.
Again, here is the PCI adapter that I used from Amazon:


- 512Gb Samsung 970 EVOPlus
- NVMe to PCI Adapter (The adapter comes with a heatsink also)
If you try it, I would love to know how you got on and what your results were.
Support This Website
Thank you for visiting. It’s because of readers like you that I continue to write on this blog.
If you found value in what I share, I’ve set up a ‘Buy Me a Coffee’ page as a way to show your support.
pop says
I Have the HP 800 G1 mini and the motherboard doesn’t have the service mode jumpers. SO how can I achieve this MOD?
Paulie says
Wow – you found this post quick. I only just pressed publish! I have no idea. I don’t have access to a mini.
Jim G says
@pop
I don’t believe the HP 800 G1 mini will work for this. I see no mention of a PCIe slot in the specs for it. The minis are almost like laptops really, no expansion other than ports really…
https://support.hp.com/us-en/document/c04266271
pop says
The mini has slot for a pcie m.2 card and many people in the past have tried to boot NVME drive but failed. If this becomes possible with the help of this tutorial Mod then a lot of people who still own this model will be very happy.
Jim G says
@Paulie Well done! Very nice. Thanks for sharing. I’m surprised the Intel ME tools work for the 800 G1, where as they would not for the HP Elite 8300 series when you tried it.
Before you posted this, I was getting ready to ask you about rom IC types for this 800 G1 and for the 800 G2 series to do those machines with Linux. But this will be much easier.
Will try this later, hopefully it works good. 🙂 The G2 would be great as it has an i5 6500 cpu, similar to the 800 G3 which has an M.2 slot already on the board…
Jim G says
@pop have you tried a M.2 PCIe NVMe in it already?
looks like you should be able to use a Samsung 950 pro in that machine natively without any mods…
https://h30434.www3.hp.com/t5/Desktops-Archive-Read-Only/HP-ProDesk-600-G1-mini-doesn-t-detect-SSD-on-M-2-slot/td-p/4099900/page/2
As for the bios mod, in theory Paulie’s mods should work with any PCIe x4 or x16 slot. How that translates to PCIe NVMe? unknown.
Maybe the board itself only supports certain revisions of NVMe? Again, unknown.
I would try the Samsung 950 pro and see if that works first, and find out what revision of NVMe it is. Perhaps the mini only likes a specific version of NVMe.
Since the mod makes a backup of the bios, you may as well just try it on the mini, and revert back if things don’t work out.
Kaz says
Another fantastic guide. Very clear and concise ?? Your guide has been invaluable. Have done this on all my DELL 7020/9020 machines with great results.
One cautionary note is regarding the PCIE card. There are compatibility issues so make sure you buy the exact one shown here or make sure you are able to return it. I learnt the hard way when I randomly purchased a card based on delivery speed and to my dismay, it didn’t work. Had to return and order one that I know works.
Paulie says
Thanks Kaz! Got a bit of a formula going. I need to film videos for the HP 800 and the 8300 and then I will move on to the 800 G2
Duncan says
Very interesting, Paulie and thank you. I did this a while ago with my 3rd generation Intel motherboard, but I pushed the NVME driver into my rEFInd bootloader and it works perfectly ever since.
With your method, can you flash any UEFI BIOS?
Paulie says
There’s many motherboards that you can do it to and there are lots of generic guides. But it does seem to be slightly different per machine – which is why I like to write a separate guide for each one to remove doubt and give confidence to the reader. I found a lot of the generic guides to be difficult to follow.
Cosmo says
i think the 800 G2 supports nvme with stock bios
siliconbeaver says
after BIOS mod, can HP still run hard drive. i.e. mix of SSD and hard drive.
If possible, I would re-use hard drive for data storage.
I am going to try my old HP 8300/800 G1. If working, that’s would be cool.
Paulie says
Yep, you can still use any drives connected to the SATA ports for data.
Paulie says
I would advise you to seek specific instructions for your motherboard. This guide is specific to this machine.
lutra says
good day, I can confirm that it also works on the 800 g1 mini, the FDO jumper is on the right side when the audio is output, used drive Patriot 310 240gb nvme gen3, excuse my English, translator
Paulie says
Thanks for letting me know – I’ve added an image of the FDO jumper on the mini to the post.
pop says
@paulie this is a good news. i will find sometime to try this on my Mini soon.
Thanh Alex says
Thank you so much!
My HP 800 mini G1 is ready to boot from nvme ssd. it took me 10 minutes to edit and install bios.
Paulie says
Beautiful! Is it fast?
David says
I find it amazing how many people have used this mod to add nvme support. Afterall I was patient zero to use this technique.
john says
OMG!! I’M THE GUY STUCK ON A LINUX MACHINE AND HAVEN’T USED WINDOSE.. Z.. Z….. (OH, sorry lol) SINCE XP PRO WAS DROPPED!! Can’t imagine a good idea to try and run through WINE or that other program for windows progs on linux?
Any idea?
Paulie says
Check out my guide on the EliteDesk 8300 if you combine that guide with this one, it should give you everything you need to do it in Linux.
Miguel says
any other brand of pci nvme adapter can be used
Miguel says
you can use any brand of nvme pci adapter and nvme hard drive sorry for my english
Tom says
Paulie, nice article and video.
I’m a novice regarding computers (probably a major understatement), bought a used HP EliteDesk 800 G1 SFF a while back to run some software and equipment offline that is only supported by Windows 7, and after seeing your YouTube video, I am interested in adding NVMe soon.
Regarding the UEFI Tool 0.28. You have a link to a GitHub page for this and a “direct” download link (https://github.com/LongSoft/UEFITool/releases/download/0.28.0/UEFITool_0.28.0_win32.zip)
If I am interpreting this correctly(?), the direct download file seems to be for a Windows running 32 bit.
Two (2) questions:
1. My machine is 64 bit, so is the correct file for me to download the one listed below?
UEFITool_NE_A65_win64.zip. (6.83 MB Feb 25)
(https://github.com/LongSoft/UEFITool/releases/download/A65/UEFITool_NE_A65_win64.zip)
2. Any problems doing the NVMe update/upgrade for people running Windows 7 (Pro), and/or does it change any of the suggested hardware/software/driver or instructions?
Paulie says
Hi Tom,
Windows 7 does not support NVMe natively, so this won’t be such an easy upgrade for you. It is possible to add NVMe support, but for the sake of simplicity I would use a SATA SSD.
Paulie
Tom says
Paulie,
Thank you for taking the time reply and your advice. Very kind of you and I sincerely appreciate it.
Ironically, immediately after I bought the HP EliteDesk 800 G1, I did add a Samsung SATA SSD as the boot drive. I realize in hindsight that this was not particularly difficult, but I was proud of myself nonetheless:).
Ultimately, I may just stay with the SATA SSD solution as NVMe may not be worth the effort or possible headaches. I’ll have to research ways to add NVMe to Windows 7 and see if there are instructions/videos that are comprehensive and easy to follow for a person with my computer skill level.
If you are aware of one/any, feel free to point me in that direction and I’ll check them out.
Since you are an IT guy, do you have advice (in general) about the trustworthiness and “safety” (spyware, malware…) of sourcing software/drivers, etc. that are not downloaded directly from the hardware manufacturer/Intel/Microsoft/etc. websites; but rather, come from third party developer sources and websites such as GitHub, etc.? I guess to put it another way, even as a computer expert trained in the field, how do you personally decide whether you are comfortable using certain third party sourced software, sometimes required for example, in upgrades such as this NVMe one?
SK MD IMRAN says
Hi Paul,
I’m using HP motherboard 406 G1 MT, can please tell me what is the backup bios command “fptw64.exe -A 0x580000 -L 0xA70000 -D backup.bin” and restore command.
Thanks,
Imran
Zack H says
hi Paul,
I had previously done 3 mods (2 Dell Optiplex 9020, one 7010). Today I am trying to do a EliteDesk 800 G1 Tower (not sff or mini). The backup.bin shows slightly different structures:
^ UEFI image
Padding
^8c8ce578-*****
but inside it I do see the CD84562C….CspLibDxe.
The question is whether I could write this modified bios back or not? since they looked different from you screen capture.
In the other machines I had to update the BIOS first, which this article does not say.
Many thanks,
Zack
Paulie says
I would suggest that you update the BIOS first.
Zack H says
ok I watched your video and it shows the same bios file…I flashed the modified bios and then the computer has no network (it had it working even after the bios jumper)….but it turned out the Netgear router chose this rebooting moment to kill itself….now computer works fine with the modified bios (with a back up router), but have not bought the board and nvme to test it yet.
Miki says
hi paul
It would be possible to plug the adapter into another pci slot I have the black one busy with the graphics I hope for a prompt response thanks
Paulie says
You can put it in another slot. You might not get the same speeds though.
Miki says
would settle for it being faster than my kingston ssd which would surely be faster
jcardenasch says
Unfortunately, I am getting the following error when I open the backup file
parseFile: invalid data checksum 5Ah, should be AAh
Dan Lewis says
Hi Paul,
‘Just wanted to let you know that I finally fixed my Dell Precision T3610 by purchasing two new BIOS chips, flashing them from the backup.bin file, and soldering them onto the motherboard. It booted right away, and all I had to do was set the BIOS clock. Then I (carefully) proceeded to do the BIOS mod and this time without bricking the motherboard!
Thanks for all your help!
Dan
Paulie says
Wow – that would have made a great video – I bet you learned loads. Well done!
Fernando says
Hi Paul
I have tried your procedure with my HP Prodesk 400 G1 SFF, but I obtain an error with the command:
c:\>fptw64.exe -A 0x580000 -L 0x7A0000
Warning: The length of data to read from flash extends past the end
of flash memory!
Start Address: 0x00580000
Read Length: 10944512
Total Flash Size: 8388608KB
Do you want to truncate the data and continue? Y/ or q to quit : n
I did the backup with the command:
c:\>fptw64.exe -BIOS -D backup.bin. I add the NVME driver and I apparently everything is correct, but I don’t dare dump the bios, not knowing if I’m doing the right thing.
What range of values ??should I take for the -A and -L parameters in my Prodesk 400G1 SFF?
Thanks
Paulie says
No idea, I do not have a 400 to try it on. I would advise you not to use these instructions for a 400 as they are written specifically for this machine. Only consider moving forward if you have a hardware based flash writer so you can revert your changes safely. It is likely to be a different flash chip.
Fernando González Macías says
Hi Paul.
Where did you get the information to know that the parameters for fptw64.exe on the 800 G1, were -A 0x580000 -L 0x7A0000?
How can I know the equivalent parameters for the Prodesk 400 G1 SFF?
On the other hand, how can I know the correct version of Intel Management Engine System Tools for the 400 G1?
Tranks
Raf says
Hey Paulie, I hope you’re well mate.
Thank you very much for putting together this great tutorial. I’ve been trying for ages to implement this on my old but reliable G1, and this is only great news.
Just one thing to add: initially, I installed the NVMe adapter in the white PCI port and was only getting half of the speeds you reported. I did a bit of research and found that the white PCI is v.2 and the black one is v.3. So, I moved the adapter to the black port and now I’m achieving read and write speeds above 3Gb/s.
I hope this helps.
Again, thank you very much for such a great and detailed tutorial.
Cheers,
Raf
siliconbeaver says
It also works on HP 800 EliteDesk G1 tower.
OS install. this time, I did ghost disk-to-disk rather than clean-install.
Under original OS Windows 7, installed Microsoft hotfix Windows6.1-KB2990941-v3-x64.msu (V3 NOT V2), reboot to finish Microsoft hotfix install, then shut-down.
next, boot from ghost, image disk-to-disk. when done, shut-down then disconnected the original OS disk (SATA SSD, to boot easy and safe).
now boot, Windows 7 started and is up.
the G1 mod is similar to HP Elite 8300 mod but much easier. all completed under Windows. I think, G1 mod is best worth. More important, after BIOS mod, all CSM feature intact on G1, I can still boot an run those CSM-boot GPT tools. but on HP Elite 8300 after BIOS mod, those tools failed to work.
Thank Paul,
siliconbeaver says
Here is Crystal report
(again, the CrystalDiskInfo cannot detect the NVMe SSD. hence no CrystalDiskInfo. per shipping slip, it’s TOSHIBA 512 GB).
——————————————————————————
CrystalDiskMark 8.0.4 x64 (C) 2007-2021 hiyohiyo
Crystal Dew World: https://crystalmark.info/
——————————————————————————
* MB/s = 1,000,000 bytes/s [SATA/600 = 600,000,000 bytes/s]
* KB = 1000 bytes, KiB = 1024 bytes
[Read]
SEQ 1MiB (Q= 8, T= 1): 3121.891 MB/s [ 2977.3 IOPS]
SEQ 1MiB (Q= 1, T= 1): 2208.103 MB/s [ 2105.8 IOPS]
RND 4KiB (Q= 32, T= 1): 795.108 MB/s [ 194118.2 IOPS]
RND 4KiB (Q= 1, T= 1): 51.478 MB/s [ 12567.9 IOPS]
[Write]
SEQ 1MiB (Q= 8, T= 1): 1145.681 MB/s [ 1092.6 IOPS]
SEQ 1MiB (Q= 1, T= 1): 1119.156 MB/s [ 1067.3 IOPS]
RND 4KiB (Q= 32, T= 1): 737.064 MB/s [ 179947.3 IOPS]
RND 4KiB (Q= 1, T= 1): 266.784 MB/s [ 65132.8 IOPS]
Profile: Default
Test: 1 GiB (x5) [C: 9% (42/477GiB)]
Mode: [Admin]
Time: Measure 5 sec / Interval 5 sec
Date: 2023/05/06 17:28:44
OS: Windows 7 Professional SP1 [6.1 Build 7601] (x64)
miki says
You could make a configuration to be able to activate the xmp profile in the bios for the memories that I can’t find any modified for that option and update to 2.78 and it doesn’t have that option, what a disaster my g.skill is no longer worth it, they stay at 1333, I didn’t do it old bios backup
Damián R. says
Good night,
I have hp 800 g1 SFF and after looking for options I found this thread.
Comment that it has worked perfectly for me cloning SSD to nvme in pcie x4 with m.2 to pcie adapter.
Outstanding performance of 1min 20s has passed to 30s of loading win10 and note that it is in legacy mode that is working, I have a PC like new and for several years of use.
Thanks for sharing your knowledge.
Zach B says
hi Paulie,
I have one white (16x downgraded to 4x) and a 16x PCI slot. which one is faster? right now inside the white one.
siliconbeaver says
@Zach, your 1st choice is the black PCIe slot (v3).
If not, then 2nd choice is the 4X slot one.
@Navi says
Hi Paul, first I apologize for my English. I followed carefully what you posted, I managed to install a ssd samsung 970 Evo Plus 500GB in Hp Prodesk 600 g1 mini, but before that I updated BIOS to the latest version and it works 10 out of 10. Thank you very much for your contribution!
Jim G. says
Hi All. Haven’t gotten to do the 800 G1, but I did just try this with an HP 600 G1 firmware version 2.78 using @Paulie ‘s steps and software files for the HP 800 G1, and it is working ok.
YMMV – I am including the read and write output at the end of the post for comparison… it is slightly different for the 600 G1.
The UEFI Tool 0.28 screens for the 600 G1 bin file look a little different too.
The intel image section is not there
vUEFI image
padding
>8C8CE578-8A3D-4F1C-9935-896185C32DD3 AppleFSO section
there are 4 of those volumes, in the first one (noted above) there is the entry that is the same as in the article
.
.
.
CD84562C-6864-40A3-A081-C8D35E82B920 File DXE driver CspLibDxe
I inserted the NVMe Express Dxe right after this one, saved, reflashed, etc. and it works fine
After the mod, I did have some problems with the NVMe drive not booting. The SATA drive was still connected. The PC was still seeing the SATA drive as Disk 0 and booting from it, instead of the NVMe disk.
Finally after a bit of tinkering, unplugging and powering off, the NVMe is booting first and the SATA drive is operating as a secondary disk now.
Windows Boot Manager has always been at the top of the list before and after the mod.
Before the mod, the NVMe drive was showing up as disk 1, and the original SATA boot drive as disk 0. Windows apparently latched on to something for disk ordering with both drives connected before the mod. It took disconnecting the SATA drive and making the NVMe boot by itself first, before the NVMe drive would show up as disk 0. After that, I reconnected the SATA drive and it works fine now as Disk 1 for secondary…
Thanks again, 2 machines done now.
flash read/write stats below:
-Jim
—–
read stats
Microsoft Windows [Version 10.0.22621.1778]
(c) Microsoft Corporation. All rights reserved.
C:\Windows\System32>cd “D:\HP600G1SSD\Intel-ME-System-Tools-v9.1-r7\Intel ME System Tools v9.1 r7\Flash Programming Tool\WIN64”
C:\Windows\System32>d:
D:\HP600G1SSD\Intel-ME-System-Tools-v9.1-r7\Intel ME System Tools v9.1 r7\Flash Programming Tool\WIN64>fptw64.exe -A 0x580000 -L 0xA70000 -D HP600G1.bin
Intel (R) Flash Programming Tool. Version: 9.1.10.1000
Copyright (c) 2007 – 2014, Intel Corporation. All rights reserved.
Platform: Intel(R) Q87 Express Chipset
Reading HSFSTS register… Flash Descriptor: Valid
— Flash Devices Found —
W25Q128BV ID:0xEF4018 Size: 16384KB (131072Kb)
– Reading Flash [0xFF0000] 10688KB of 10688KB – 100% complete.
Writing flash contents to file “HP600G1.bin”…
Memory Dump Complete
FPT Operation Passed
—–
write stats
D:\HP600G1SSD\Intel-ME-System-Tools-v9.1-r7\Intel ME System Tools v9.1 r7\Flash Programming Tool\WIN64>fptw64.exe -A 0x580000 -L 0xA70000 -F HP600G1-NVME.bin
Intel (R) Flash Programming Tool. Version: 9.1.10.1000
Copyright (c) 2007 – 2014, Intel Corporation. All rights reserved.
Platform: Intel(R) Q87 Express Chipset
Reading HSFSTS register… Flash Descriptor: Valid
— Flash Devices Found —
W25Q128BV ID:0xEF4018 Size: 16384KB (131072Kb)
PDR Region does not exist.
– Reading Flash [0xFF0000] 10688KB of 10688KB – 100% complete.
– Erasing Flash Block [0x5E1000] – 100% complete.
– Programming Flash [0x5E1000] 4KB of 4KB – 100% complete.
– Erasing Flash Block [0x90B000] – 100% complete.
– Programming Flash [0x90B000] 16KB of 16KB – 100% complete.
– Verifying Flash [0xFF0000] 10688KB of 10688KB – 100% complete.
RESULT: The data is identical.
FPT Operation Passed
D:\HP600G1SSD\Intel-ME-System-Tools-v9.1-r7\Intel ME System Tools v9.1 r7\Flash Programming Tool\WIN64>
amitri55 says
I do have HP EliteDesk 800 G1 Ultra-Slim (USDT). It has Mini PCIE which could be used for NVME disks with adapter.
Could someone point me to relevant FDO Pin header in this one?
https://h30434.www3.hp.com/t5/image/serverpage/image-id/320365i62810492894DB734?v=v2
Thanks in advance.
Fernando says
Hello Paul. I have a HP Prodesk 400 G1 SFF. I did the fptw64.exe -d BackupBIOS.bin, and I obtain a file. The -A 0x580000 -L 0xA7000 is not possible because I obtain error:
Intel (R) Flash Programming Tool. Version: 9.1.10.1000
Copyright (c) 2007 – 2014, Intel Corporation. All rights reserved.
Platform: Intel(R) H81 Express Chipset
Reading HSFSTS register… Flash Descriptor: Valid
— Flash Devices Found —
W25Q64BV ID:0xEF4017 Size: 8192KB (65536Kb)
Warning: The length of data to read from flash extends past the end
of flash memory!
Start Address: 0x00580000
Read Length: 10944512
Total Flash Size: 8388608KB
Do you want to truncate the data and continue? Y/ or q to quit :
Any idea? Thanks in advance? I’m sure there is a solution but I don´t find.
Muhammad Ramzan says
Hi , Can I use 16 pin pci adopter for this
Hatem Fares says
is this work with any NVMe PCIe 3.0 x4 ? or just with Samsung 970 EVOPlus
Paulie says
Any NVMe SSD. The Samsung is just the one I chose to use.
Miki says
A mi me sirvió un nvme wd green y un pcie sin marca ni nada y lo tengo en el pcie 2.0 blanco y me va a 1800 con eso me sobra antes iba a 500 de velocidad por que el pcie 3.0 negro lo uso para una gráfica Gtx 1050 lp y ni un problema va mucho más rapido que un ssd me conformo tb lo probé con un Riser en el puerto pcie x1 y funciona ? gracias
Kane says
No problems adding support on both a 600 G1 and 800 G1 desktop minis, which have very similar boards but with slightly different chipsets. The M.2 slot is beneath the fan — one must remove the CPU heatsink (3 screws), being careful as the fan cable runs through a slit in the shroud, and then the fan itself (4 screws). One must clean off and apply new thermal paste on the CPU when reinstalling the heatsink.
Physically, there is only one mounting post for a 2280 sized NVMe and the required screw is a M3x0.5mm — larger than the usual M.2 drive screws as it’s the same thread pitch as a 2.5″ drive screw. If one is using 2.5″ drive screws, make sure the head is smaller than the M.2 drive’s mounting pad; otherwise it may short out and damage the drive and/or the motherboard.
One aspect on these minis — the M.2 slot runs off the chipset, which is PCI-E 2.0 x4. There is no reason to get a super fast drive here as 1.6 GB/s is the maximum speed achievable, regardless if the drive is capable of greater throughput. I did experienced some incompatible drives — a Kioxia BG4 will not boot and a SK Hynix BC711 ran slow. Both are OEM drives, so they were designed for an intended market, not the general market. No issues using an affordable WD SN570 and PNY CS1030 instead, both of which maxed out the bus.
Hatem Fares says
Thank you Paulie. It works with UGREEN NVMe PCIe Adapter PCIE4.0 x4 and TEAMGROUP MP33 512GB PCIE Gen3x4 M.2 2280.
I installed it on white PCIE becuase Nvidia 1050Ti uses the black PCIE. and I got read 1700MB and write 1600MB.
now game load is more faster than SSD SATA.
Thank you for sharing your knowledge.
luyc says
Thank you Paulie! I have one HP 800G1 SFF. I did it too !
But I still have one HP 600G1 SFF . Is there still hope for it?
Paulie says
I’m sure it is possible – but I don’t want to say for sure as I do not have one to play with. So proceed at your own risk if you decide to try it!
Jim G. says
@luyc check my notes in the comments back in June. I got it to work with the 600 G1 and I posted the output results You will definitely want to back up your bios first, and make at least 2-3 backups to be careful.
luyc says
@Jim G Yes, I did as you said my HP 600G1 SFF worked right, 2 older computers with NVMe SSD (and Win7) That’s great!
Thank you very much
Jim G. says
@luyc Glad it worked. You will want to keep those backup files indefinitely. I have some concerns about the area that doesn’t get flashed.
I’m not sure what the difference is (if any) for the programmed locations between the 600 G1 and the 800 G1. The command I used below is exactly the same as the article.
D:\HP600G1SSD\Intel-ME-System-Tools-v9.1-r7\Intel ME System Tools v9.1 r7\Flash Programming Tool\WIN64>fptw64.exe -A 0x580000 -L 0xA70000 -D HP600G1.bin
For security reasons, you may want to do the free upgrade to win 10. It can be done by using the win 10 media creation tool to get the win 10 iso, and then extracting it and run the setup from inside win 7.
JJ says
Hi Paul
Many thanks for your post.
I have a HP EliteDesk 800 G1 TWR and attempting to do the upgrade using your blog.
I have an issue in that the image file is not the same as yours.
The first lines are
^ UEFI image
Padding
^8c8ce578-*****
The “CspLibDxe” is there.
I have the latest BIOS on my system dated 5/9/2017.
Also I am a bit concerned when I open the backup.bin file using the UEFI utility it says
“invalid data checksum 5Ah, should be AAh”
Any thoughts?
Paulie says
I would guess you downloaded the wrong version of UEFITool
JJ says
Hi Paul
Thanks for the reply.
Yes you could be right. The link in your blog points to the win32 version, “UEFITool_0.28.0_win32”.
I am struggling to find the version for win64. Could you provide a link for this?
Have tried “UEFITool_NE_A67_win64” but get errors when reading the file.
Thanks
Paulie says
Why not use use the linked version? It doesn’t matter if it is 32-Bit
JJ says
Hi Paul
Thanks for the reply.
I did use the version in you blog (UEFITool_0.28.0_win32) but am seeing a checksum error.
Also when it reads the file it does not appear as in your blog. It starts with
^ UEFI image
Padding
^8c8ce578-*****
Any other thoughts?
Thanks.
Jim G. says
@Paulie is this a flash rom manufacturer issue like we see with the linux method?
@JJ this sounds like a bad read into the bin file. I would suggest making a new bin file using the win32 version. I know the win32 works with the 600 G1 and it has been noted with the 8300 series there are several
flash rom types between sff and cmt tower models. Also make sure your command prompt is run as administrator too when reading and writing the bin file.
JJ says
Hi Jim
Many thanks for the reply.
Have tried the win32 version to read flash and am running cmd as admin. Afraid still get the same.
Thanks
Jim G. says
@JJ let’s see if @Paulie has any suggestions. Maybe the cmt uses a different Intel flash utility.
The other route you could try is the Linux instructions from the HP 8300 article. But you will have to know what kind of flash rom the bios chip is on your 800 G1 cmt main board for the flashrom utility to work correctly.
I would be super cautious with this method and you will definitely want to make a few bin file backups and keep them for quite awhile
jj says
Hi Jim & Paul
Thanks for the replies.
I assume it does not make any difference but I read the flash ROM without putting the PC in service mode.
Thought I would see if I could read the ROM and modify the file before writing to to ROM.
JJ says
Looking through the comments I see @jcardenasch had the same checksum error.
“parseFile: invalid data checksum 5Ah, should be AAh”
@jcardenasc, did you ever solve the problem?
Jim G. says
@JJ
a quick googling of ‘invalid data checksum 5Ah, should be AAH’ resulted in this:
—
https://winraid.level1techs.com/t/howto-get-full-nvme-support-for-all-systems-with-an-ami-uefi-bios/30901/3002?page=151
as noted from that link
When I open the original BIOS by using CodeRush’s UEFITool, I get the same error message as with the BIOS, which had been modified by you:
1
parseFile: invalid data checksum 5Ah, should be AAH
So this message may be caused the specific unusual BIOS compilation done by HP, but definitively not a mistake done by you.
—
Don’t know what to suggest as I do not have an 800 G1 CMT to test with. I just have the 800 G1 SFF and haven’t had a chance to look at it yet.
I am curious what happens when trying to read the flashrom using the util from the HP 8300 steps:
https://www.tachytelic.net/2022/01/hp-compaq-8300-nvme/
As I mentioned before, you will need to figure out what kind of flash rom the 800 G1 CMT has for it to work properly.
Other than that, no idea.
JJ says
Hi Paulie
I have noticed on your Video instruction that when you read the back file using the UEFI utility you also have the same checksum error – “parseFile: invalid data checksum 5Ah, should be AAh”.
Should I just ignore this?
JJ says
oops! You have probably already worked it out but I meant the backup.bin file not back file. Sorry.
Anyway as I mentioned the video tutorial shows the same checksum error so should this be ignored?
Steve says
I’m trying this with an 800 g1 DM.
@JJ I too was getting a different output from the UEFITool than what Paulie’s screenshot is showing. But I decided as mine is a test machine I could afford to see what happens if I continue regardless. Funnily enough, no issues. It wrote the new nvme.bin image without any errors. I shutdown the computer, removed the jumper, and booted it back up. No problems. Unfortunately, I don’t yet have an NVME SSD to see if it works.
Jim G. says
@JJ @Steve I made a post last week that is still awaiting moderation, I guess because it had a web article link in it.
One needs to google the error message JJ provided.
“parseFile: invalid data checksum 5Ah, should be AAh”
You will find a winraid page showing that error is possibly due to how HP programmed the EEPROM itself originally at the factory.
In light of this error, if I were doing the mod, I would go with the flashrom instructions in the HP 8300 article as it uses linux and you should NOT get the error reading in the EEPROM with that util, provided it is done correctly. However, you do need to find out what flash rom type is on your 800 G1 mainboard. The flashrom util needs to know what kind of EEPROM chip for it to do the reading and writing correctly. As we noted with the HP 8300, there’s at least 3-4 different types of EEPROM chips HP used for the 8300 series, the same may apply with the 800 G1 of having more than one type of EEPROM chip.
Steve says
@Paulie I’ve just watched your Youtube video for this procedure, and the output from the UEFITool after opening backup.bin, is NOT the same as your above screenshot. In fact it matches what most of us here have been seeing. Could you please check and update this blog.
JJ says
Hi
Just completed the upgrade and all looking great.
A couple of points.
Desktop – HP Elitedesk 800 G1 Tower
Used – Samsung 970 Evo Plus 1TB
PCIe card – glotrends PCIe M.2 Adapter
FDO pin header are on the edge of the motherboard next to the white PCIe slot.
I ignored the parser checksum error – “parseFile: invalid data checksum 5Ah, should be AAh”
The UEFI Tool reads the bin file starting –
^ UEFI image
Padding
^8c8ce578-*****
These last two observations match Paulie’s You Tube video tutorial but are not the same as the blog.
To clone my HDD I used Macrium Reflect (trial version). As I cloned from a 512GB HDD to the Samsumg SSD which is 1TB.
the additional unallocated space is placed at the end of the recovery partition. To move the unallocated space next to the main
data volume and merge I used Minitool Partition Wizard
Hope this helps others who may wish to undertake the upgrade.
Paulie says
Thanks for the helping comments. Did you get a good performance boost?
jj says
Hi Paulie
The processor in my HP Elitedesk 800 G1 Tower is an Intel i7-4770. Previously I was using a HDD drive which was taking ages to boot up and settle down. The Crystal Disk Mark read test was of the order of 100MB/s.
I am now seeing a significant improvement – Read 3203 MB/s, Write 2036 MB/s. (Test SEQ1M Q8T1)
My Desktop now boots up amazing quickly (about 20sec) and is responsive. No longer do I have to wait for the disk to settle down. Previously the disk utilisation was running at 100% long after Windows has loaded.
Apps now run a lot faster.
So this has been a great improvement.
Thanks for doing this blog and sharing your knowledge.
Hope my experience will help others.
All the best,
JJ
Window user says
Hello , im stucked at last command where it showing parameter not recognize , so what to do , its hp elitedesk 800g1 sff
Steve says
Hmmm. Windows 10 recognises the nvme drive but the BIOS does not?
HP 800 g1 Mini. BIOS version 2.33
Steve says
Unplugged the SATA drive. The NVME drive is 2nd hand and must have already had Windows 10 installed. Boots up just fine. Thanks Paulie.
Steve says
HP EliteDesk 800 g1 DM (Mini)
As mentioned before, the Mini only has a PCI-E v2 for M.2, so speeds will be no faster than 1.5GB/s. But that is still many times faster than a SATA SSD.
It is possible to use an AHCI based M.2 SSD that can be booted from without this mod, but the largest drive I found is 512GB (Samsung MZHPV512HDGL). This also gives 1.5GB/s. But this mod is worth it just for a greater range and capacities of M.2 SSD’s that you can boot from.
Steve says
Added a Crucial P3 1TB, modified the BIOS as per this blog, installed Debian Linux (UEFI), and getting a boot speed from power on to desktop in 15 seconds. Benchmarked the drive at 1.6GB/s.
800 g1 Desktop Mini
i7 4790T 2.7GHz
16GB 1600Hz RAM
Thanks for sharing this Paulie!
Sumit says
Hello i have successfully booted with window 10 nvme and im getting 1.6GBps speed in pcie 3.0 wired x4 but here is something i have to ask , why the boot image of window 10 22h2 is little flat , how to fix that and there is a hard drive partition which is of 49mb what to do with that it is mbr , i haven’t cloned my hdd to ssd because there is an error was showing during hdd cloning through acronis , and in crucial drive before booting with usb i set 5GB for over provisioning but its now 500mb when im clearly it then it said failed so how to fix that too ,
? thank you for this good tutorial , I hope you will make more of amazing tutorial for older pc , just like installing window 11 in unsupported hardware , im waiting for it , have a nice day
Alex says
HP 800 G1 min it turned out, but you need to take NVMe M2 and install from 0 as UEFI – then the loading point will appear and it will be possible to load from M2. Thank you very much!
Tub says
The operation failed on my HP EliteDesk 800 G1 TWR. I performed the commands successfully but the “computer setup” bios menu became a black screen. Fortunately, Windows is still booting and I was able to restore backup.bin. So “computer setup” came back.
Version 2.15.1236. Copyright (C) 2013 American Megatrends, Inc.
32768 MB
Product Name HP EliteDesk 800 G1 TWR
BIOS Version & Date L01 v02.71 05/09/2017
ME Firmware version 9.0.31.1487
Craig says
OMG THANK YOU SO MUCH!!!! HP 800 G1 MINI!! It worked perfectly the exact same steps, the only difference was my UEFI tool screen did not look the “exact same way” it didn’t list the “Intel” or any other information like yours did but I found the same line of code “CD8462C-6864-40A3-A081-C8D35E82B920” hit the install after write the new bios and bam it worked beautifully
qdjd2000 says
Tested it’s working.
HP Elitedesk 800 G1 DM, Intel nvme 256GB. After inserting nvme driver, booted from the nvme drive.
David says
OMG…. I spent ages trying to get my EliteDesk 800 mini to boot off a 1tb Samsung 870, it would load windows installer then format everything but just sit there not booting.
Did some google searches and found this article… you sir are amazing !
Now booting in about 10 seconds.
Was a bit squeaky doing it as the UEFI said checksum error but was brave and ignored the warning , rebuilt the bios and amazed as it works just great.
Might go and buy a 2tb just as a treat.
Jim G. says
@Dave
Thanks. Glad it worked for you, easy enough. 🙂
It is good to have old small usb sticks laying around. They are excellent for utility boot disks. Sometimes when someone doesn’t want their old one anymore because it is ‘too small’, I try to get them. And amazon has them cheap enough as a 5pk for 16gb too.
Instead of a usb stick, I’d go with a Samsung T7 Shield or something of a USB NVMe external. They do cost more, but they are are MUCH faster. 3 words: black friday sales. I just picked up a USB 3.1 Gen 2 x4 PCIe card and the Samsung T7 shield flies at 850MB/sec for an external. Pair that with the modded NVMe boot and one really- is off to the races. Even with the standard USB 3.x ports, it can get up to 450MB/sec which still runs circles around usb sticks…
—–
@Paulie
Any insight on this from your poweredge article? Just stumbled upon it today while doing some reading…
Now I am trying to figure out how to do CLOVER to boot BIOS to NVMe. It’s kind of an expansion on what you did with the poweredge.
Been reeding some articles and it seems this CAN work. Where the clover boot loader can get older BIOS or UEFI machines to boot NVMe, without modifying the bios firmware. But I have yet to figure out how to properly build the Clover boot ISO to do it. Boot Disk Utility did not work and a pre made ISO of Clover just hang on my test machine.
If I can get this to work, it should basically be universal?! I was going to try an HP 6200 and some other older machines to where this kind of thing is probably a much better solution vs. getting brave with undocumented firmware mods.
Cheers.
Rajesh Shanmugam says
Any way to do pcie bifurcation so i can install 2 nvme in one pcie x16 slot ?
Paulie says
Nope. I believe HighPoint sell a NVMe adapter that makes this possible, but it’s very expensive.
Jim G. says
Well Ladies and Gents:
I am happy to say I have managed to get a nice little USB EFI NVMe booter going on. 😉
Though I still have yet to get legacy BIOS to work with ANY boot stick, it just hangs.
For those who are having problems flashing the ROM for the HP 8300 for NVMe support, OR for other models that support EFI boot: you may find this post to be- very helpful.
I have tested the Clover installer method below with the HP 8300, and it DOES work to boot to the HP 8300 PCIe NVMe via Clover. So in effect, one does NOT need to flash the HP 8300 bios, if they want to use this method.
My test machine is an HP 6200 Pro SFF with latest stock bios 2.33, no NVMeExpressDxe was added to it as a BIOS mod. No bios mod guides are out there for it either. So this machine was a great choice for this. The drive is a Western Digital sn730 1tb disk with a MAIWO PCIe x16 adapter card in the only pci x16 slot available on the HP 6200 SFF.
Some of this may be slightly similar to what @Paulie did in his Dell poweredge article. Mine is a different usb boot stick and a different windows setup method.
Please be aware that you do any of this below at your own risk. I cannot say this method is *completely* universal, but that certainly is the hope for other uEFI systems. The HP 6200 has no raid controllers built in, such devices may throw a monkey wrench into things with other systems, or other non intel systems or chipsets with proprietary SATA or RAID controllers, etc… things you would need the proper Dxe files for in the Clover USB stick config or drivers in Windows installer boot images, so I cannot say that other things will work with anything else, outside of my test hardware. So try this at your own risk.
First, what does NOT work: posted here to save you time:
I tried some things with @Paulie’s BDU, plus DUET/rEFInd, and Clover original iso, all in BIOS only mode. None of these would ever work, the system would just hang. Yet there is supposed to be a way to make those older machines boot with with usb sticks… so older BIOS only (non uEFI) machines are out (for now?)
Next, turned on EFI mode. DUET/rEFInd would boot the win 11 usb installer stick, but it would never boot the NVMe drive. It does not see it, my guess is it needs a Dxe file somewhere in the config to solve this problem.
Now, what DOES work:
The current full Clover stock ISO works 🙂 so that is what we will use.
I can’t share a link to download it, because the post will just sit in awaiting moderation status in purgatory. :/
I got my clover iso directly from github, or you can Google search for Clover EFI boot ISO, and you make the bootable usb with Rufus and the defaults on the FIRST usb stick, just like you would for a windows usb installer image. Paulie’s BDU Boot Disk Utility image he used for the dell poweredge might work too, I did not try it.
Before you get started: you MUST use a GPT disk for your windows installation. Throwing an a MBR disk with a previous windows install on it into this deal, may be a big monkey wrench. If you do not have a GPT disk set up already, my suggestion is to go with option 1 below, and start from scratch with your PCIe NVMe drive.
I used AOMEI Partition Assistant free version to switch the PCIe NVMe disk to GPT mode, before doing anything. This GPT setting remained throughout the install process. I did this to save time and avoid a headache, this may or may not be necessary. Something like Minitool Partition Wizard or other utils should do the same.
Two ways to get the HP 6200 PCIe NVMe to boot Windows 10/11 with Clover USB boot stick:
Method 1. Install Win 10/11 Pro from scratch.
Prerequisites: have a licensed version of Win 10 or Win 11 ready to go for your machine. Win 7 does NOT support NVMe booting at all, as far as I know.
Get your windows install files ready on a SECOND usb stick.
I did use the Clover and Windows Installer sticks together (whereas @Paulie did not in his poweredge config), actually selecting the clover stick from the boot menu, only on the first boot. Once clover loads, you can select to boot the windows installer from EFI via clover.
To keep things simple, with the HP 6200 machine laying flat horizontally as a desktop pc:
I used the front usb ports next to power switch, power switch on left side:
I have both my clover usb stick and win 11 pro installer sticks connected:
left to right 1 2 3 4
1 windows installer usb image
2 empty
3 empty
4 clover install boot stick
The HP 6200 Bios sees these ports in REVERSE of this numbering, it sees the first boot device of 2 the usbs- as the clover installer on port 4. Clover installer can be moved to the back of the machine, once completed.
This will be DIFFERENT for other machines, you will have to figure it out from your BIOS boot ordering.
The BIOS is set to boot for EFI section to boot first. Windows boot manager is still at the top of the list, because MS likes to put it there (I purposefully left it this way, given MS will set it to this with a NEW install anyway, and future MS Windows upgrade probably switch it to this also). Since Windows doesn’t find the NVMe drive (the machine has no NVMe BIOS mod), it flips down to the next boot device: the First USB booter it finds, which is the Clover usb. If for some reason you get a non system disk error when booting, then move the USB boot device to the TOP of the list in your BIOS setup.
Once the initial setup is done and the first reboot happens:
the pc should automatically go to a clover boot screen if all goes well. Boot Microsoft EFI Boot from EFI is the default, and it will boot within a few seconds. The rest of the setup will finish. And you can continue using the clover default from now on. 🙂
Once windows setup is complete: remove the usb sticks, and plug the clover USB boot device on a usb port in the back of the machine. It will need to be there permanently. Be aware that if you do want to boot other devices in the future, you may need to use you bios boot menu to select the appropriate usb stick.
———
Method 2. Clone previous/current GPT mechanical hard disk to the PCIe NVMe.
Again please DO NOT clone a previous MBR Windows installation over to the new PCIe NVMe drive, Windows may not like it with this Clover config.
I used Acronis True Image for this. Full disk clone worked perfectly, no issues. If you don’t have a paid license for this: there is another way. If you have a Western Digital drive of ANY kind (even an old 500gb usb 2.0 my passport will do), Western Digital has their own custom version of True Image as download on their site. It is FREE and works for 5 years. (You will need to swap to a different WD drive to re-trigger it as useable for another 5 years.) You can also use things like clonezilla that is free, and other softwares.
Once cloning is complete: remove any usb sticks, and plug the clover USB boot device on a usb port in the back of the machine. It will need to be there permanently. Be aware that if you do want to boot other devices in the future, you may need to use you bios boot menu to select the appropriate usb stick.
The pc should automatically go to a clover boot screen if all goes well. Boot Microsoft EFI Boot from EFI is the default, and it will boot within a few seconds. And you can continue using the clover default from now on. 🙂
———-
My test WD black SN730 1tb disk gets 1641MB/sec read and 1144MB/sec write. The drive is more than fast enough for this PCIe 2.0 system. Older NVMe drives actually might be better for this pc. Meaning: you can upgrade an SSD in a newer machine, and repurpose the drive that was removed from the new machine: by using it in this setup.
Again, I cannot say this Clover boot stick is universal for ALL uEFI systems, but that certainly is the hope.
I hope this helps those of you who are having problems modifying your HP 8300 bios, or those who don’t have a way to do bios mods for their particular setup.
-Jim
QB says
Paul, you are a genius! I followed your instructions and was able to get the E800G1 SFF to boot off the PCIE-NVMe disk. Now the PC shows improved performance and we can get rid of the slower SATA drives. Thank you for this article!
You sir, are a scholar and a gentleman 🙂
cheers!
QB
Paulie says
Thank you! I do enjoy reading all of the success stories
Jim G. says
Sorry wasn’t trying to steal @Paulie’s thunder. @Dave @David 2 Daves and I’m getting confused between different posts with posters with similar names. 🙂 whoops.
Paulie says
Don’t worry Jim – I don’t have much thunder!
Erhard Falkenberg says
Thank you so much for this excellent tutorial.
Everthing works just fine.
Time for ‘fast’ computing…..
Paulie says
Pleasure – glad it helped you out.
Ozsvárt Ottó says
Thanks for your work!
800 G1 DM works perfectly with Windows 11, Kingston NVME ssd.
Kanga says
OK, all good until the final flash bin. It does not pass and asks if I wish to overwrite bin file, answer yes or no. Which selection ?
Kanga says
— Flash Devices Found —
N25Q128 ID{0x20BA18 Size 16384KB (131072Kb)
(backup.bin) file already exists
Do you wnat to overite file? Y/N or q to quit:
Not game to proceed, any advice welcome
Kanga says
If You get message to overwrite file, answer yes (y) and I now have nvme speeds.
Thanks for the comprehensive video Paulie.
Bob says
Paul,
Recently tried this up date on my HP Elite Desk 800 G1 TWR and worked fine until I tried to flash the bios and I got the following: Error 280 : Failed to disable write protection for the bios space!
Ray says
Hi i have a g1 mini and just installed a m2 crucial p3 nvme but couldnt get it to boot, it detected in win10 as a storage drive. I would test this method out soon, when i download the file Intel Management Engine Components from HP its for the G1 tower, is that ok? Thanks!
jj44 says
A small comment for those who use this type of system as a headless proxmox server: When you set “Video Option ROMs” to UEFI Only in de BIOS (as described), the system does not start booting without a display connected!
Just change “Video Option ROMs” back to Legacy Only, and the problem is solved.
Paul, thanks for this brilliant description! My HP EliteDesk 800 G1 mini runs ProxMox at blazing speed now.
Martin Sp. says
Hello everyone
I performed the BIOS modification on my HP Elitedesk 800 G1 SFF. It’s relatively easy. Thanks for the instructions.
As an M.2 NVME SSD to PCI Express converter, I bought a card on Ebay for around 12 EUR. Plus an ADATA XPG SX8200 Pro 512 GB, SSD (PCIe 3.0 x4, NVMe 1.3, M.2 2280) for around €33.
So far everything works (Windows 11 + Kubuntu 23.10 dual-boot). Sometimes the PC doesn’t seem to recognize something correctly when it starts. The GRUB page doesn’t come up. Instead, the following is displayed:
>> Checking Media Presence….
>> Media Present….
>> Start PXE over IPv4.
After a while there will be a restart. Strange …
Gerez says
Dear Paul!
Thank you a lot! It works perfectly step by step with 800 G1 mini (dm). Now i write from it, and use samsung 970 pro evo nvme m.2. I reach ~1600mb/s read and write. Again thank you a lot!!!
Paulie says
That is interesting. What add in card did you use for that machine? Well done!
Gerez says
This is a desktop mini version with an m.2 slot on the main board. So easily i flash the bios, plug in the ssd in the m.2 slot, then install win. Because the dm version do not have a pcie slot, but got an m.2, 1600mb/s is the speed limit. Someone before post about that a bit detailed.
Paulie says
But if it already had an m.2 slot wouldn’t it already contain support for nvme? Or not?
Gerez says
Its already have support for m.2 SSD, but without your BIOS flash it cant boot from an NVME SSD. It can boot from only ACHI controllled m.2. I did a research before I found your page, and its very difficult to find a m.2 SSD that you can boot from. But with your solution I easily can boot from nvme ssd
Paulie says
Very cool, nicely done.
Gerez says
Steve says
AUGUST 22, 2023 AT 11:25 AM
HP EliteDesk 800 g1 DM (Mini)
As mentioned before, the Mini only has a PCI-E v2 for M.2, so speeds will be no faster than 1.5GB/s. But that is still many times faster than a SATA SSD.
It is possible to use an AHCI based M.2 SSD that can be booted from without this mod, but the largest drive I found is 512GB (Samsung MZHPV512HDGL). This also gives 1.5GB/s. But this mod is worth it just for a greater range and capacities of M.2 SSD’s that you can boot from.
Martin Sp. says
After successfully booting my HP Elitedesk 800 G1 SFF from M.2 NVMe SSD, I’m now trying to get my HP Elitedesk 800 G1 USDT running with a PCIe MXM 3.0 to M.2 NVMe adapter … bought on AliExpress for €9.
I’ll report back in 2-4 weeks… I hope it’s successful 🙂
Mempoh says
Great article !
I successfully updated my HP Elitedesk 800 G1 SFF with a mini PCIE adapter to NVME ssd.
I can now have 4 ssd on my computer 🙂
– one 2.5 sata ssd on sata connector
– one 2.5 sata ssd on CD connector with case to sata adapter
– one B+M ssd on mSata connector with adapter mSata to sata B+M ssd
– one M ssd on mini PCIE connector with adapter mini PCIE to NVME M key ssd
Adapters I used (fr Aliexpress links) :
https://fr.aliexpress.com/item/4001013783291.html?spm=a2g0o.order_list.order_list_main.5.16475e5bTwCJa9&gatewayAdapt=glo2fra
https://fr.aliexpress.com/item/4001013783291.html?spm=a2g0o.order_list.order_list_main.5.16475e5bTwCJa9&gatewayAdapt=glo2fra
Mempoh says
sorry wrong link in previous post
https://fr.aliexpress.com/item/1005004333652556.html?spm=a2g0o.order_list.order_list_main.17.16475e5bTwCJa9&gatewayAdapt=glo2fra
Mempoh says
Great article !
I successfully updated my HP Elitedesk 800 G1 SFF with a mini PCIE adapter to NVME ssd.
I can now have 4 ssd on my computer 🙂
– one 2.5 sata ssd on sata connector
– one 2.5 sata ssd on CD connector with case to sata adapter
– one B+M ssd on mSata connector with adapter mSata to sata B+M ssd
– one M ssd on mini PCIE connector with adapter mini PCIE to NVME M key ssd
Adapters I used (fr Aliexpress links) :
https://fr.aliexpress.com/item/4001013783291.html?spm=a2g0o.order_list.order_list_main.5.16475e5bTwCJa9&gatewayAdapt=glo2fra
https://fr.aliexpress.com/item/1005004333652556.html?spm=a2g0o.order_list.order_list_main.17.16475e5bTwCJa9&gatewayAdapt=glo2fra
Paulie says
That’s a lot of drives!
Jim G. says
@Mempoh
I’d say that is a great setup to use smaller or older SSD drives for sure!
Though I am confused:
– one B+M ssd on mSata connector with adapter mSata to sata B+M ssd
– one M ssd on mini PCIE connector with adapter mini PCIE to NVME M key ssd
What is this thing below you purchased? Is this for AHCI/SATA B key to NVMe M key or something like that?
Where does this go? Wifi slot? I think the wifi slot is only a PCIe x1 slot… so slow performance possibly…? curious what your crystal disk marks look like.
NEW Mini PCI-E to NVME Adapter Card Board Converter Expansion Card Riser Supports 2230 2242 2260 2280 M.2 NVME PCIE M Key M2 SSD
https://www.aliexpress.us/item/3256804147337804.html?spm=a2g0o.order_list.order_list_main.17.16475e5bTwCJa9&gatewayAdapt=fra2usa4itemAdapt
Something like this doesn’t fit what you are trying to do?
this has both SATA + NVMe on a single PCIe x4 card.
https://www.amazon.com/Adapter-advanced-solution-Controller-Expansion/dp/B07JKH5VTL/ref=sr_1_6?crid=2ZTP3KC3VB60Z&keywords=sata+and+nvme+to+pcie+adapter&qid=1700696183&sprefix=sata+and+nvme+to+pcie+adapter%2Caps%2C147&sr=8-6
Aikawa24 says
Hi, Thank You very much for your Impression.
ive managed to edit the Bios of my Prodesk 600 G1 Mini
your Area does not fit for my 2.33 Bios so ive changed it to
-A 0x580000 -L 0xE22660
and it worked
Andre Medeiros says
Hi,
I have hp 800 g1 mini, i have done all the process ok.
But still cant see the m.2 sata driver in bios or in windows 10.
Can anyone can point me in right direction?
Regards.
Jim G. says
@Andre Medeiros
You have to insert the dxe at the right point in the file, as shown in the pictures.
If you confirmed the modded bios file was properly written back to the flash chip with the FDO jumper enabled, then the bios mod should be fine.
I think you have a hardware/disk problem. What model of disk are you trying to use?
Make sure you are using the right kind of M.2 disk. There are two types: SATA M.2 drives and NVMe M.2 drives. If you do not have an NVMe M.2 disk, then you need to get one.
With the add in cards: the NVMe disk will NOT show up in the bios, even with a propely modded bios. I would assume this is the same with the mini.
SATA NGFF M.2 does NOT work with NVMe adapter cards. I don’t think it will work with the mini either.
If everything is set up correctly, you should see the NVMe M.2 disk it as a second drive in the windows disk management console.
André Medeiros says
Hi,
@Jim G thanks for the reply. Everything was setup properly, with no issues at all.
The disk i have is a lextar M.2 SSD 240GB, and not a M.2 nvme. Could this be the issue? Thanks for support.
Martin Sp. says
My HP Elitedesk 800 G1 USDT not recognize the NVMe-SSD (in PCIe MXM 3.0 to M.2 NVMe adapter) at BIOS. My modified BIOS do not work.
Boot Windows 11 form a SATA-SSD -> Recognize the NVMe-SSD an can format it.
I can install Windows 11 on it, but not boot afte installation (not recognized).
Do I need an other NVMe-Driver?
Possibly insert at an other position [actual after CspLibDxe (CD8462C-6864-40A3-A081-C8D35E82B920)]?
Any suggestions?
Jim G. says
@Andre
Lexar has NVMe products, but we need more info on the exact Lexar model you have.
You need an NVMe M.2 drive that has an M key. Anything Western Digital SN5xx or SN7xx, Samsung 970 Evo or above, Crucial P3 or above, etc. The product description should say NVMe on it, whatever you choose.
To confirm this is a hardware issue, boot with a regular SATA 2.5 or 3.5 disk using a SATA port, just like Martin did in the post below yours.
If the pc does not see your M.2 drive in disk management or device manager using the windows installation on the SATA drive, then you definitely have the wrong kind of drive in your M.2 slot, or the drive is possibly dead.
We need to figure out what type of drive you have.
Take a look at this for more info too on NVMe types.
You need the one in the SECOND picture with the M key for NVMe.
I’ll take a guess and say your Lexar is in the FIRST picture with the B+M key, and is incompatible. I don’t know without more info on your Lexar model number.
https://www.partitionwizard.com/partitionmanager/m2-m-vs-bm.html
Besides just being B, M, or B+M, the pc M.2 slot also has to support the SATA and/or NVMe.
I think you should also test your drive with an external enclosure, just to confirm it is working correctly.
There are enclosures that can use either SATA and NVMe drives. And I’d suggest one of those from amazon or somewhere else. Something like this one.
https://www.amazon.com/SSK-Enclosure-RTL9210B-Tool-Free-2280-black/dp/B09S323JBP/ref=sr_1_4?crid=1TA1GFGTI9O0H&keywords=sata%2Band%2Bnvme%2Benclosure&qid=1701374611&sprefix=sata%2Band%2Bnvme%2Benclosure%2Caps%2C102&sr=8-4&th=1
There are also enclosures for SATA/NGFF only, or for NVMe only also. But you need to know what type of drive you have for those.
Also: the NVMe M.2 drive is never going to detect in the BIOS, even after the BIOS is properly modded. I have never seen any NVMe drives show up after any bios modifcations I have done. So do make sure your drive works in your windows install, or with an external enclosure.
Jim G. says
@Martin Sp
The M.2 drive is never going to detect in the BIOS, even after the BIOS is properly modded. I have never seen any NVMe drives show up after any bios mods I have done.
Since you have troubleshooted the NVMe drive to work from inside your current windows install, we know the M.2 works.
Did you clone your Windows install onto the M.2? Get the windows install onto the M.2 or do a fresh install. Disconnect your sata drive and boot with ONLY the M.2 drive installed. In my experience, it won’t do the first M.2 boot with the sata drive connected. So take that off and try it.
If that does not work: It’s something to do with where you put the code. I don’t have time right now to look at what you did with the code. I don’t think the code is the problem right now either… see how that goes.
Martin Sp. says
@Jim
I made a fresh Windows 11 install from a USB-Stick.
I tryed to install Kubuntu 23.10 from USB-Stick, but the NVMe-SSD Was not recognized. The boot from old Sata-SSD in Kubuntu (dual-boot Windows/Kubuntu) the NVMe-SSD works and can format and so on.
In BIOS there is no “Pata” shown in the list of bootable devices (seen that at HP-Elitedesk-800-G1-SFF and AsRock-Z77-Pro4).
Boot without SATA i allready tested … dont work …
I’m still testing around a bit…
Jim G. says
@Martin
I’m not familiar with the USDT model or MXM. The pictures I am seeing for MXM to PCIe looks like a sodimm type of slot on a converter board wht has a PCIe 16x slot connector on it. Is that what you are using? Or are you using some kind of M keyed M.2 slot to PCIe adapter board like paulie used?
See below for what I did on a 600 G1 SFF, June 4th is the post date if you want to look at it. It is in this article.
I would assume with the 800 G1 USDT has this same line somewhere in the bios code.
Perhaps you need to start over with a clean copy of the original bios image you saved at the start…
From my 600 G1 post, granted these items may not line up exactly the same with the 800 G1 mini.
My bios version was 2.78, latest at the time. If you haven’t installed the latest bios yet for your USDT, try that.
—
v UEFI image (v is a down arrow)
padding
>8C8CE578-8A3D-4F1C-9935-896185C32DD3 AppleFSO section
there are 4 of those volumes, in the first one (noted above) there is the entry that is the same as in the article
.
.
.
CD84562C-6864-40A3-A081-C8D35E82B920 File DXE driver CspLibDxe
I inserted the NVMe Express Dxe right after this one, saved, reflashed, etc. and it works fine
—
CD84562C-6864-40A3-A081-C8D35E82B920 File DXE driver CspLibDxe
This line above is the key area of the bios bin file. ^^^^ Did you put the Dxe entry here in the last one of these that you could find? Or do you put it somewhere else?
I’m assuming the 800 G1 USDT has this same line in it somewhere, since @Paulie says it works as he noted:
‘Also download the NVME Driver which will be injected into the BIOS Image.’
https://www.tachytelic.net/wp-content/optiplex/NvmExpressDxe_Small.ffs
Be sure to use this dxe file, this is the same one I used with the 600 G1 SFF. The file does work.
Hope this helps.
Jim G. says
@Martin sp
a few other things: I did use UEFI only boot, and had Windows Boot Manager at the top of the list. If you see it, put it there at the top. You’ll probably want to get your SSD formatted as a GPT drive, so that it can UEFI boot easily.
If you’re using legacy (MBR) boot, this could also be the problem as legacy does NOT support M.2 drives for booting.
Also: an Acronis true image linux boot iso does detect the M.2, that is how I was able to clone the sata disk to the NVMe M.2 without being inside of windows… so linux does work with it
Jim G. says
@Martin sp
Last post for now.
Now I am starting to wonder if something about MXM itself does NOT allow you to boot the M.2 drive. From what I am reading, apparently MXM was designed for GPU vid cards, though there are M.2 NVMe to MXM adapters out there… and not cheap, 40 bucks for one? ouch. 🙁
IF that is the case, then the other route you can go is trying clover… but will it work?
https://linustechtips.com/topic/1525297-mxm-to-nvme-adapter-with-clover-but-i-cant-figure-out-clover/
I did clover on an HP 6200 in paulies HP 8300 article… the ISO defaults and UEFI + GPT partition for NVMe were used
SEPTEMBER 20, 2023 AT 2:52 PM was the post time
https://www.tachytelic.net/2022/01/hp-compaq-8300-nvme/
The more I see clover work, the more I am thinking USB boot sticks are just less headaches and hassles for many reasons…
Let us know what you wind up getting to work, something should work between all these suggestions…
Martin Sp. says
@Jim
Thanks for all the suggestions and support.
I’ll report back if it worked… 🙂
Martin Sp. says
I extracted the BIOS again (fptw64.exe -A 0x580000 -L 0xA70000 -D backup.bin).
Then I scrolled down and looked for the entry “NvmExpressDxe_Small” -> not present
Since I couldn’t find an FDO jumper to get into service mode, I couldn’t flash the modified BIOS directly with the command “fptw64.exe -A 0x580000 -L 0xA70000 -F nvme.bin”.
I then created a bootable USB stick and used it to flash the modified BIOS without errors. But something isn’t working because the entry “NvmExpressDxe_Small” is no longer there.
There’s the problem.
Jim G. says
@Martin Sp
Sounds like the FDO still needs to be jumpered since the changes are not saving apparently. Seems your write process is going through the motions, but not saving the Dxe entry stuff.
Take the jumper off the password jumper pins, and use it on the FDO while doing your mod, then put it back on the password pins.
If the USDT does not have the password jumper block, I read this other trick in another article:
First, make sure your bios settings are prepared to boot from the USB drive you’re using for the mod.
With the power off, take a flat blade screwdriver and use it to jump the FDO pins. While holding it: power up the machine.
All you have to do is boot the machine with the FDO block jumpered with the screwdriver. Once the boot is done, the FDO jumper can be removed.
You could use a paper clip or a safety pin too if you are careful. Something can be devised for that FDO jumper.
Hopefully this will do it.
Jim G. says
@Martin sp
what are the 2 pins by your upright CMOS battery? 2 pins to the right of a silver heatsink (for chipset?) and left of a white block of 5 wires that are next to your MXM slot
I cannot find a good diagram, there has to be an FDO somewhere on that board…
Martin Sp. says
@Jim
Oh no … i’m blind … the 2 pins by the CMOS battery to the right of a silver heatsink … I can read “FDO” 🙂
Everything again from the beginning… this time in service mode.
I’ll get in touch again soon.
Martin Sp. says
@Jim
Success… or as the Klingons say: Qapla’ 🙂
Now I’m make a fresh install of Windows 11 and Kubuntu.
Very much thanks for all the support Jim
Jim G. says
@Martin Sp
Great! Glad it worked out. You’re welcome. 🙂 I figured it was that FDO jumper somehow! Just strange that HP does not have any mention of it at all in their manuals. I guess they don’t want most people fooling around and accidentally trashing the BIOS.
That’s pretty interesting that it works off the MXM slot like that. Any pictures? I saw one that had the M.2 slot diagonal across the MXM board. Maybe there is one that fits an NVMe M.2 + SATA M.2 like for the PCI-e cards? Looks like you have many different kinds of SATA SSDs that can be used with that machine on board anyway… Interesting.
Martin Sp. says
@Jim
The MXM card is available relatively cheaply from AliExpress (currently ~15 EUR; i payed 9 EUR). Yes, the M.2 slot is diagonal across the MXM board.
My relatively slow 512GB M.2-NVMe-SSD (22 EUR) runs only with 2500/1800, but that is 5 times faster than the “old” Sata-SSD 🙂
The old SSD is now just data storage in this PC.
Jim G. says
@Martin Sp
That 512gb M.2 NVMe you have is more than fast enough. Other’s aren’t really that much faster with PCI 3.0 – 3600MB/sec is max really. more like 3000 write – 3400 read range from what I’ve seen.
Don’t know if this will fit in your USDT but this looks of interest??? The white and black SSD slots- those are Mini PCIe? or are they mSATA or something else?
NEW Mini PCI-E to NVME Adapter Card Board Converter Expansion Card Riser Supports 2230 2242 2260 2280 M.2 NVME PCIE M Key M2 SSD
https://www.aliexpress.us/item/3256804147337804.html?spm=a2g0o.order_list.order_list_main.17.16475e5bTwCJa9&gatewayAdapt=fra2usa4itemAdapt
André Medeiros says
Hi @Jim,
Regarding my issue, i have a lexar nm100 256 SSD m.2 stick, and i confirm it is a B+M. Since it is a SSD m.2 and not a nvme, isnt it supposed to appear on BIOS, or Windows?
Thanks
Jim G. says
Hi @Andre
There are two types of M.2 SSD, SATA M.2 and NVMe M.2.
The lexar nm100 256 SSD M.2 stick you have is SATA M.2 SSD, so it is going to require connection to a SATA port on your motherboard.
The PCIe card you have will not work with your drive. You need an NVMe M.2 ssd to use with the PCIe card that you have.
I would go with something like this, it is cheaper. And just mount it like a regular 2.5 HDD in your case.
https://www.ebay.com/itm/386321939184
or
You need something like this, and use it in the SATA port slot. You have to connect the included cable to your motherboard.
https://www.amazon.com/gp/product/B0C7PX25VR/ref=ppx_yo_dt_b_asin_title_o00_s00?ie=UTF8&th=1
or
just get an external SATA/NGFF USB enclosure, and just use it as an external drive.
Once the M.2 SATA ssd is connected properly via the SATA port on the mainboard, then yes it should show up in the bios as a SATA drive.
Otherwise, you are better off just buying an NVMe ssd to use with the adapter card you already have, and repurposing this Lexar SATA SSD for something else.
Martin Sp. says
@Andre
I trinken your SSD is an mSATA NGFF, not an PCIe NVMe.
Marton Sp. says
grrr … autocorrection … sorry
There are some PCIe-to-NGFF conectors, but you need a NGFF driver for the BIOS mod
Paulie says
Just to let you know, I have purchased an 800 g1 USDT so I can analyse the options. It should be here in a few days and then I will update the post with my findings.
These posts are so popular I am thinking of changing the comments section to a forum function. That would make it easier for people to make sense of the comments.
Jim G. says
@Paulie that would be a great idea. I was hoping that might happen for a forum post style, that would be a lot easier, especially for the ‘off topic’ things that people ask about…
Also: what about a linked list of ALL your articles? Honestly, my recent clover idea came from your article but alas, it cannot be found on your page as a link. But Google did find it…
https://www.tachytelic.net/2020/10/dell-poweredge-install-boot-pci-nvme/
As for the rest of you: curious if any of you have done some experimenting with the E key or NGFF slot that wireless m.2 cards are used for on things like the 800 G3 and up, and on many laptops. It looks like besides wifi, there are usb 3.x cards and 2.5gb network cards and even cards with a pair of sata III ports that fit this slot.
I came across this the other day, might look into this next for some of the smaller 2230 sized drives that should fit… interestingly the slot CAN be converted to NVMe, but the speed… that’s the question.
Jim G. says
oh wow, the video is embedded… pretty cool 😀
Rus says
I have a hp 705 g1 mini which is a amd processor. The layout is similar to 800 g1 mini. I’m wondering if this will work? It has the nvme on the motherboard under the fan. Thanks for any input.
Ton says
And I can also confirm this works on a HP T820 of 12 years old with the before mentioned MXM to NVME card. I did the BIOS change as described and works flawless. Put in a PCIE 4.0×4 drive and Windows now starts cold to desktop in just under 7 seconds!!!
Paulie says
I’m going to order one of these MXM to NVME adapters. Do you mind sharing which one you purchased please?
Martin Sp. says
https://de.aliexpress.com/item/1005005736763638.html
EUR 10,50 🙂
bilou24 says
Hello i’ve tried the method but no result
the bin is different than yours, the tree indicate UEFI so no “Bios region” branch but i’ve found the same number behind. I ‘ve saved the bin, modified it and “falsh” the bios, result say “FPT operation passed” but after than when i install the NVMe, I am not able to find it in windows with disk manager (the blue led on the M2 is turn on) and in bios when I run a diagnostic on hard drive : the bios didn’t find it and the list only indicate the already known hard drive
Jim G. says
@bilou24
The NVMe drive should show up in device manager even without the bios mod, this may be a hardware problem.
What is the make and model of your NVMe drive?
What form factor is your 800 G1?
What version of the BIOS are you using?
Can you test your M.2 drive in another machine? If so, let us know what comes up in device manager for it.
If not, try reverting back to the original bios and see if the NVMe comes up in device manager. You might actually have a SATA M.2 and not an NVMe, we need more info on the make and model to determine this.
Chris Z. says
Hi Paul,
Thanks so much for your post on this upgrade project. My Elitedesk 800 G1 SFF is some serious need of a performance boast and clearly see how slow it is with Crystal Disk Mark. My intention is to clone all HP factory partitions over to the NVMe SSD (just picked up the 980). So, I’ll need to leave the SATA in the system for now. But I do want to replace that SATA with a SSD on the SATA connection for some extra drive space.
I clearly understand all your directions except for the BIOS changes. Can you put some more specifics in your BIOS configuration instructions? The images are not clear as to exactly what you changed. The UEFI is a bit different from what I’m used to in the older BIOS days. I did update my BIOS from version 2.5x (2014) to the 2.71 (2017). I assume you were on the latest version when you upgraded your Elitedesk 800 G1 SFF.
Thanks.
Jim G. says
@Chris
Hi. Have you done the modification steps yet? Which part has you confused? It sounds like you are confused about the bios settings for boot order?
If so, take a look here in the article:
“Optimise BIOS Settings
Now that you have written the new BIOS you have some choices to make. The very first thing you need to understand is that you must boot in UEFI mode if you want to use the NVMe drive.
Here are my boot settings:”
Make your bios boot order looks like the first picture. UEFI boot options should be at the top, and Windows Boot Manager the first option in the UEFI section.
Paulie has his legacy BIOS boot options disabled. (I think he shut them off to cut down on possible problems, which makes sense.) With the UEFI options enabled and ordered at the top of the boot menu screen: The system will never get much further than the Windows Boot Manager anyway.
The only difference with these older UEFI bios like the 800 G1, is that they have a UEFI section, plus the ‘BIOS boot’ section you are used to, which is called Legacy Boot today. It is the section that is grayed out in Paulie’s image.
Make sure your Windows OS disk is formatted to GPT. If your disk is MBR, then you need to do a fresh Windows install using GPT for UEFI. Rufus can make this kind of install disk if necessary.
Paulie’s article assumes you already have a GPT windows install to work with. You’d have to check your current windows install to see if it is MBR or not. This may be a problem for you, because Legacy BIOS does not boot GPT disks and vice versa, UEFI will not boot MBR disks.
This is because there is new UEFI partitioning for disks too, it is called GPT. You are familiar with MBR partitioning for Legacy BIOS, now there is also GPT partitions for UEFI and is a requirement for disks above 2TB to use the full amount of space. Legacy boot does not work with GPT disks. UEFI boot works with only GPT. Anything Win 7 or above can use MBR or GPT.
You can read more up on it here: https://www.diskpart.com/gpt-mbr/can-i-use-mbr-with-uefi-0825.html
I never got the windows convert gpt command line they mention to work, so I wind up doing a fresh GPT install to save time and headaches.
Just so you know: the NVMe drive will NOT show up anywhere in the bios after these mods. So if that is adding to the confusion, don’t worry with it because the Windows Boot Manager will control the NVMe. Think of the windows boot manager as your ‘NVMe disk’ if that makes more sense.
After the mod: if your machine does not boot off of the NVME, take the SATA disk fully out of the system, because the windows boot manager may still try to use the SATA disk first. After you successfully boot once and login to windows, you can shutdown and add the SATA drive back in. And then it will boot off the NVMe from now on.
If cloning your disk doesn’t work and your machine does not boot: then you are probably better off with a fresh install of windows on the NVMe with a GPT partition.
I hope this helps and doesn’t leave you more confused. I don’t know the minimum Windows version for NVMe. I think it is Win 10. 7 definitely does not work. So some things to consider.
Chris Z. says
Hi Jim G.,
Thanks for the great info. I just received the PCIe adapter and have the NVMe SSD waiting to get married to the adapter. Have to plan and schedule to have the system down for some time to allow for the BIOS mod and other tasks along with troubleshooting if necessary. I’ve already installed the Intel Management Engine Components and have the tools and driver staged in their appropriate locations. Next step is to shutdown the system and shunt the FDO pins. I’m basically following Paulie’s instructions to the letter being I have the same HP system.
This is exactly same Elitedesk 800 G1 SFF Paulie has. Should be the exact same effort. I was inquiring more on what the BIOS configuration looks like before the changes and what it looks like after. I’ll try to capture the settings before I start to make the boot order changes and stuff. My boot options look a bit different than what Paulie shows on this page.
Thanks again.
Chris Z.
Chris Z. says
I do need to note that I received a different PCIe adapter from Amazon than the one shown in Paulie’s photographs. Hoping this isn’t an issue but did see someone mention that they regret not getting the exact adapter Paulie specified after having troubles with some variant of the adapter.
Chris Z. says
Jim G.,
My OS is Win 7 Pro with option to do an upgrade to Win 10 and hope that is not a show stopper. I’ll check the partition on the OS. I believe it is GPT already. When I got the system from MicroCenter I opted to initiate the system with Win 7 for the functions and applications/programs that are no longer supported on Win 10.
Jim G. says
Hi Chris.
Sure thing.
Yes, following @Paulie’s steps should work just fine for the BIOS mod.
The screens might be different if you are on an older BIOS. The latest one probably matches the screens on the article.
Maybe look here about why the UEFI options are not there: https://support.hp.com/us-en/document/ish_3891464-2337914-16
As for GPT, try these commands. This should tell you what your SATA disk currently is. I think they may work for Windows 7.
The * will tell you if your disk is GPT or not
diskpart
list disk
you should see something like this
DISKPART> list disk
Disk ### Status Size Free Dyn Gpt
——– ————- ——- ——- — —
Disk 0 Online 3726 GB 8 MB *
Disk 1 Online 953 GB 476 GB *
Disk 2 Online 16 TB 2047 GB
DISKPART>
Notice the GPT column has a * in it, this indicates the drive is GPT
Disk 0 being your SATA disk drive, you might only only see this one line if you have one disk in the system
Mine has
Disk 0 SATA 4tb GPT
Disk 1 NVMe 1tb boot disk GPT
Disk 2 USB 3 disk hooked up at the moment for testing, wiped and reverted to MBR without the *
IF yours is blank (like disk 2) then it is in MBR format, and it is NOT going to work for UEFI boot.
After this mod, it is competely normal for disk 0 to still be the SATA disk. For whatever reason, the BIOS sees SATA drives before NVMe.
See if you can get the machine up to Windows 10 first. I don’t see the mod being much help without it.
Do you have a spare SATA disk that doesn’t have important data on it? I think you’ll need one for testing.
Win 7 does not support NVMe booting, plus it does not get new security updates today. Looks like Win 8.1 was the first version to NVMe boot. I don’t think Microsoft is doing the free upgrade from Windows 7 to Windows 10 anymore either. You could try cloning the Win 7 to the NVMe, but it probably will not boot. You definitely should get your Win 7 license upgraded to Win 10 if you can.
If it was me, I would just do a fresh load of Windows 10 on the NVMe, and save the time and headaches. But to do this, you have to get your Win 7 license properly upgraded to 10 first on a spare SATA drive. Something with the upgrade creates a digital license for Win 10, and from there on you can do fresh installs, if Microsoft is still allowing this. So basically you would clone your Win 7 to separate disk, and use it to do the license upgrade. Once completed, you can do the fresh install of Win 10 on the NVMe. If things don’t work, you have your current install on the original disk to fall back to.
Make sure you are doing the right upgrade for Home or Pro or whatever your Win 7 install is.
Chris Z. says
Thanks so much for your responses, Jim.
BIOS was updated to the version 00.02.71 Rev.A 22.8 MB (May 26, 2017). That the lastest for the model. Many people don’t realize they stand to benefit from keeping the BIOS updated. I had and Evo SFF that was advertised as only having a max of 1GB of RAM. The last BIOS update for that model allowed it to go to 2GB of RAM. I’m hoping the Win 7 Pro SP1 with Paulie’s solution does allow for operability on at least 1TB. I have seen other people attempt to do the upgrade but don’t have the steps Paulie clearly outlined which appeared to definitely be their failure. Windows 7 SP1 on that system seems to be able to read 1GB maybe 2GB. I going to have to go through the system and check the areas you pointed out in your comments. I’ll report back with what I find if that helps others with their projects. Would love to hear if someone was actually successful with upgrading the hardware and migrating a W7 SP1 OS to the NVMe SSD.
Chris Z. says
Sorry. My typing is terrible today. Meant “Windows 7 SP1 on that system seems to be able to read 1TB maybe 2TB. Mistyped some other words but am sure everyone gets the idea.
Jim G. says
Hi Chris.
Oh, you mean TB. Yes MBR has a limit of 2TB. For example, if you had a 2tb drive and a 4tb drive in the same machine: you could only boot from the 2tb. If you installed windows on the 4tb: the 4tb would be bootable as MBR, but limited to 2TB, you would have 2tb of space you could not format. So what you would do is boot the 2TB as MBR, and then format the 4tb in windows 7 as GPT and use it as an extra data drive.
Still, it sounds like your Win 7 OS drive is MBR: you’d need to do a reload of win 7 to get the GPT options up correctly for UEFI booting to work. I dont know if 7 even has install options for UEFI, I know 10 does for sure. It is all in how the installer usb stick is built with rufus. There are options to force for Windows to install in GPT mode. You could try this with a spare SATA drive too…
Win 7 and NVMe, it’s not officially supported from what I read. Maybe there are hacks and mods that I guess can be done to add NVMe drivers for 7 and make it bootable. I just don’t see that OS being optimized for NVMe drives, even if it can be made to work. I suggest the Win 10 for security, plus I know it works and I can help. The mods and stuff, no clue, you’d have to find someone knowledgeable on that.
Dont know what is missing in 10 from 7 besides games and things I didn’t use. Some of the things might be able to be added back in manually, no idea. Or maybe they stay installed as part of the upgrade? No clue. Rufus USB stick builder has great options these days for disabling all the Win 10/11 spying stuff and data sent to ms…
For the NVMe: If your PCIe adapter did not come with a heatsink, definitely get one. The Samsung EVO controller chips get SUPER hot! I grabbed some thermalright NVMe heatsinks for under $6 USD at amazon (linking is not working for it, sorry). They have heat transfer material on both sides of the heatsink. Definitely worth the money.
And for any of you Samsung EVO owners, you may want to look at this too… This is how to fix the EVO controller heat problem using most NVMe heatsinks.
https://www.youtube.com/watch?v=I8Z09nU554Q
I have seen some EVO drives die from overheating for sure, because people didn’t use heatsinks. And so I’m not a fan of using any EVO NVMe without a heatsink these days. Some NVMe adapters even come with heatsinks. They will help some and are better than nothing at all. Definitely use something if you don’t have a NVMe heatsink already.
Good luck and let us know how things go.
Jim G. says
Let me try one more time, I guest the posts don’t like having more than one link in them
Thermalright Heatsink at Amazon
https://www.amazon.com/Thermalright-2280-M-2-Conductivity-Performance/dp/B0BP6PYZ35/ref=sr_1_3?crid=33GUVZ5DV860T&keywords=amazon+thermalright+nvme+heatsink&qid=1706904983&sprefix=amazon+thermalright+nvme+heatsink%2Caps%2C98&sr=8-3
Chris Z. says
Thanks again, Jim.
Based on this article it looks like it can be done. It describes the best method is to clone the SATA drive/partitions over to the SSD which is what I wan to do. Need to ensure the NVMe SSD driver is in the Windows OS too if I’m reading it correctly.
https://www.ubackup.com/windows-7/install-windows-7-to-nvme-4348.html
P.S. Also noticed I’m not getting any notifications of follow-up comments or new post here even thought I have the boxes checked. Hmmm?
Jim G. says
Hi Chris.
No idea on the post notifications. I have those turned on and no one is posting lately except you and me on this one here… you have to have those turned on before you send a reply.
hmm, yeah this article stuff may actually work, but the screen is wrong for the second method.
AOMEI is decent free software, AOMEI Partition Assistant Standard also can show you if the drive is GPT or not. And it is free (or at least it was). You may want to grab that (if they still make it) to clone the disk, unless you have something already.
You need to do method 2 and 3 as steps. That screen in method 2 is not in windows setup, it is in windows itself. So something is off their in their article.
For Method 2: you need to have your NVMe inserted in the system along with your SATA drive. Then boot off the SATA drive and get the NVMe driver loaded in your device manager, as it shows.
IDK where you get this driver, probably somewhere at Samsung. You have a Samsung 970 EVO right?
Once that is done, you can clone the drive over as mentioned in Method 3, and maybe this will actually work.
But you need some kind of clone software to do this. Cloning was in AOMEI partition standard, but I have no idea these days if they still make a free product. I flipped over to MiniTool Partition Wizard. They may have something if AOMEI does not.
If your SATA drive is a WD drive, they have their own version of Acronis True Image for free, that will work. Or you can get clonezilla that is free…
Anyway, Once the driver is loaded and a reboot: the NVMe should show up in your Windows 7 as a second drive. If that much is working, you’re on the right track anyway… and all things being equal, this may very well work.
If this doesn’t work, then you might need to do a clean Win 7 GPT install on a SATA disk and move that over to the NVMe using these steps.
Bilou24 says
Hi Jim G.
First thanks for your reply.
For your questions about my config :
What is the make and model of your NVMe drive?
=> it is not some good device , but i thought the compatibility will matching :
my aim is to make a NAS with my 800 G1, and I want to have the maximum of sata output for the hard drives (5 sata)
so i tried to install
– a PCI express – M2 adapter (alieexpress = Adaptator X16 M.2 NVMe SSD NGFF -PCIE 3.0 X16 = because the motherboard have only 3x PCIe protocol)
– M.2 256Go PCIe from Aliexpress (KingSpec product)
If this M2 solution doesn’t work i will install OMV (open Media vault) on USB device but i’ll prefer the M2 solution.
What form factor is your 800 G1?
=> it is the 800 G1 Tower
What version of the BIOS are you using?
=>the BIOS in the Computer : 2.15.1236 so it is the same version than this in this tuto (see screenshot about optimize the boot)
Can you test your M.2 drive in another machine?
=> On a other machine on external USB support = it is working
First i received the M2 with no partition on it, i thought that’s why it was not recognized, it is not the case, after i’ve made a NTFS partition on it (with external USB adaptor on an other PC) and after reinstalled it on PCIe in the elitdesk ; neither the bios or Windows find the M2
You might actually have a SATA M.2 and not an NVMe = it is really a NVMe
But i’ve seen on this discussion =
that a special M2 will be better to be directly recognized by the 800 G1 : M2 AHCI
https://h30434.www3.hp.com/t5/Business-PCs-Workstations-and-Point-of-Sale-Systems/HP-EliteDesk-800-G1-SSD-Compatibility/td-p/8335711
Do you think it will be the solution (i think this solution is adapted for slim elitdesk 800 which have the M2 slot on motherboard but it will be more easy with the AHCI protocol, because the bios take in charge natively the AHCI)
Jim G. says
@Bilou24
Sure thing, we are still missing necessary information to get this figured out though.
I’m not seeing anything with google or duckduckgo for M.2 256Go PCIe from Aliexpress (KingSpec product)
What does it say in your device manager for the drive? Using your usb M.2 case, pull it up and get the drive model.
I would not use anything about the 800 G1 mini because it has native M.2 slots and the tower does not. PCIe cards are a whole different story, because there are cards for NVMe, or AHCI/SATA or BOTH.
M.2 AHCI is NOT the same an NVMe drive.
AHCI = NGFF = SATA
Before going into the rest of that, we need more details on the drive.
Because the M.2 drive is NOT showing up in Windows 10 with the PCIe card, but is working with the usb case: there’s an incompatibility between your M.2 drive, and the PCIe card you are using.
Without EXACT details about the hardware, I do not know what to tell you. ‘Ali Express’ hardware doesn’t mean anything to me. I don’t shop there, I’d need to see actual product links. And even product links from seller sites, may not have the right specs of a manufacturer part. I have seen that before too.
So we need the EXACT info off of the hardware parts. There should be labels and part numbers on the USB case and on the M.2 drive itself.
If you cannot get the info, then. I suggest you buy one of these. Based on the info you have given me, I think your M.2 drive needs to go in the SATA slot on it, and you would use a SATA cable and connect it to your mainboard.
https://www.amazon.com/Nvme-PCIe-Adapter-Card-SATA/dp/B0B6W61C8F/ref=sr_1_6?crid=11QEOLL0106ZG&keywords=sata+nvme+pcie+adapter&qid=1707605236&sprefix=sata+nvme+pcie+adater%2Caps%2C106&sr=8-6
Without EXACT info: I think you have an AHCI or SATA drive and not an NVMe drive. This card should work either way with the disk you have. Or, you need to get a known NVMe disk. I’d suggest The Western Digital SN 570 1tb you can get that at walmart in the US for 50 or so off the shelf in store, and amazon has plenty of 1tb NVMe drives for under 50 bucks these days.
Jim G. says
Also, there is the different type of keys KEYS There’s B key for SATA, B+M key for AHCI (which is still the same as SATA) and M Key which is NVMe only. If your drive has B+M, then definitely the drive is not compatible with an NVMe adapter card.
If you cant get the model info, then match the kingspec drive connector up with this.
https://hotelectronicsproducts.com/types-of-ssd/
NVMe drives are M key only. If you don’t have an M key drive, you do not have an NVMe drive, and you definitely need the adapter card above.
bilou24 says
Hello Jim G.
thank you for your repply. for the information concerning the Aliexpress product : see the link below
https://fr.aliexpress.com/item/1005005589274213.html?spm=a2g0o.order_list.order_list_main.11.3edb5e5bRPSFhc&gatewayAdapt=glo2fra
and the adapter :
https://fr.aliexpress.com/item/1005006016461478.html?spm=a2g0o.order_list.order_list_main.17.3edb5e5bRPSFhc&gatewayAdapt=glo2fra
I think, i’ll go order a sdd for the boot of OpenMediaVault (not in MVMe but may be easy to find compatibility with lower bitrate) this product :
https://www.amazon.fr/gp/product/B07LGKQLT5/ref=ewc_pr_img_2?smid=A3QMICJXJ6ZF6V&psc=1
and to add sata on the board (5 natively and to make a NAS more output are necessary), i think order this product :
and install it on the white PCIe (X4PCIEXP label on the board – PCI express x16 reduced in 4x):
https://www.amazon.fr/gp/product/B097RBLM9G/ref=ewc_pr_img_1?smid=A21CTMDLFXECIV&th=1
do you think, this 2 products will be properly recognised in bios or UEFI ?
Mike Y. says
Thank you for the comprehensive procedure description, it worked just fine for me.
First I have flashed the latest HP BIOS (2.71) by HP instructions, then modified UEFI part following your procedure. I have encountered “invalid data checksum 5Ah, should be AAh” from UEFITool as many users here but ignored the warning – it relates to the region which we do not modify.
I put a “secondhand” Samsung PM981 1TB SSD (which is believed to be the OEM version of 970 EVO drives) and my old Elitedesk 800 G1 really shines now – THANKS!
Jim G. says
@bilou24
send me an email to blackhawks_fan54@yahoo.com
I wrote a reply to your post with links, and it is still awaiting moderation. Your questions are kind of an off topic anyway… maybe that is why my post is not showing up a week later.
Mars says
I am about to try this with a wildly different BIOS than the majority of commenters… everyone seems to have 2.71 but I have 2.78 on my Elitedesk 800 G1 SFF… am I going to run into trouble here? I don’t want to regress to 2.71 because .77 at least contains critical security updates. These are mostly undocumented on HP bios page for the machine but can be found in security advisories. I don’t really know how I got bumped up to this version of the BIOS…
Jim G. says
@Mars Windows updates now include many BIOS updates for HP and Dell computers. That’s probably how you got it.
The NVME mod should work fine with 2.78. It did for me for a 600G1 with the 2.78 BIOS. Why anyone doesn’t want to run the latest BIOS is beyond me. They release these BIOS updates for a reason. Spectre and Meltdown are reason enough to patch them to the latest. Unless someone wants to end up with a fried CPU.
Mars says
Hi Jim,
Glad to see you’re still watching for replies. I got nervous when the UEFI tool output looked very different to the contents of Paul’s blog post. So I am actually in the process of regressing back to 2.71, though I do have the backup.bin that scared me off. Oddly, I always turn off meltdown and spectre mitigations in Windows with GRC InSpectre. Anyway, this 800 G1 SFF got me through the pandemic (with low profile RX/550), but now that I am building a new main rig, this guy will become a local-only NAS. So I am not necessarily worried about latest BIOS…
Curious to hear your thoughts.
Cheers,
Mars
Jim G. says
@Mars Sure thing, happy to help when I can.
The mod itself is not version dependent from what I have seen. I wouldn’t worry about rolling back to an older version.
The bin files may look different between BIOS versions though.
It looks like HP dropped the ball on this model, the latest on their site is 2.71. I guess Paulie used version 2.71 for his article? No idea.
Windows update should up it to a newer one, or maybe downloading the update from inside the bios setup itself? I think mine came to me with 2.78 on it. I seem to remember thinking it was strange to have a newer BIOS on the machine, than what is available online, that was a first .
Here’s some notes from what I did using 2.78 awhile ago.
—
v UEFI image (v is a down arrow)
padding
>8C8CE578-8A3D-4F1C-9935-896185C32DD3 AppleFSO section
there are 4 of those volumes, in the first one (noted above) there is the entry that is the same as in the article
.
.
.
CD84562C-6864-40A3-A081-C8D35E82B920 File DXE driver CspLibDxe
I inserted the NVMe Express Dxe right after this one, saved, reflashed, etc. and it works fine
—
CD84562C-6864-40A3-A081-C8D35E82B920 File DXE driver CspLibDxe
this is the ticket, need to find this, and you insert the nvme dxe file right after that, no matter what BIOS version it is. This line does match up with Paulie’s images.
See if you can find this, I am hoping the layout is the same as mine, as it is the same version. Though mine is for the 600 G1 vs yours for the 800 G1.
Mars says
Hi Jim,
Live update. I figured I would just give it a shot, this machine doesn’t owe me anything. I’ve gotten more than my money’s worth. I putzed about trying to install Intel Management Engine firmware and drivers thinking this may be the issue – didn’t have any luck.
So I found the relevant section of the BIOS image in the UEFI tool, and injected the NVME driver as Paul’s post instructs. I am just now cloning my Windows install to see if the box will now boot from NVMe. I think it worked fine though, I tried reading back the BIOS after a reboot and the NVMe injection is still there! dd in GParted Live is almost halfway done cloning to the NVMe. I will be back if there are issues.
I used the exact same card that is linked in Paul’s post (the Amazon product listing is different now from what is in Paul’s actual machine in the pics, but I don’t think these cards are terribly complex).
I also don’t think it’s even possible to regress to an older BIOS version. Although the latest BIOS softpaq from HP did install without issue for me, the BIOS still reports itself as 2.78.
Thank you Jim! And Paul!
Mars
Mars says
Great success! R/W over 1.25GB on the lower (white) PCIE 2.0×16 (wired x4) on the Elitedesk 800 G1 SFF. As expected. Good night.
Paulie says
Well done! Jim is ever helpful!
Chris P. says
I have a HP 800 G1 USDT (will be trying this mod, after success with a DM) and found a FDO header pins next to the CMOS battery. Not clear from this post if finding it is an issue, and whether a NVMe with M.2 to mPCIe adapter is confirmed to work.
On Page 4 (showing a blue jumper installed, mine had none).
https://h10032.www1.hp.com/ctg/Manual/c03812598.pdf
Chris P. says
Update to my earlier post… I described the incorrect FDO header (it is the other one next to the CMOS battery, labeled FDO) on the USDT, and the modified BIOS flashed successfully after reading it back. Waiting on mPCIe to M.2, and MXM to M.2 adapters to test with an NVMe.
Jim G. says
Is the mPCI slot the one to the right of the mSATA slot on the diagram? If so that looks to be an x1 slot. If itbis an x1 slot, then the speed isn’t going to be very fast, around 900MB/sec max. Maybe use a smaller 2230 ssd in this space. An old 256mb nvme drive probably works well for this one.
Jim G. says
Sorry 256gb 2230 size probably is best for this. MXM should work, check the other replies, someone got it working. Or was it with an HP 8300? I don’t recall
Paulie says
I actually tried with an MXM and it was fine. I meant to update the blog post with photos etc but life and real work has got in the way!
Chris P. says
Neither the mSATA nor mPCI slot worked with a NVMe (gave 5-beep code) on the USDT, with the following adapter.
https://www.amazon.com/dp/B08W9JPH9R
So the MXM adapter is the way to go.