In this post I will show you how to export data from Power Automate, to an Excel file. This would seem to be a straightforward requirement, but until recently has required the use of apply to each loops which are slow and can potentially use many API actions.
Table of contents
Video Demonstration
In this demonstration I am exporting 2,000 records from a SharePoint list to an Excel document and the flow takes only 5 seconds to execute:
Create an Excel Export Template
The first step in this process is to create an Excel that contains a table for your exported data to be inserted into. Format the cells and add formulas as per your requirements and then save the file. In my example, the file looks like this:
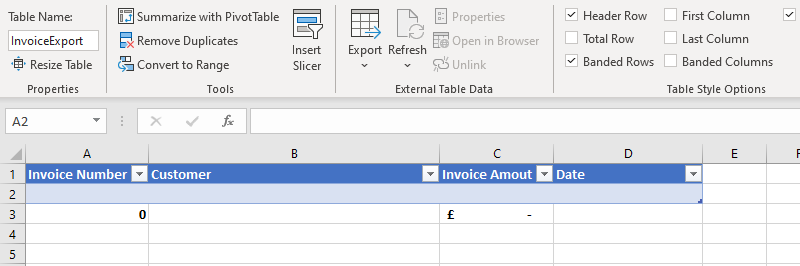
As you can see from the screenshot, the table is called InvoiceExport and it has four fields. The fields containing values have had number formatting applied and there are some formulas to sum the Invoice Amount and count the number of records.
Make a note of what you have called the table, you will need it for your flow.
Convert the Template to Base64
Once you are happy with your Excel template. Head to Base 64 Guru and upload your template file. Base64 Guru will create a base64 representation of your file, like this:
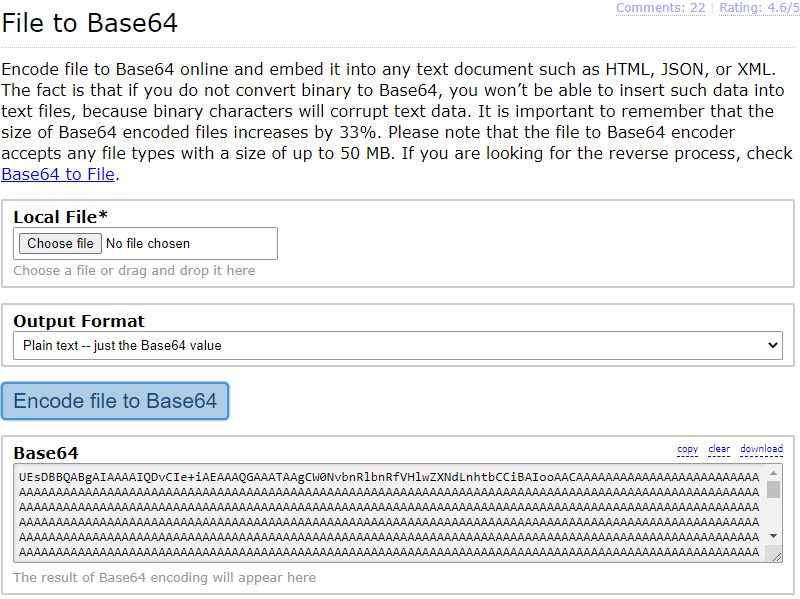
Click on the copy button above the Base64 representation of your file to copy it to your clipboard.
Flow Overview
To give you an idea of how simple this flow is to build, here is a screenshot of the entire thing, it consists of only 5 actions:
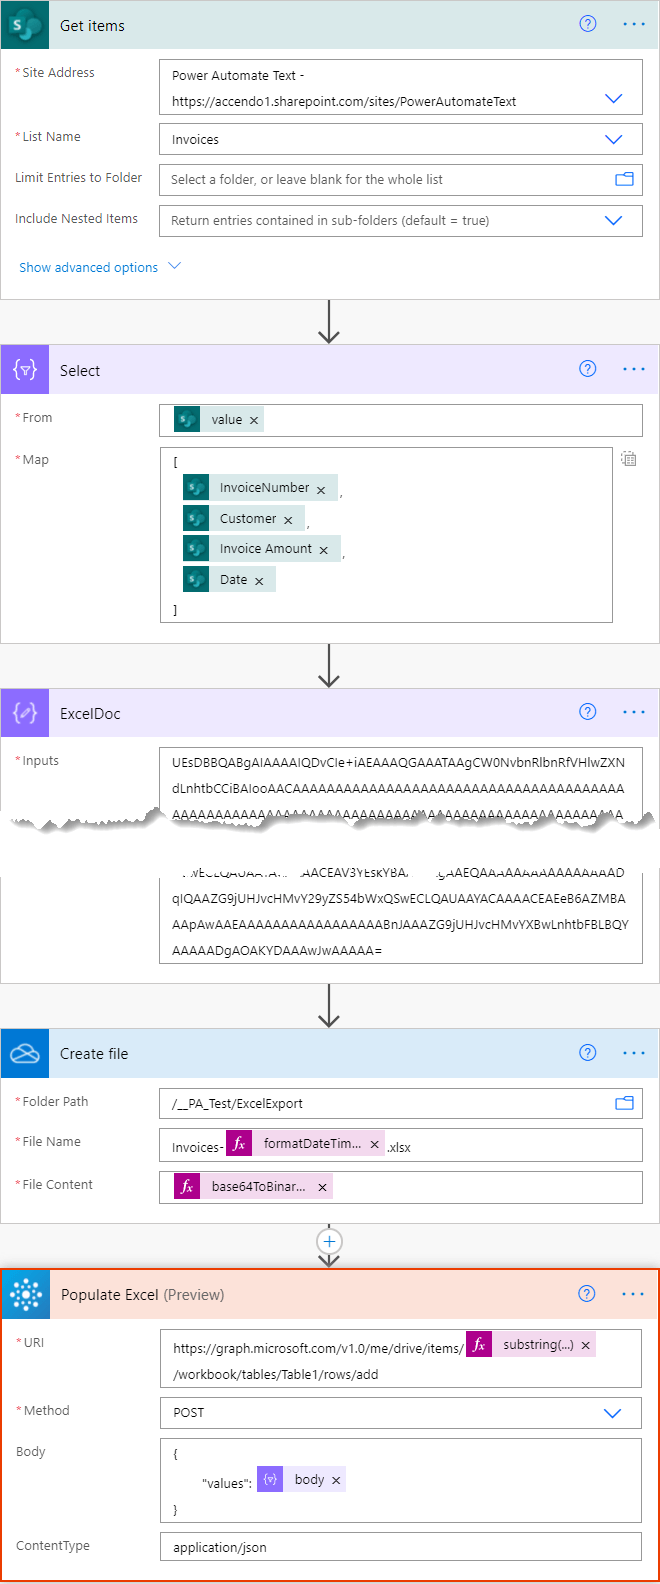
Use the Select Action to Reshape your export Data
In my example, the data source is SharePoint, but any data source accessible to Power Automate will work. It could be SQL Server, Dataverse, SharePoint or even another Excel file. The purpose of the select action is to reshape the data down to just the columns that you want to export.
Within the select action create a raw array of values that match the order of the columns of your Excel template. We do not want to name the columns.
The code for my select action looks like this:
[
  @{item()?['Title']},
  @{item()?['Customer']},
  @{item()?['Invoice_x0020_Amount']},
  @{item()?['Date']}
]
Select Action Text Mode
Your Select action may look a different to mine, because the default mode is Key/Value mode.
You can switch to Text mode by clicking on this:

Create the Excel File and Populate with your Data
Next step is to create your Excel file and populate it with the data from your Select action:
First, create a Compose action called ExcelDoc and paste in the Base64 representation of your template file.
Next, use a Create File action, name the file as per your requirement and for the file content use the expression:
base64ToBinary(outputs('ExcelDoc'))
Finally, create add a new action by searching for HTTP and you should see this action:

At the time of writing this post, this is a preview action and it is not available in all Office 365 Tenants. If you do not see it in your list of actions, simply copy the code below:
{
  "id": "c78ee521-4c62-4f34-84b1-8ef7-98516f0f",
  "brandColor": "#EB3C00",
  "connectionReferences": {},
  "connectorDisplayName": "Office 365 Groups",
  "icon": "https://connectoricons-prod.azureedge.net/releases/v1.0.1504/1.0.1504.2515/office365groups/icon.png",
  "isTrigger": false,
  "operationName": "Send_a_HTTP_request",
  "operationDefinition": {
    "type": "OpenApiConnection",
    "inputs": {
      "host": {
        "connectionName": "shared_office365groups",
        "operationId": "HttpRequest",
        "apiId": "/providers/Microsoft.PowerApps/apis/shared_office365groups"
      },
      "parameters": {
        "Uri": "",
        "Method": "GET",
        "ContentType": "application/json"
      },
      "authentication": {
        "type": "Raw",
        "value": "@json(decodeBase64(triggerOutputs().headers['X-MS-APIM-Tokens']))['$ConnectionKey']"
      }
    },
    "runAfter": {
      "Create_file": [
        "Succeeded"
      ]
    }
  }
}
And then add a new action to your flow, go to My Clipboard and press CTRL-V. The new action will then appear in your clipboard and you can add it to your flow:

Once the new action is in place, configure it as follows:
URI:
https://graph.microsoft.com/v1.0/me/drive/items/@{substring(outputs('Create_file')?['body/Id'], add(indexOf(outputs('Create_file')?['body/Id'], '.'),1))}/workbook/tables/InvoiceExport/rows/add
Notice that I have put the name of the table into the URL:
/workbook/tables/InvoiceExport/rows/add
You will need to update this to reflect the name of your table.
Method: POST
Body:
{
	"values": @{outputs('select')['body']}
}
Export to Excel Done!
With this new action it is possible to add many rows to an Excel file very quickly and use only a single API action to do so. I tested this with 2,000 rows and it took 5 seconds to complete.
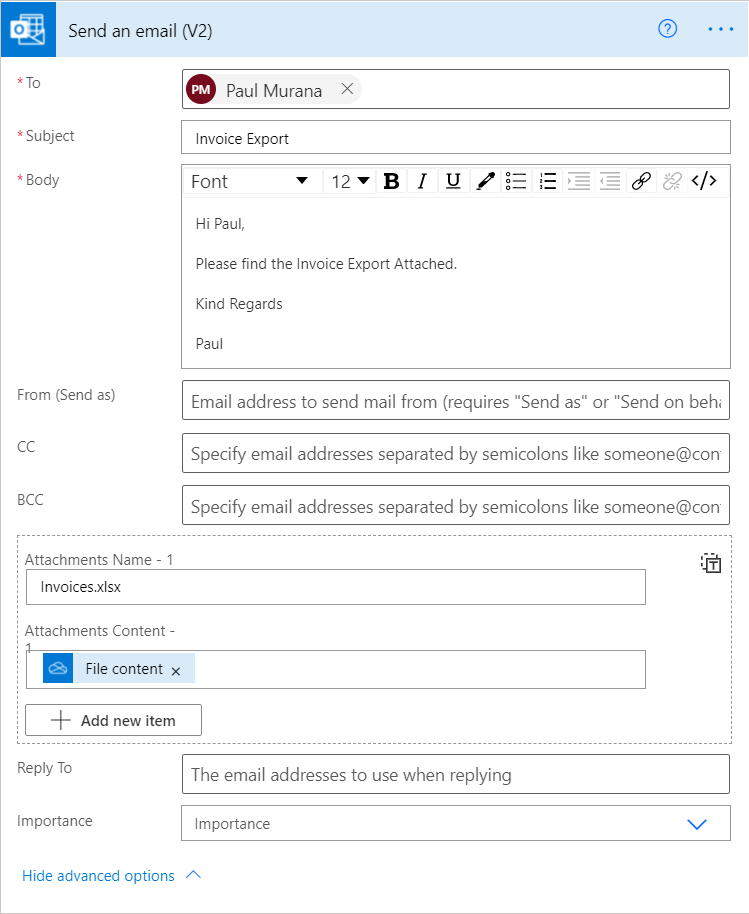
Once the export is complete you can take whatever action you want to with the file. For example to email it you could do a Get File Content and an email action:
This is a really fast, and easy way to export data from Power Automate to Excel. Please let me know if in the comments if you get stuck or found this useful.
jayant khushalani says
i am getting an error while running the workflow – “Could not obtain a WAC access token.” How can i fix this?
Juan says
i am getting an error while saving the workflow, pass: “Send a HTTP request”
Some of the connections are not yet authorized. If you just created a workflow from a template, add the authorized connections to your workflow before saving.
{“id”:”5a4a51fe-a6e3-4f86-be1c-8607-82f78640″,”brandColor”:”#EB3C00″,”connectionReferences”:{“shared_sql_1”:{“connection”:{“id”:”/providers/Microsoft.PowerApps/apis/shared_sql/connections/ae54955c66464f1cbe727046af24dd09″}},”shared_office365″:{“connection”:{“id”:”/providers/Microsoft.PowerApps/apis/shared_office365/connections/shared-office365-86f90a62-3616-4628-b864-e6d092ae5383″}},”shared_onedriveforbusiness”:{“connection”:{“id”:”/providers/Microsoft.PowerApps/apis/shared_onedriveforbusiness/connections/shared-onedriveforbu-77bfbdeb-b8a6-4f2b-8477-4c22-e89733fd”}}},”connectorDisplayName”:”Grupos de Office 365″,”icon”:”https://connectoricons-prod.azureedge.net/releases/v1.0.1525/1.0.1525.2578/office365groups/icon.png”,”isTrigger”:false,”operationName”:”Send_a_HTTP_request”,”operationDefinition”:{“type”:”OpenApiConnection”,”inputs”:{“host”:{“connectionName”:”shared_office365groups”,”operationId”:”HttpRequest”,”apiId”:”/providers/Microsoft.PowerApps/apis/shared_office365groups”},”parameters”:{“Uri”:”https://graph.microsoft.com/v1.0/me/drive/items/@{substring(outputs(‘Crear_archivo’)?[‘body/Id’], add(indexOf(outputs(‘Crear_archivo’)?[‘body/Id’], ‘.’), 1))}/workbook/tables/Rep_Deuda/rows/add”,”Method”:”POST”,”Body”:”{\n \”values\”: @{outputs(‘Exceldoc’)}\n}”,”ContentType”:”application/json”},”authentication”:”@parameters(‘$authentication’)”},”runAfter”:{“Crear_archivo”:[“Succeeded”]}}}
Juan Pierre Jesus Gonzales says
Hi Paulie, it’s amazing what you did, i just have a question pls, when I send the file after the http request, the attached file is empty, but when I go to my file in one drive the data is there. How can I resolve this? Do you think that could work to create and send many files more than 1K without any problem? I tried with office scripts but it has limitations. Thanks in advance.
Andy Lawrence says
Hi Paul,
Following up on my Youtube comment, I just wanted to leave the information here about the problem and solution I found when working through this great method. Thanks for getting me started with this by the way.
The problem I had was that your URI didn’t work for me – that was;
POST https://graph.microsoft.com/v1.0/me/drive/items/@{substring(outputs(‘Create_file’)?[‘body/Id’], add(indexOf(outputs(‘Create_file’)?[‘body/Id’], ‘.’),1))}/workbook/tables/InvoiceExport/rows/add
Even after doing the following;
– removing the string manipulation
– realising that me/drive is for Onedrive – for sharepoint I would need drives/{drive ID}
– discovering and hard-coding the IDs
Which meant that I ended up with this;
POST https://graph.microsoft.com/v1.0/drives/{drive ID}/items/{item ID}/workbook/tables/CSVOutput/rows/add
It still didn’t work in the Power Automate ‘send http’ call …
… but it DID work in the brilliant and time-saving Graph Explorer tool (https://developer.microsoft.com/en-us/graph/graph-explorer) !
The error I was getting in Power Automate said;
“URI path is not a valid Graph endpoint, path is neither absolute nor relative or resource is not one of the supported (me, users, groups, sites, search, planner, teams, chats):”
In the end I put it down to the 3rd reason listed here;
“resource [i.e. /drives/] is not one of the supported (me, users, groups, sites, search, planner, teams, chats)”
The way I worked around this was to use the /sites/ resource instead which is listed as supported in Power Automate, so
POST https://graph.microsoft.com/v1.0/sites/{site ID}/drive/items/{file ID}/workbook/tables/CSVOutput/rows/add
The above URI works in both environments and allows you to write multiple rows directly to an Excel file in a sharepoint library.
I hope this is helpful for future readers of your article,
Andy
PS. Some readers that haven’t read up on the basic calls of the Graph REST API might be asking, “how do I get those IDs I need for this to work?”. I would refer them here for the API resource;
https://docs.microsoft.com/en-us/graph/api/overview?view=graph-rest-1.0
And also give them a little help as follows;
Find your site ID;
GET https://graph.microsoft.com/v1.0/sites/contoso.sharepoint.com:/sites/{site name}
Drive ID;
GET https://graph.microsoft.com/v1.0/sites/{site ID}/drive
File (item) ID;
https://graph.microsoft.com/v1.0/drives/{drive ID}/root:/{folder}/{subfolder}/{Filename}.xlsx
🙂
Paulie says
Cheers Andy, really helpful information.
yang says
I got an error in final step, “The response is not in a JSON format.”
is there any idea for this error?
Herbert Auster says
Hello Paulie,
I would be very grateful if you could show me an example of how to do this syntactically if I want to create the Excel file on SharePoint instead of OneDrive. Unfortunately I did not understand the contribution of Andy.
Thanks in advance
Regards
Herb
Herbert Auster says
Hello Paulie,
I have now tried to recreate this exactly as you suggest here, i.e. with the Excel file in the OneDrive.
But I always get the error message: The requested resource does not exist.
It would be nice if you could get back to me in the new year before I jump out of the window in despair.
Regards
Herb
PS: The action “Send a HTTP request” was already available for me.
Jile says
Is there a way to do this with lists over 5000? I saw your other post on how to create the do until loop but I can’t get it to work and send the output to a file. It always gets stuck in a loop.
Sourav Mahapatra says
Hi,
i am getting below error while creating the flow. Can you please help me out.
Correct to include a valid reference to ‘select’ for input parameter(s) of action “Send_a_HTTP_request’.
Sourav Mahapatra says
I got an error in final step, “The response is not in a JSON format.”
is there any idea for this error?
Dave says
@Sourav Mahapatra,
I would check the body of your http request, and make sure the { } brackets are there. The body should look like:
{
“values” : ARRAY
}
My problem is that my Graph API keeps timing out, even with prefer: respond-async set in the header… my array is 621 columns wide and 115 rows high. LOL
Gideon says
Hi Paul
What a great article! It was really helpful and it is working beautifully for me.
I just have one strange thing happening – I used a similar excel template than you for creating the base64 representation. The table in the template has a header row and then one blank row (…because excel does not allow you to create a table with only a header row).
When I append rows to the table using the HTTP request, the resulting excel file always have row 2 blank and the appended rows starting at row 3.
How can I ensure the appending starts at row 2 and not leave this blank row?
Thank you
Gideon
Miro Atanasova says
Hi Paul, wonderfull post.
I am having issues similar to Andrew, and followed his suggestions but still struggling with the flow and cannot get it past failing with “URI path is not a valid Graph endpoint, path is neither absolute nor relative or resource/object is not supported for this connect”.
Are you able to advise?
Paulie says
HI Miro,
I am not sure what your problem is, but if you use the get in touch form I will have a look with you.
Paul
Sourav Mahapatra says
I have tried that, But Getting error of “unsupportedWorkbook”, “message”: “This workbook couldn’t be opened because the file format may not be matching with the file extension.”. Any Idea what went wrong?
David Haygood says
Hey Paulie,
Thank you so much for the automations you continue to develop and explain…extremely helpful. I have implemented several! As I was reviewing this one, I thought about the reverse of this process…acquiring an excel file (without tables) and grabbing the content and converting it to json. Have you ever done something like that? Seems like it would be easy enough to decodebase64 and then convert to json. What do you think?
Paulie says
The problem is you’d have to unzip it first (which is possible). Inside of each worksheet the content is xml – so it should be possible to convert to json quite easily.
But power Automage already has actions to read excel files easily (office scripts).
And you can read and write to cells using MS Graph if you need even more control.
Chris Florian says
I am trying to use this process with a document I create in a SharePoint library.
I have everything working up to the Send HTTP Request.
The error I’m getting is “Item not found”.
Here are some of the data values:
ID = “%252fShared%2bDocuments%252fWF%2bBatch%2bFiles%252f2023-04-28%2b(560).xlsx”
The substring output = “xlsx”
The body of the Create File looks like this:
{“ItemId”:3,
“Id”:”%252fShared%2bDocuments%252fWF%2bBatch%2bFiles%252f2023-04-28%2b(560).xlsx”,
“Name”:”2023-04-28 (560).xlsx”,
“DisplayName”:”2023-04-28 (560).xlsx”,
“Path”:”/Shared Documents/WF Batch Files/2023-04-28 (560).xlsx”,
“LastModified”:”2023-04-28T16:52:12Z”,
“Size”:19505,
“MediaType”:”application/vnd.openxmlformats-officedocument.spreadsheetml.sheet”,
“IsFolder”:false,
“ETag”:”\”{2A2B9FC5-578A-4DF6-BEFA-ADE8AFEA9D2B},6\””,”FileLocator”:”dataset=aHR0cHM6Ly91c2Jhbmsuc2hhcmVwb2ludC5jb20vdGVhbXMvSUNTL0FwcHMvV0ZNZ3Q=,id=JTI1MmZTaGFyZWQlMmJEb2N1bWVudHMlMjUyZldGJTJiQmF0Y2glMmJGaWxlcyUyNTJmMjAyMy0wNC0yOCUyYig1NjApLnhsc3g=”}
Max says
Hi,
I have about 200,000 items in a CSV file that I need to update into a spreadsheet each day. Everything works fine in what I have developed so far using your method but when I get to larger volumes in my test file I get the message “The response is not in a JSON format” “Cannot read server response”. Any suggestions for how I can update this volume of data?
Thanks.
Wim says
Hello Paulie
Some time ago I posted a comment to your youtube video that “your method would not work for me.” Today, I tried again and with more success. The flow is saved with no errors. However, when I test it, it gives an error on the http request: “Action A_HTTP request_send failed.” Under error details I read the following: “Encountered internal server error. The tracking Id is ‘2f55e23f-11fa-4289-8fca-4b978ff2e40a’.” (this id changes with every test)
Any idea what can help me solve this error?
(The language of my browser and power automate is in Dutch so the exact terminology may be slightly different from what I mentioned above because I had to translate some.)
Donald Fager says
I just finished reading your blog post on “Power Automate Export to Excel,” and I must say, it’s an incredibly informative and well-written piece. As someone who frequently uses Power Automate to automate workflows, I found the content both relevant and useful.
Kyle says
This is AMAZING!
>4000 rows, >20 columns, just over ONE MINUTE!!!!
Took me all day to figure out why it wasn’t working, went down a rabbit hole with Andy Lawrence’s comment and advice.
The fix (for me) was to not use the Send a HTTP Request (V2) and use the code that Paulie provided above. It worked perfectly the first time!!!!
Andy Lawrence says
Oh no Kyle,
Sorry if my comment caused you a rabbit hole or wasted any of your time.
Glad you got it working in the end. 🙂
Andy
Kyle says
No, not a waste of time, just a learning experience. I experienced the same errors and always look to the comments for a solution. I thought yours would fix the issue for me as well but it didn’t. In my research I noticed that on other sites users mentioned this blog and your suggestion not working for them either.
Cam says
When I used this approach, the initial row of the table (blank) is left untouched, because the HTTP post is appending the information to the table.
Is there a way to remove that first row (blank placeholder) within this step, or subsequently without having to use the Excel operations?
Stefan says
Hello Paul, excellent post! I have prepared a new workflow in a few minutes (without Power Automate experience).
Thanks a lot.
Stefan.
Krzysiek says
Hello Paulie,
(sorry for my English)
Can You help with one modification. I grab data from PowerApp’s collection with JSON, so it is necessary to fix the column names (skip the prefix for Dataverse).
The outputs of select action are (below is one row):
[
{
“Nr_zlecenia”: “AX0317-23”,
“Klient”: “SWS”,
“Projekt”: “XXX”,
“Etap”: null,
“REP”: null,
“Pracownik”: “XXX”,
“Wydzia?”: “H1”,
“Operacja”: “Kompletacja”,
“Program_CNC”: “FINITION_LOT_2_26”,
“Arkuszy_do_ci?cia”: 1,
“Arkuszy_wyci?tych”: 2,
“Nominalny_czas_arkusza”: 0.08,
“Data_start”: “2023-10-22T13:46:00.000Z”,
“Data_koniec”: “2023-10-22T13:46:00.000Z”,
“Czas_operacji”: 0
}
]
The columns name in excel table is (like above):
Nr_zlecenia
Klient
Projekt
…
Czas_operacji.
How should I cod the Body filed in Send a HTTP request to update xls file?
I will be grateful for your help.
Greeting from Poland.
Akash says
Hi Paul,
The flow is working for upto 6000 rows of data. When I am trying to export 9000 rows the flow is erroring out with
{
“error”: {
“code”: 302,
“source”: “flow-apim-unitedstates-002-westus-01.azure-apim.net”,
“clientRequestId”: “d54164e4-5bdf-4999-8236-c9d20ae609b1”,
“message”: “The response is not in a JSON format.”,
“innerError”: “Cannot read server response.”
}
}
Any idea how to enable this to handle larger data volume?
Thanks
Mandy says
Dear Paul,
I have create an CSV file from sharepoint list, but i would like to convert it into excel so that i can do following like split the excel file to sent to different user. Now my problems is that all my process are in sharepoint, the method you used need to save the file in Drive? which i do not have access. How to transfer the CSV file in sharepoint to excel file in sharepoint with table
Andrew says
Hi Paul,
I too am getting the same error as Akash (APRIL 25, 2024 AT 4:43 PM). Although can’t get past 50000 rows. Any ideas on how to isolate the error?
{
“error”: {
“code”: 302,
“source”: “flow-apim-unitedstates-002-westus-01.azure-apim.net”,
“clientRequestId”: “f62261b4-cc72-413b-acb5-53351432b06b”,
“message”: “The response is not in a JSON format.”,
“innerError”: “Cannot read server response.”
}
}
Keane says
Paulie, you are an absolute saviour!
I had been banging my head against a wall trying to export an SP list into xlsx on an hourly basis as a back-up for our data which changes frequently. The need was due to no versioning on an actual list, only list items and I am worried someone will break something.
(side note- why is this such a difficult process when there is a button in a SP list do do it manually, and its also relatively easy too get a CSV??).
Anyway I digress, Paulie’s solution worked a treat when copy-pasting the action code for the HTTP request, but when I selected the action from the actions list initially it didn’t work (it was a V2 which may have been the issue). I re-added the action using the code and voila.
I couldn’t work out the URI for where I need the file on Sharepoint so in the end I saved it to my OneDrive as per the instructions, then just copied it over to SP as part of the flow.
This flow is so fast, the other methods I tried were slow as and far more complex!
Thanks again Paulie.
Paulie says
Great news! Well done – glad it’s helped
Keane Orchard says
I have this running for one process, but for another I just keep getting stuck at the Send a HTTP request- it just keeps failing and retrying with the error of Bad Gateway.
I’ve tried re-building the whole thing multiple times to no avail.
Any advice?
Chuck says
Can anyone explain why it is soooooooo bloody difficult to do something so basic? Capturing a portion of a SharePoint List (easy) and writing it directly to an Excel spreadsheet (a bloody bitch). In my 40 years working with technology, I have never experienced anything so difficult…. converting to Base64???? Really??? I thought we were “automating” something here… This screams: “use Linux”.
Mohamed says
Hi Paulie,
Thank you for your post.
I’m trying to export data from Power BI to an Excel table and tried following Andrew’s solution but it didn’t work for me and get the URI error. Kyle mentioned about finding a fix without needing to use the http request but didn’t mention how he went about it so any assistance is greatly appreciated.