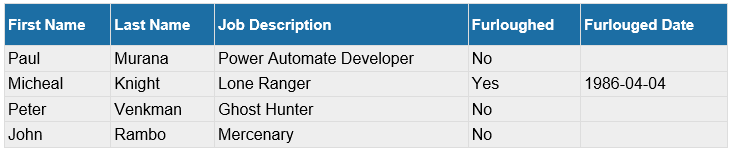
The Create HTML Table action in Power Automate is a useful tool, but lacks any formatting or styling options. In this post I am going to explain how to format the HTML table produced by Power Automate. Here is an example of the default output:

In my opinion:
- The table is just ugly.
- There are no column alignment options.
- If you are using custom columns, it does not allow you to put spaces in the column headers.
The good news is that the Create HTML Table action produces basic HTML that can be easily modified or styled. The HTML source of the table generated above by Power Automate above is:
<table>
   <thead>
      <tr>
         <th>FirstName</th>
         <th>LastName</th>
         <th>JobDescription</th>
         <th>Furloughed</th>
         <th>FurlougedDate</th>
      </tr>
   </thead>
   <tbody>
      <tr>
         <td>Paul</td>
         <td>Murana</td>
         <td>Power Automate Developer</td>
         <td>No</td>
         <td></td>
      </tr>
      <tr>
         <td>Micheal</td>
         <td>Knight</td>
         <td>Lone Ranger</td>
         <td>Yes</td>
         <td>1986-04-04</td>
      </tr>
      <tr>
         <td>Peter</td>
         <td>Venkman</td>
         <td>Ghost Hunter</td>
         <td>No</td>
         <td></td>
      </tr>
      <tr>
         <td>John</td>
         <td>Rambo</td>
         <td>Mercenary</td>
         <td>No</td>
         <td></td>
      </tr>
   </tbody>
</table>
Use CSS to create a much more attractive table
By adding some CSS, you can make the table much more attractive very quickly:

The simple CSS I applied to the above is:
<style>
Table {
  font-family: Arial, Helvetica, sans-serif;
  background-color: #EEEEEE;
  border-collapse: collapse;
  width: 100%;
}

Table td, Table th {
  border: 1px solid #ddd;
  padding: 3px 3px;
}

Table th {
  font-size: 15px;
  font-weight: bold;
  padding-top: 12px;
  padding-bottom: 12px;
  text-align: left;
  background-color: #1C6EA4;
  color: white;
}
</style>
If you aren’t a CSS wizard you can use https://divtable.com/table-styler/ to get you started.
So now you have got the CSS, here is how to add it to the table:
- Create a compose step called CSS Table Style.
- Paste your CSS into that compose action.
- In your Send an email action paste the CSS and then the HTML Table:
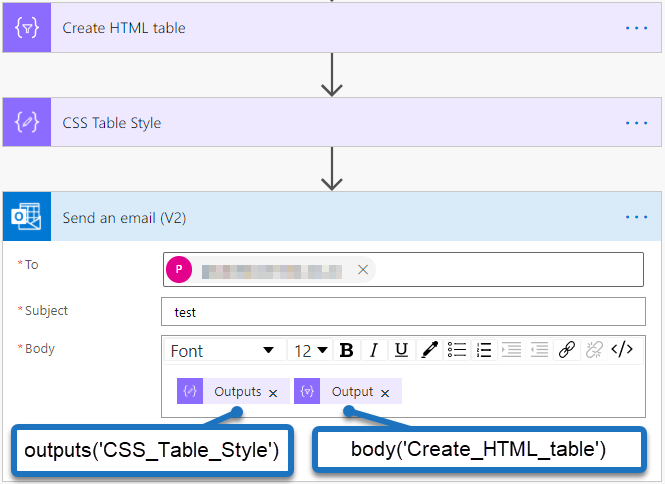
You can put anything else you need in the body, but I would suggest that you put the CSS before anything else.
Add spaces to the column headings
In my example, I used custom columns and I was unable to add spaces to the column headings. So here is my workaround:
- Use a carat ^ symbol wherever you want a space in the column header.
- Create a compose action to replace the carat with a space.
- Select the output of the compose in your email instead of your HTML Table output:

The compose expression is:
replace(body('Create_HTML_table'), '^', ' ')
You could of course use any symbol, but make sure to use one that isn’t going to be in use elsewhere in the table. The carats are replaced with spaces:
You can take this much further by not using the Create HTML Table action at all, and constructing your own table directly in Power Automate and looping through an array of records. This is something I do sometimes, but it is a lot more work and I wanted to quickly cover how to improve the look of the standard action.
Support This Website
Thank you for visiting. It’s because of readers like you that I continue to write on this blog.
If you found value in what I share, I’ve set up a ‘Buy Me a Coffee’ page as a way to show your support.
Alek says
This is great! However, it removes all the line breaks where there are multiple paragraphs in a field. Any solution to that?
Paulie says
Hi Alek,
Yes, this is quite normal. Newline characters are not automatically converted to HTML line breaks. But you could add a compose step to do this for you, something like:
replace(body('Create_HTML_table'), decodeUriComponent('%0A'), '<br>')Will replace newlines with a HTML break.
Alek says
Thank you Paulie! For anyone reading this in the future, if you want to both replace the line breaks with html breaks AND the carrots with spaces, use:
replace(replace(body(‘Create_HTML_table’), decodeUriComponent(‘%0A’), ”),’^’, ‘ ‘)
Paulie says
Thanks Alek, I am going to put these extras in the main blog post I think. I am going to make a video of it also I think.
Paul says
This was very helpful. Thank you.
I have nice formatted tables now but they only work for my outlook recipients. Gmail strips css blocks from incoming emails. It seems that making this would would require inline css. IE styles inside the table’s etc.
Have you found a way around this?
Inuyasha says
Thanks, It worked!
Abhinow Kumar says
To add spaces in headings, you can simple enter the text in notepad. Copy text with space from notepad and paste in table header.
Paulie says
I didn’t know that! Nice workaround. Thank you
Ulf Werner says
Great instruction…….. i tried to use selector to for example make the background color of the thrid column differ to the other columns. Seems that the selector ist not working. Do you have any workaround for it?
Angelyn says
Thank you, thank you, thank you. This was a perfect solution to my problem!
tjolivet says
This isn’t working for me…is it because I have a prior Compose action that formats the HTML table color, font, and borders?
Paulie says
Could be, why not try removing the other one temporarily and try it out?
Omprakash says
Thanks, guys. Great work.
I have another issue, i use carriage return within excel cell for multiple items. The compose section output shows a proper line breaks for list items within a cell. However, in the email body, the list items are converted into a paragraph. Is there a work around this.
Keep up your good work! Cheers!
Adam C says
Brilliant! Thank you.
Mercedes Lozano says
My standard reply e-mail footer gets changed as well in a ugly way… How to avoid this?
Andrea says
For some reason, when I do this, it leaves the ugly table in the email. Am I missing a step to “replace” the formatting in the Create HTML table step?
Andrea says
Figured it out 2 mins after posting my last question. : ) I had the create html table output listed in the CSS table style compose step. : )
Gene Rice says
Is this possible if I need to Nest tables?
What if I need to span a column over multiple rows?
Tejas says
Hi, Can anyone help me with code to highlight header background color
replace(body(‘Create_HTML_table’),”,”,'<header background-color="green")
its not working
Tejas says
Hi, Can anyone help me with code to highlight header background color
replace (body (‘Create_HTML_table’),”,”,’)
its not working
DEV says
If the cell contains long text it wraps inside the table. Any ideas on how to avoid that ?
Claire says
this is really fab and looks so much better, but I have the horrid table around the signature part of the email, which someone else had, but I can’t find a way to get rid of it, can anyone help me out?
Melissa Flores says
This is great but I seem to have a random white line on row 3 of the table that I cannot get rid of. Any ideas?
Paulie says
I’d say you have an empty value in the output of the array creating the table. Have you checked?
Melissa Flores says
Yes, I have 5 columns and when there isn’t a value the column displays “blank”
Paulie says
You can get rid of the blank with a filter. If you fill out the contact form I will quickly help you out.
Shitesh says
Hi Paulie,
Trust you are doing well!
In the table, i want only 3rd column to be in bold or have a background of some color. Is there a way I can achieve this. ? I tried with nth child in css but that does not seems to be working.
any advise please?
thanks in advance.
Adrien says
Hi, this is super. Is there a way to cancel the CSS Style after the table has been created. We use automated signature which in the process are taking the same CSS Style which is not great.
claire says
Adrien, I had the same issue but managed to solve it using an extra ‘replace’ expression
Phil says
The replace() for the ^ doesn’t work for me. Just a HTML table and directly after it the compose. Tried a bunch of things but can’t get it to work
Phil says
I think I got it now. Probably had one space too many in my replace function…
PMCD says
Is it possible to post this nicely formatted table into a field on a SharePoint Online List perhaps a Multiple Lines of Text field?
Uday Kumar C says
anyone can explain how we can apply table styles in one note page
similar way