• Skip to primary navigation
  • Skip to main content
  • Skip to primary sidebar

Tachytelic.net

  • Get in Touch
  • About Me

Windows Server 2019

How to use Group Policy to defer Windows Quality and Feature updates

January 21, 2019 by Paulie Leave a Comment

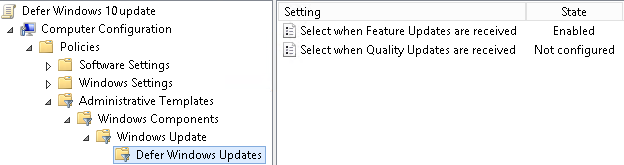
Sometimes feature updates can cause issues with the base operating system or third party applications. This post explains how to defer either Quality updates or Feature updates to Windows 10 or Windows Server 2016 in a domain environment.

Defer Updates with Group Policy

  1. Open Group Policy Editor.
  2. Create and link a new policy or edit an existing one if appropriate.
  3. Navigate to:
    • Computer Configuration
    • Polices
    • Administrative Templates
    • Windows Components
    • Windows Updates
    • Defer Windows Updates
      Image showing group policy settings to defer Windows Quality and Feature updates

Defer Feature Updates

Feature updates tend to cause more issues than quality updates. Microsoft have an update branch called “Current Branch for Business”. This branch is not deployed until Microsoft considers the feature update safe for enterprise deployment. You can choose this option only, or introduce a further delay if required.

Defer Feature updates as follows:

  1. Double click on “Select when Feature Updates are received”.
  2. Click on “Enabled”.
  3. In the Branch readiness drop down, select “Current Branch for Business”.
  4. Enter the period for which you want to delay the deployment of this update:Image showing how to defer Windows Feature updates
Feature updates can be deferred for up to 365 days.

Defer Quality Updates

Quality updates can be deferred for a maximum of 30 days.

Defer Quality updates as follows:

  1. Then double click “Select when Quality Updates are received”.
  2. Click on “Enabled”.
  3. Enter the amount of days that you want to defer for.

It might seem risky to defer quality updates, but there have been many occasions when these have also caused severe problems. I recommend that you have a subset of computers that receive updates first (which do not have these policy settings defined).

A customer using Cyberark EPM on Windows 10 had to defer update 1809, which at the time of writing has compatibility issues.

Filed Under: How To Tagged With: Windows 10, Windows Server 2016, Windows Server 2019, Windows Update

How to install Flash Player in Windows Server 2019

December 14, 2018 by Paulie 1 Comment

  1. Copy and paste the below command into a command prompt:
    dism /online /add-package /packagepath:"C:\Windows\servicing\Packages\Adobe-Flash-For-Windows-Package~31bf3856ad364e35~amd64~~10.0.17763.1.mum"
  2. You should get output like the following if you had a successful installation:
    Image showing command line installation of Flash Player on Windows Server 2019
  3. You can verify if the installation was successful by visiting:
    https://helpx.adobe.com/flash-player.html
    you should be able to see that Flash Player shows as installed and detected as per the following:
    Screenshot showing successful installation of Flash Player on Windows Server 2016

If you need to install Flash Player on other versions of Windows Server, instructions are here:

  • Install Flash Player on Windows Server 2016
  • Install Flash Player on Windows Server 2012

Filed Under: How To Tagged With: Windows Server 2019

How to install telnet client on Windows Server 2019, 2016 or 2012

November 28, 2018 by Paulie 2 Comments

Telnet is not installed on Windows Server by default. I don’t understand why, because it is a useful tool and uses little space. It is however, easy to enable telnet on Windows Server 2016 or 2012. If you do not have telnet installed you will see this message from the command line:

Image showing telnet not available in Windows Server
Telnet is not recognized as an internal or external command.


Install Telnet Client on Windows Server 2019, 2016 or 2012 using the command line

The command line is the quickest way of installing the telnet client, very simply just type:

dism /online /Enable-Feature /FeatureName:TelnetClient

Image showing how to install telnet client on Windows Server 2016


Install Telnet Client on Windows Server 2016 using Server Manager

You can use Server Manager to install the telnet client, but it is a much longer process than doing it via the command line, here is a short video of the correct options to select.

Check that Telnet is installed

To check if your installation was successful, just go into a command prompt and type “telnet” and you should come to the interactive telnet prompt, like this:

Image showing successful installation of Telnet client on Windows Server

Check Ports with Telnet

Now that you have got telnet installed, you can use it to test open ports ports and connect to remote machines.

Filed Under: How To Tagged With: Windows Server 2012 r2, Windows Server 2016, Windows Server 2019

Primary Sidebar

Link to my LinkedIn Profile
Buy me a coffee

Subscribe to Blog via Email

Enter your email address to subscribe to this blog and receive notifications of new posts by email.

Join 245 other subscribers.

Go to mobile version