• Skip to primary navigation
  • Skip to main content
  • Skip to primary sidebar

Tachytelic.net

  • Get in Touch
  • About Me

Windows Server 2016

Quickly access System Properties in Windows 10 or Server 2016

March 11, 2019 by Paulie Leave a Comment

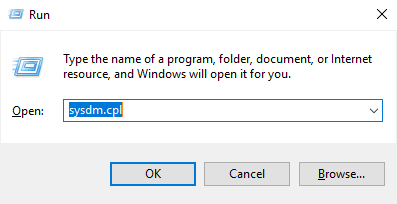
Access to the System Properties dialog in Windows 10 and Server 2016 frustrates me when it used to be so easy to access. There are lots of routes to this familiar and useful screen, but I find this the easiest and fastest way:

  1. Press Windows Key + R
  2. Type sysdm.cpl
    Image showing how to access System Properties from the Windows Run Dialoog
  3. Click OK

If you want to make a shortcut to it on your desktop use the following path:

C:\Windows\System32\sysdm.cpl

Either method will get you quick access to your System Properties. I was writing a blog post on setting environment variables and it was annoying me having to go to such lengths to get to this screen.


Filed Under: How To Tagged With: Windows 10, Windows Server 2016

Remote Desktop CredSSP encryption Oracle remediation Registry fix

February 20, 2019 by Paulie 13 Comments

This is a quick credssp registry fix for the following error when trying to connect to a machine using RDP (Remote Desktop):

Image showing RDP CredSSP Authentication Error when connecting to a host with RDP
An authentication error has occurred. The function requested is not supported

This is because the server you are connecting to is not patched up to date, and the machine you are connecting from is. Modify the registry to allow your machine to connect to it:

  1. Open Regedit.
  2. Navigate to the following registry key, or create it if it does not exist:
    HKEY_LOCAL_MACHINE\SOFTWARE\Microsoft\Windows\CurrentVersion\Policies\System\CredSSP\Parameters
  3. Create a new DWORD value called “AllowEncryptionOracle“
  4. Set the new registry entry to have a value of 2:

    Image showing AllowEncryptionOracle registry entry being set to a value of 2
    Set the value of AllowEncryptionOracle to 2
  5. Connect to the server that you were unable to connect to before.

Run this from an elevated command prompt to achieve the same result:

REG ADD "HKLM\SOFTWARE\Microsoft\Windows\CurrentVersion\Policies\System\CredSSP\Parameters" /v AllowEncryptionOracle /t REG_DWORD /d 2

This registry entry is a temporary workaround until you have patched your server, when you have done that, remove the setting with this command.

REG Delete "HKLM\SOFTWARE\Microsoft\Windows\CurrentVersion\Policies\System\CredSSP\Parameters" /v AllowEncryptionOracle

Filed Under: Technical Posts Tagged With: Windows Server 2012 r2, Windows Server 2016

How to use Group Policy to defer Windows Quality and Feature updates

January 21, 2019 by Paulie Leave a Comment

Sometimes feature updates can cause issues with the base operating system or third party applications. This post explains how to defer either Quality updates or Feature updates to Windows 10 or Windows Server 2016 in a domain environment.

Defer Updates with Group Policy

  1. Open Group Policy Editor.
  2. Create and link a new policy or edit an existing one if appropriate.
  3. Navigate to:
    • Computer Configuration
    • Polices
    • Administrative Templates
    • Windows Components
    • Windows Updates
    • Defer Windows Updates
      Image showing group policy settings to defer Windows Quality and Feature updates

Defer Feature Updates

Feature updates tend to cause more issues than quality updates. Microsoft have an update branch called “Current Branch for Business”. This branch is not deployed until Microsoft considers the feature update safe for enterprise deployment. You can choose this option only, or introduce a further delay if required.

Defer Feature updates as follows:

  1. Double click on “Select when Feature Updates are received”.
  2. Click on “Enabled”.
  3. In the Branch readiness drop down, select “Current Branch for Business”.
  4. Enter the period for which you want to delay the deployment of this update:Image showing how to defer Windows Feature updates
Feature updates can be deferred for up to 365 days.

Defer Quality Updates

Quality updates can be deferred for a maximum of 30 days.

Defer Quality updates as follows:

  1. Then double click “Select when Quality Updates are received”.
  2. Click on “Enabled”.
  3. Enter the amount of days that you want to defer for.

It might seem risky to defer quality updates, but there have been many occasions when these have also caused severe problems. I recommend that you have a subset of computers that receive updates first (which do not have these policy settings defined).

A customer using Cyberark EPM on Windows 10 had to defer update 1809, which at the time of writing has compatibility issues.

Filed Under: How To Tagged With: Windows 10, Windows Server 2016, Windows Server 2019, Windows Update

How to install telnet client on Windows Server 2019, 2016 or 2012

November 28, 2018 by Paulie 2 Comments

Telnet is not installed on Windows Server by default. I don’t understand why, because it is a useful tool and uses little space. It is however, easy to enable telnet on Windows Server 2016 or 2012. If you do not have telnet installed you will see this message from the command line:

Image showing telnet not available in Windows Server
Telnet is not recognized as an internal or external command.


Install Telnet Client on Windows Server 2019, 2016 or 2012 using the command line

The command line is the quickest way of installing the telnet client, very simply just type:

dism /online /Enable-Feature /FeatureName:TelnetClient

Image showing how to install telnet client on Windows Server 2016


Install Telnet Client on Windows Server 2016 using Server Manager

You can use Server Manager to install the telnet client, but it is a much longer process than doing it via the command line, here is a short video of the correct options to select.

Check that Telnet is installed

To check if your installation was successful, just go into a command prompt and type “telnet” and you should come to the interactive telnet prompt, like this:

Image showing successful installation of Telnet client on Windows Server

Check Ports with Telnet

Now that you have got telnet installed, you can use it to test open ports ports and connect to remote machines.

Filed Under: How To Tagged With: Windows Server 2012 r2, Windows Server 2016, Windows Server 2019

Change network from public to private on Windows Server 2016

November 27, 2018 by Paulie 2 Comments

  1. Open Powershell
  2. Type Get-NetConnectionProfile
    Image showing Powershell to get the current network profile
  3. If you have only one network connection you can change the profile to private by typing:
    Get-NetConnectionProfile | Set-NetConnectionProfile -NetworkCategory Private

    Image showing how to change network profile on Windows Server 2016 from Public to Private

  4. If you have multiple network interfaces and would like to change a specific adapter use the Interface Index Property like this:
    Set-NetConnectionProfile -InterfaceIndex 3 -NetworkCategory Private
  5. You can then verify the change has taken place by running Get-NetConnectionProfile again:
    Image showing Windows Server 2016 Network Connection with a Private Profile

How to change network profile to public

The same command also works to switch back to a public profile

Set-NetConnectionProfile -InterfaceIndex 3 -NetworkCategory  Public

Filed Under: How To Tagged With: Powershell, Windows Server 2016

  • Go to page 1
  • Go to page 2
  • Go to Next Page »

Primary Sidebar

Link to my LinkedIn Profile
Buy me a coffee

Subscribe to Blog via Email

Enter your email address to subscribe to this blog and receive notifications of new posts by email.

Join 245 other subscribers.

Go to mobile version