• Skip to primary navigation
  • Skip to main content
  • Skip to primary sidebar

Tachytelic.net

  • Get in Touch
  • About Me

SCO Openserver

Add an additional hard drive to virtual SCO Openserver 5

July 11, 2019 by Paulie 3 Comments

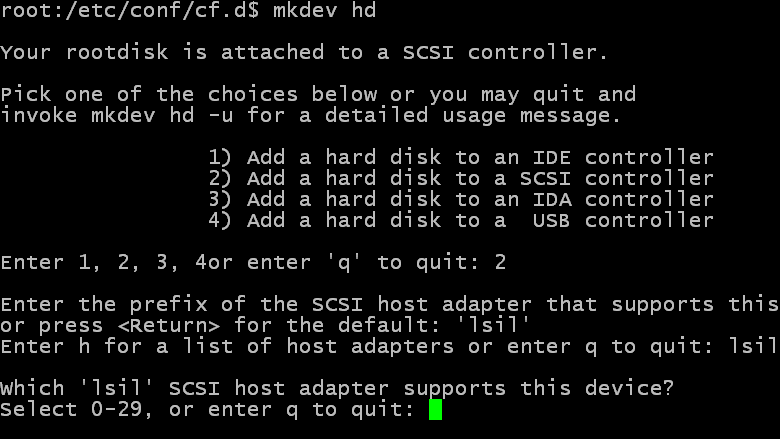
This is a quick post and video that shows how to add an additional Hard Drive to a Virtual SCO Openserver 5 system.

When I configure SCO Openserver Systems I always use the LSI Logic Parrallel controller. It seems to provide reasonable performance and makes it easy to add additional virtual drives if required.

The virtual machine in the video already has two SCSI drives and I demonstrate how to add a third. When completed the /etc/conf/cf.d/mscsi file looks like this:

*ha     attach  number  ID      lun     bus
*
lsil    Sdsk    0       0       0       0
wd      Srom    1       0       0       0
lsil    Sdsk    0       1       0       0
lsil    Sdsk    0       2       0       0

The highlighted line represents the virtual disk that is going to be added. Note that in the mscsi file an asterisk symbol denotes a comment. So this virtual machine has 3 hard drives, all using the “lsil” controller at IDs 0,1 and 2.

How to add an Additional Virtual Drive

Adding an additional drive is easy, but not very intuitive in my opinion. Here is how to do it:

  1. From a root prompt run:
    mkdev hd
  2. Choose Option:
    2) Add a hard disk to a SCSI controller
  3. You are now prompted for the prefix of the SCSI Host Adapter that will support the new drive. In this case it is “lsil”. You can just press enter if that is already the default.
  4. When asked which SCSI Host Adapter supports the new device (0 or 1). Put in whatever you specified on the Virtual Hard Drive. But more than likely it will be zero.
  5. Next you are asked what the Target ID for the device is. Again, match this to the SCSI ID specified with the Virtual machine.
  6. The LUN will be Zero.
  7. Finally you are asked if you would like to update the SCSI configuration. Press y for Yes.

Now relink the kernel and reboot. When you have logged back in run the procedure above and answer the questions in the same way again. This time around “mkdev hd” actually does some work with the drive.

From here it is up to you how you want to setup the drive, but in a ESXi environment I always just make a single division and use the entire drive for Unix.

After the new drive is added and you have created a division you can mount it with scoadmin.

It is far easier to watch the video below than understand the written explanation. If you have any questions, feel free to ask.

Filed Under: How To Tagged With: SCO Openserver

How to reset the root password on SCO Openserver 5

January 26, 2019 by Paulie 5 Comments

Should you need to reset the root password on a SCO Openserver 5 system, the procedure is quite simple, do the following:

  1. Boot from your Emergency Boot Disk.
  2. Type the following commands:
    mount /dev/hd0root /mnt
    /mnt/bin/chroot /mnt /bin/su root
    passwd
  3. You should then get the change password prompt:
    Image showing how to reset the root password using an Emergency Boot floppy
  4. Then reboot the system with:
    sync;sync;sync;reboot
  5. Login with your new root password.

Here is a video of the procedure:

https://tachytelic.net/wp-content/uploads/Sco-Reset-Password.mp4

This example was done with SCO Openserver 5.0.7 – I used a virtual 2.88Mb floppy with both boot and root file-system support.

If you need help or support with your SCO system click here.

Filed Under: How To Tagged With: SCO Openserver

Convert fdisk output from heads,sectors and cylinders

January 18, 2019 by Paulie Leave a Comment

On Unix and some versions of Linux fdisk either does not report the size of the disk, or makes an incorrect calculation. This is because of the way that fdisks calculates sizes:

  • 1000 bytes = 1 Kilobyte
  • 1000 Kilobytes = 1 Megabye
  • 1000 Megabytes = 1 Gigabyte

Normally calculations would be made using 1024, not 1000. Here is an image of the fdisk output from an older release of Ubuntu:

Image showing output of fdisk command, reporting the size incorrectly
The actual size of this disk is 64 GB but fdisk reports it as 68.7 GB.

Formula to calculate disk size based on Heads, Sectors and Cylinders

Number of heads * Number of sectors * 512 * Number of cylinders

From the example above:

255 * 63 * 512 * 8354 = 68,713,989,120 bytes
68,713,989,120/1024 = 67,103,505 kb
67,103,505/1024 = 65,530.76 mb
63.994 gb

Calculator to work out the correct disk sizes from fdisk output

Input the number of cylinders, heads and sectors of your disk into this form and it will calculate how many Megabytes/Gigabytes the drive is.


Value in Kilobytes:
Value in Megabytes:
Value in Gigabytes:

Some old Unix systems do not report the disk size at all with fdisk, but you can normally get the numbers of heads, sectors and cylinders quite easily.

Filed Under: Scripts & Utilities Tagged With: SCO Openserver

License Expired on Virtual SCO Openserver Installation

January 14, 2019 by Paulie Leave a Comment

When you create a new virtual machine with fresh install a version of SCO Openserver prior to version 5.0.6 you may find that it reports that the license is expired:

Image showing SCO Openserver License Manager license expiry

The reason this happens is because earlier releases are not fully year 2000 compliant and if the date the system was installed is after 31st December 1999 then the installation date is incorrect and the license is already expired when you first boot the system. The fix is quite easy:

  1. Shutdown the VM.
  2. Go into the Virtual BIOS.
  3. Set the system date to a date before the year 2000:
    Image showing the virtual BIOS of a SCO Openserver Virtual Machine
    Set the year to 1999
  4. Boot the system and go into single user mode.
  5. Go into scoadmin and then license manager.
  6. Remove the license that you have already entered.
  7. License the the SCO OpensServer Enterprise System and any other licenses you want to apply.
  8. You should now see the licenses properly licensed:
    Image showing SCO Openserver Licenses Valid
  9. Exit Scoadmin and quit single user mode
  10. When the system is booting you will get a prompt to set the date and time. Enter the current date and time:
    Image showing setting the date and time on SCO Openserver during boot
  11. Finally, reboot.

You should find that all of the licenses are now properly in place.

Filed Under: Technical Posts Tagged With: SCO Openserver

A SCO OpenServer 5.0.5 Rescue and Virtualization Story

September 9, 2018 by Paulie Leave a Comment

The owner of a business using a SCO Openserver 5.0.5 system got in touch requiring urgent assistance with their system. It was unable boot and was continually showing the error message:

NOTICE: HTFS: No Space on dev hd (1/42)

Unable to access single user mode on Sco OpenServer 5.0.5

At first I thought this would be pretty simple fix:

  1. Boot the system into single user mode
  2. Clear enough space to boot the system.
  3. Access the system over the network and give the machine a good clear out.

I talked someone non-technical through the boot process. But he said that the prompt for single user mode was not being shown. So we decided to wait until the IT expert was on site. I still thought this would be an easy fix.

Brad (the IT expert and I) tried once at getting into single user mode, but the prompt was just never shown:

Image showing SCO Openserver failing to boot due to lack of disk space on the root Fileystem
HTFS: No space on dev hd (1/42)

There were no usable backups of the system, so that option was also out.

So there were a couple of different ways we could go:

  • Try booting from Boot and Root floppies and see if we could mount root and remove some files.
  • Try creating a backup of the system via a boot CD to then work on it on more stable hardware (virtual machine)

I decided it would be best to try image the system and restore it to a virtual machine to prevent any potential further damage. This is when we came to the next problem, seriously old hardware! 

The system was running on a HP Netserver E60 with a Pentium 2 450 CPU, 128Mb Ram and a 9Gb SCSI Drive:

HP Netserver E60 running SCO Openserver 5.0.5

Making a CloneZilla Image of a SCO Openserver 5.0.5 System

Key Problems we faced straight away:

  • This machine has no USB Ports – so it was not possible to use an external drive to image the internal drive.
  • CloneZilla was unable to recognise the network card in this machine so the option of an SSH backup destination was unavailable
  • Server was unable to read a ISO burned onto a CD-R.

We were able to find an old IDE CD-Drive and put that into the machine. We were then able to boot an old version of CloneZilla.

Although we could boot CloneZilla, it was not able to recognise the network card in the machine, so that option wasn’t going to work either. At least it did recognise the disk, so there was a bit of hope there.

Brad called some local IT shops and we able to locate various bits of old hardware, IDE drives, network cards etc. So we had some more options. We tried the 3com 3c905 card in the server but CloneZilla still didn’t see. This was starting to seem like a hopeless route.

As a last resort I suggested that we try to use the Ubuntu version of CloneZilla to see if that would have any better results at seeing the old hardware. We had to find and download an old release because the recent versions require 256Mb Ram and this machine had only 128Mb. The Ubuntu version of CloneZilla was able to see both the on-board network card and the 3com card, so we began the process of imaging the drive across the network.

I was confident that once the image of the machine was restored into a virtual machine, that the system would running up and running quickly.

The Image was restored into VMWare Workstation 14 and and things seemed quite positive. The machine could not boot because there was no BTLD (Boot Time Load Driver) for the LSI Logic SCSI Controller, I know how get that in place easily.

Using Boot and Root floppies to access the HTFS root file system.

I used boot floppies and tried to mount the root file system, this didn’t work because SCO was reporting that the Superblock was bad and that the magic number was wrong. After a period of trying different things I gave up and restored the image again, but this time on to an IDE drive instead of a SCSI LSI Logic drive. This was much more successful and I was able to boot the system to the same point the customer was getting with the out of space message.

I Used boot and root floppies to mount the root file system. The root file system had some corruption but fsck was able to take care of that. I then removed enough files to create space to boot the system into multi-user mode. Although it booted, I was unable to get a login prompt. This was because the physical system was originally configured to use a DIGI Serial over Ethernet Server. The serial server generated so many errors that a login prompt could not be shown.

Multi-User Boot and editing /etc/default/boot configuration.

I cleared out the Digi configuration and booted the system using a custom boot string. After that I edited /etc/default/boot to reflect the new drive setups and disabled the existing SCSI driver.

I reconfigured the network, cleaned up the root file system and handed it over to for testing. It all works fine and SCO is now  running on VMWare Workstation 14.

Other small issues

There are still some minor issues to address:

  • The data backup routine will be changed to work over NFS to a file instead of a tape device.
  • Printer will be reconfigured from parallel to HP Jetdirect.

My gratitude goes out to Brad who was incredibly enterprising and patient with the old hardware. I could not have asked for a more helpful remote companion to work on this with me.

Key Points if you are in a similar situation with an old SCO Openserver System that needs recovery.

  • CloneZilla can take good images of a SCO Openserver System.
  • Ubuntu Version of CloneZilla seems to have better hardware support for older systems than the stable release.
  • You are probably going to need boot and root floppies, so make them while your imaging is taking place.

If you need help virtualizing your SCO system, please get in touch here.

Filed Under: Technical Posts Tagged With: SCO Openserver

  • Go to page 1
  • Go to page 2
  • Go to Next Page »

Primary Sidebar

Link to my LinkedIn Profile
Buy me a coffee
Sco Openserver Support Image

Subscribe to Blog via Email

Enter your email address to subscribe to this blog and receive notifications of new posts by email.

Join 259 other subscribers.

Go to mobile version