• Skip to primary navigation
  • Skip to main content
  • Skip to primary sidebar

Tachytelic.net

  • Get in Touch
  • About Me

Dell PowerEdge

How to install and boot a Dell PowerEdge from a PCIe NVMe drive

October 5, 2020 by Paulie 61 Comments

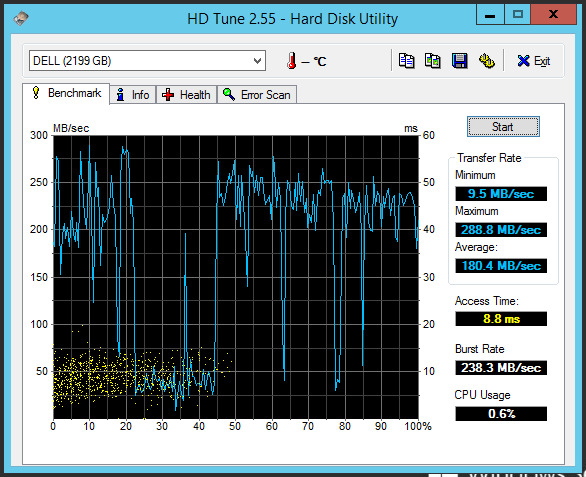
PCIe NVMe storage can provide an incredible speed boost to any server but booting from it is not natively supported on some older Dell PowerEdge servers.

11th and 12th generation servers like the Dell PowerEdge R710 and R720 are very popular amongst the home lab community and could benefit from a fast boot device.

This procedure should work on any Dell PowerEdge Server that can boot from a USB device.

Booting from NVMe storage is simple to do. In this post I am going to explain how it’s done and show the benchmarks from both a Dell PowerEdge R310 and T320.

Hardware you will need:

  • Two USB Flash drives:
    • One to run clover bootloader. I used this tiny Sandisk Ultra Fit Flash Drive.
    • One for your bootable Windows ISO.
  • A PCI NVMe Adapter and a NVMe Drive:
    • I used this cheap NVMe to PCIe adapter from Amazon.
    • With a Samsung 970 Evo Plus also from Amazon

I also tested the process on an 1.2Tb Intel DC P3520 PCIe card, which also worked fine.

Software you will need:

  • A Windows Server Installation ISO
  • Rufus to create the bootable Windows Installation.
  • Boot Disk Utility

PCIe NVMe Boot Process

When this procedure is complete, the PowerEdge server will boot from the internal USB storage and run the Clover EFI Bootloader. Clover will contain the NVMe boot driver and boot the installed operating system from the NVMe storage.

If your server has internal SD card storage, you could boot from that instead.

Install the NVMe Adapter and Drive

First install the NVMe adapter and drive into your Dell PowerEdge server. I used this cheap adapter from Amazon and a 500Gb Samsung 970 Evo Plus.

Here is the unit before I installed it into the server without the heatsink applied. It comes with regular and low profile PCIe bracket:

Samsung 970 Evo Plus NVMe SSD Installed into a PCIe adapter.

And here is the unit installed in the PowerEdge R310 with the heatsink and thermal pad applied:

PCI NVMe Adapter installed into an 11th Generation Dell PowerEdge Server

Create your bootable Windows Server Installation

The first step is to create your Windows Server Installation USB Stick. There are lots of guides on how to do this but I will show how I did it.

  • Download and Install Rufus.
  • Point Rufus to your Windows Server ISO.
  • Configure Rufus with the following options:
    • Partition Scheme: GPT
    • Target System: UEFI (non CSM)
      Image showing configuration of Rufus to make a Windows Server Bootable ISO

Install Windows in the normal way

Windows Server 2012 R2 and newer have Microsoft NVMe drivers built in, so it will see the NVMe storage and offer to install to that location.

When Windows setup is complete it will reboot. It will be unable to do because the Dell UEFI does not have any NVMe support. But don’t worry about that!

Setup the Clover EFI USB Boot Stick

Now setup the Clover USB Boot stick or SD Card.

  • Download and run Boot Disk Utility.
  • Insert the USB Stick that you are going to boot from into your PC.
  • Select your USB Stick and click format:
  • Open your newly formatted drive and copy \EFI\CLOVER\drivers\off\NvmExpressDxe.efi to:
    • \EFI\CLOVER\drivers\BIOS
    • \EFI\CLOVER\drivers\UEFI

Copying the NvmExpressDxe.efi to the drivers folder adds NVMe support to Clover which will enable booting from the Windows Installation that has just been completed.

My \EFI\CLOVER\drivers\UEFI looks like this:

Insert the Clover USB Flash Drive or SD Card into your server

Next simply insert the USB flash drive or SD Card into your server and set the UEFI boot order on the server to boot from it:

Sandisk USB Flash Drive installed into internal USB Port of a Dell PowerEdge Server to support booting of an NVMe drive.

Ensure your UEFI Boot order is set correctly and pointing to your Clover USB Stick or SD Card:

Image of Dell UEFI Boot Settings set to an Internal USB Device containing clover boot loader.

When booting from the internal Clover USB stick it will briefly display a boot screen:

Screenshot of the Clover Boot Manager.

The clover defaults worked right away for me and I didn’t have to configure anything.

You can modify the config.plist file (which is in the root of the USB Stick) to reduce the timeout if you want to speed things up a little bit:

<key>Boot</key>
<dict>
	<key>#Arguments</key>
	<string>slide=0 darkwake=0</string>
	<key>#DefaultLoader</key>
	<string>boot.efi</string>
	<key>#LegacyBiosDefaultEntry</key>
	<integer>0</integer>
	<key>#XMPDetection</key>
	<string>-1</string>
	<key>CustomLogo</key>
	<false/>
	<key>Debug</key>
	<false/>
	<key>DefaultVolume</key>
	<string>LastBootedVolume</string>
	<key>DisableCloverHotkeys</key>
	<false/>
	<key>Fast</key>
	<false/>
	<key>Legacy</key>
	<string>PBR</string>
	<key>NeverDoRecovery</key>
	<true/>
	<key>NeverHibernate</key>
	<false/>
	<key>RtcHibernateAware</key>
	<false/>
	<key>SignatureFixup</key>
	<false/>
	<key>SkipHibernateTimeout</key>
	<false/>
	<key>StrictHibernate</key>
	<false/>
	<key>Timeout</key>
	<integer>5</integer>
</dict>

Modify the “integer” value on line 36 to reduce the boot delay.

Windows should now proceed to boot normally directly from the NVMe drive.

Performance Results

I was really impressed with how much faster both machines PowerEdge are when booting from the NVMe drive. For the purposes of clarity the config of these systems are:

Dell PowerEdge R310
Intel XEON X3470 2.93GHz
16Gb Ram
Dell PERC H700 (512mb)

Dell PowerEdge T320
Intel XEON
32Gb Ram
Dell PERC H710 (1Gb)

Performance of the Samsung 970 Evo Plus NVMe Drive was excellent in both machines. But the drive performance is constrained in the R310 because it has a PCI Gen 2 x 4, whereas the T320 has PCI Gen 3.

Disabling C States in the BIOS increases performance in both machines.

Here are the results from a CrystalDiskMark from the R310 with C States Disabled:

Image of CrystalDiskMark showing performance results from an NVMe drive installed in a Dell PowerEdge Server with C States Disabled

Here are all the results from both machines with and without C States Enabled.

Test TypeC StateMachineRead Result (MB/s)Write Result (MB/s)
SEQ1M Q8T1EnabledR3101670.131636.13
SEQ1M Q8T1DisabledR3101811.271760.90
SEQ1M Q1T1EnabledR3101359.941346.70
SEQ1M Q1T1DisabledR3101529.411498.86
RND4K Q32T16EnabledR3101147.301351.01
RND4K Q3T16DisabledR3101149.571346.97
RND4K Q1T1EnabledR31035.9585.65
RND4K Q1T1DisabledR31037.9693.31
SEQ1M Q8T1EnabledR3203339.913124.31
SEQ1M Q8T1DisabledR3203576.683265.89
SEQ1M Q1T1EnabledR3202303.262510.44
SEQ1M Q1T1DisabledR3202421.822793.11
RND4K Q32T16EnabledR3201150.971557.42
RND4K Q32T16DisabledR3201145.251558.19
RND4K Q1T1EnabledR32033.23101.27
RND4K Q1T1DisabledR32043.98111.05

As a crude comparison here is the performance of a RAID 0 Array in the R310 comprising 4 x 7,200 RPM SATA Drives:

Image showing performance benchmark of a RAID 0 array on a Dell PowerEdge R310 with PERC H700 controller.

This R310 server also has a Samsung 860 EVO SSD in the DVD Drive bay, which is connected via a SATA 2 port on the motherboard:

Image showing performance of a Samsung SSD Installed in the optical drive bay of a Dell PowerEdge R310.

You can see the performance of the drive being constrained by the SATA2 port, but it still gives good random performance.

If you are using VMWare then you can just access the NVMe drive in the normal way if you are booting from a different storage device such as SD Card or USB Stick.

Conclusion – is it worth adding NVMe storage to a old Dell PowerEdge?

Given the low cost of both the adapter and Samsung SSD and the huge resulting performance boost, it is certainly worth experimenting.

I can’t say if I would use this setup in production yet, but so far, it seems to work fine. Here is an image of Samsung Magician Drive information:

Filed Under: How To Tagged With: Dell PowerEdge

Install an SSD in the Optical Bay of a 13th Generation PowerEdge

October 14, 2019 by Paulie 8 Comments

Installing an SSD to the optical drive by on a 13th Generation Dell PowerEdge is really easy. The only thing you really need to know is that the bay is 9.5mm high. I used this caddy from Amazon.

I installed the SSD into a PowerEdge R330, it works really well. Here is the SSD Installed in the Optical Drive Bay:

Image of a Dell PowerEdge server with an SSD Installed in the DVD Drive bay.
The SATA SSD Installed in the DVD/CD Drive bay.
Front image of an SSD Installed into the optical bay of a Dell PowerEdge Server
From the front it looks just like a Normal Optical Drive

ESXi is installed on 2 x 32Gb SD Cards, the SSD is free to be used as a data store:

Image showing ESXi datastore with an SSD installed into the Optical bay of a Dell PowerEdge Server.
Image of Install of Internal SD Card Into a Dell PowerEdge R330
SD Cards being installed by a certified PowerEdge expert.

There is a second SATA connector on the motherboard and space at the front where you could install another SSD. But I haven’t tried that.

I haven’t used the DVD Drive on a Dell server in years, an SSD makes better use of the space. You could use it as a normal data store or perhaps a flash based read cache in ESXi.

Filed Under: How To Tagged With: Dell PowerEdge

How to change the default Dell iDRAC Password

May 23, 2019 by Paulie 1 Comment

The Dell iDRAC is so useful for many things, but in its default configuration it is very insecure:

  • The default username is “root”
  • The default password is “calvin”

In this post I will show you how both rename the root account and change the password.

Renaming the root account adds a layer of obscurity making it more difficult for unauthorised users to gain console level access.

How to rename the iDrac root account and change the password.

  • Login to the iDRAC using your credentials or use the default if they have not been changed
  • On the left hand menu, choose “iDRAC Settings” and then “User Authentication”:
    Image showing User Authentication Settings on Dell iDRAC Enterprise
  • Click on the User ID that corresponds to the root account, to edit it:
    Image showing root account of Dell iDrac
  • The default action of “Configure user” should already be selected, so click on “Next”
  • Change the username as per your preferences and set the new password:
    Image showing root account of Dell iDrac being renamed and password changed.
  • Scroll to the bottom of the page and click apply.
  • Log-out of the iDrac and check your new settings.

Filed Under: How To Tagged With: Dell PowerEdge

Install an Intel P3520 SSD into a 11th Gen PowerEdge

October 10, 2017 by Paulie Leave a Comment

We are still running some 11th Generation Dell PowerEdge servers in our DC and some of the virtual machines were having some performance issues. We considered completely replacing replacing the servers, but found that the CPU load was very low most of the time.

The bottleneck for the database application running on these servers was disk related and we felt that a boost in performance in this area would bring the performance back to where we needed it to be. We decided to put an Intel P3520 NVMe SSD into two of the machines. This card, although not top of the range in terms of performance, has a great price/performance ratio and should be much faster than the existing drive array.

The specification of the server we put them into:

Dell PowerEdge R510
2 x Intel XEON X5670
128Gb Ram
PERC H700 1Gb (For Hard Drives)
VMWare ESXi 6.0.0.5050593

Here is the card in the server PCI slot:

Intel P3520 installed in Dell PowerEdge R510 VMWare recognised the card no problems, but I also installed the Intel NVMe drivers, which boosted the performance a bit. I haven’t done extensive performance testing but I can tell from using the applications hosted on the machine that it is much quicker.

Disk Benchmark with the Intel P3520 NVMe ssd: Disk benchmark showing performance of Intel P3520 on Dell PowerEdge R510 on VMWare ESXi

And for comparison the 8 disk SATA array on the PERC H700: Disk Performance on Dell PowerEdge R510 with PERC H700

So overall adding the Intel SSD provided a significant boost in performance over the existing array, which is now just there for redundancy, the application performance has boosted much more than the performance metrics above signify.

Filed Under: Technical Posts Tagged With: Dell PowerEdge

How to add a USB 3 PCIe card to a Dell PowerEdge Server

November 26, 2014 by Paulie 3 Comments

Adding a USB 3 PCIe card to a Dell PowerEdge Server is easy, but most USB 3 PCIe cards require an internal power source, and Dell servers do not have any.

The HighPoint RocketU 1344A PCIe card works perfectly with Dell PowerEdge servers and does not require any additional power source. I’ve used it on many times and not a problem.

  • It is a PCIe x4 card and can supply up to 25W of power
    (most add-in cards which are PCIe x1 and provide only 10W of power).
  • It has 4x Dedicated 10Gb/s USB 3.1 ports..

It is more expensive than many USB3 cards, but I have found it to be very good.

High Point RocketU 1344A PCI-Express 3.0
  • 4x USB 3.2 10Gb/s Ports
  • PCIe 3.0 x4 Host Interface
  • Driverless Installation: Native XHCI Support
  • Fully backwards compatible with USB 1.0/2.0/3.x devices & peripherals
  • macOS, Linux & Windows
$159.00
Buy on Amazon

I did some testing by copying a Windows Server ISO to a Samsung Portable SSD, it took 16 seconds with the USB 3 card:

Image showing file copy from Dell PowerEdge to Samsung Portable SSD T5 over USB 3 using a Highpoint USB PCIe card

The same file from the USB2 ports took 2 minutes and 57 seconds to complete:

Image showing a file copy from a Dell PowerEdge to a Smasung Portable SSD T5 over USB2

This is the Samsung SSD I used for testing. It is tiny, smaller than a credit card!

Sale
Samsung Portable SSD T5
  • Superfast read write speeds: SSD with V-NAND offers ultra-fast data transfer speeds of up to 540MB/s (up to 4.9x faster than external HDDs); Ideal for transferring large-sized data including 4K videos, high-resolution photos, games and more
  • Compact and portable design: Top to bottom shock resistant metal design fits in the palm of your hand and easily slides in your pocket or purse to take work and entertainment on the go
  • Secure encryption: Optional password protection and AES 256-bit hardware encryption keeps your personal and private data more secure
  • Seamless connectivity: Includes USB type C to C and USB type C to A cables to connect to PCs, Macs, smartphones and other devices
  • Warranty and compatibility: 3-year limited warranty; Requires Windows 7, Mac OS X 10.9 (Mavericks), Android 4.4 (KitKat), or higher; Older versions of the Windows, Mac and Android operating systems may not be supported
$84.00
Buy on Amazon

Here is the card installed in the server:

Image of Dell PowerEdge Server with HighPoint Four Port USB 3 Card Installed

Filed Under: How To, Technical Posts Tagged With: Dell PowerEdge

  • Go to page 1
  • Go to page 2
  • Go to page 3
  • Go to Next Page »

Primary Sidebar

Link to my LinkedIn Profile
Buy me a coffee

Subscribe to Blog via Email

Enter your email address to subscribe to this blog and receive notifications of new posts by email.

Join 246 other subscribers.

Go to mobile version