• Skip to primary navigation
  • Skip to main content
  • Skip to primary sidebar

Tachytelic.net

  • Get in Touch
  • About Me

Office 365

Remove forwarding from Office 365 Mailboxes with Powershell

June 30, 2019 by Paulie 5 Comments

It’s easy to check if email is being forwarded to external or inappropriate recipients with PowerShell and remove those forwards if they are in place.

First, connect to Exchange Online with the following:

$Cred = Get-Credential
$Session = New-PSSession -ConfigurationName Microsoft.Exchange -ConnectionUri https://ps.outlook.com/powershell/ -Credential $Cred -Authentication Basic -AllowRedirection
Import-PSSession $Session -CommandName "Get-Mailbox", "Set-Mailbox"

I restricted “Import-PSSession” to import only the Get-Mailbox and Set-Mailbox commands. It makes things a little bit faster by leaving out all the commands that aren’t needed.

List all users with mailbox forwarding enabled

To list all users with forwarding enabled, use the following code:

Get-Mailbox -ResultSize Unlimited | 
  Where {($_.ForwardingAddress -ne $Null) -or ($_.ForwardingsmtpAddress -ne $Null)} | 
  Select Name, ForwardingAddress, ForwardingsmtpAddress, DeliverToMailboxAndForward
Image showing the use of the "Get-Mailbox" cmdlet to list mailboxes which have forwarding enabled and will be set for removal.
The command found one mailbox with forwarding enabled

If you have many users you can export the results to CSV for analysis like this:

Get-Mailbox -ResultSize Unlimited | 
  Where {($_.ForwardingAddress -ne $Null) -or ($_.ForwardingsmtpAddress -ne $Null)} | 
  Select Name, ForwardingAddress, ForwardingsmtpAddress, DeliverToMailboxAndForward | 
  Export-Csv "c:\script\Office365Forwards.csv" -NoTypeInformation -Encoding UTF8

As you can see, there are two different types of fowards:

  • ForwardingAddress – This is set by an administrator and the end user has no control over it.
  • ForwardingSMTPAddress – This can be set by the user in Outlook Web Access

Remove forwarding from a Mailbox

You can remove the forwarding from a single mailbox with the following command:

Set-Mailbox paulie -ForwardingAddress $NULL -ForwardingSmtpAddress $NULL

This will disable both the admin forwarding and the user forwarding for the specified mailbox.

Remove User Forwarding and Admin Forwarding for all users

Get-Mailbox -ResultSize Unlimited | 
  Where {($_.ForwardingAddress -ne $Null) -or ($_.ForwardingsmtpAddress -ne $Null)} |
  Set-Mailbox -ForwardingAddress $null -ForwardingSmtpAddress $null

Remove All forwards set by an Administrator

Same as the command above with a small modification:

Get-Mailbox -ResultSize Unlimited | 
  Where {($_.ForwardingAddress -ne $Null)} | 
  Set-Mailbox -ForwardingAddress $null

Remove All forwards set by users

Get-Mailbox -ResultSize Unlimited | 
  Where {($_.ForwardingSmtpAddress -ne $NULL)} |
  Set-Mailbox -ForwardingSmtpAddress $null

Remove all User forwards to a specific domain

Get-Mailbox -ResultSize Unlimited | 
  Where {$_.ForwardingSMTPAddress -ne $null -And $_.ForwardingSMTPAddress -like '*@gmail.com'} |
  Set-Mailbox  -ForwardingSmtpAddress $null

Loop through a file of aliases and remove admin forwarding for each alias

The following code will read a file containing mailbox identity’s and remove the admin forwards on each account.

$mailForwards = get-content c:\script\AliasList.txt
foreach ($alias in $mailForwards)
{
  "Removing Forward for $alias"
  Set-Mailbox $alias -ForwardingAddress $null -DeliverToMailboxAndForward $false
}

There are so many ways of controlling the forwarding with PowerShell, I hope the provided examples are useful.

To learn how to add a forwarding from PowerShell, see this post.

Filed Under: Office 365 Tagged With: Office 365, Powershell

Power Pivot for Excel: Object Reference not set to an instance of an object

April 8, 2019 by Paulie 3 Comments

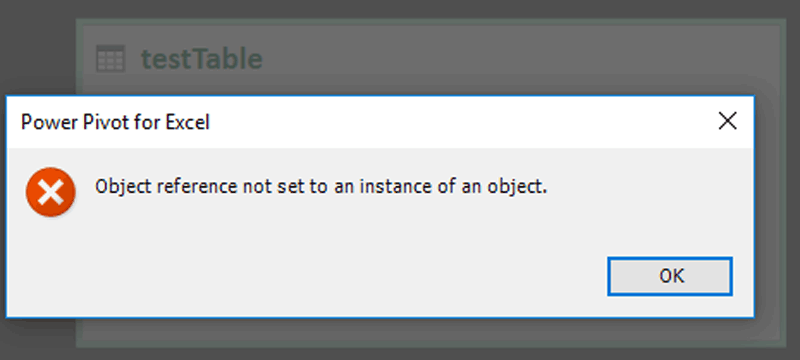
When trying to delete a table from the Data Model in Excel 2016 you may get the error “Object reference not set to an instance of an object.”

Image showing Excel error "Object reference not set to an instance of an object." when trying to delete a table from the data model.
Object reference not set to an instance of an object.

Having tried all sorts of complicated things to rectify the error, nothing seemed to get rid of it. The solution is actually very simple:

  1. Go into Data View
  2. Right click on the table on the tab strip at the bottom of the data view:
    Image showing context menu when right clicking on a table in data view of Power BI for Excel
  3. Click on Delete.
  4. Choose Yes when prompted if you really want to delete the table.

Your table should now be deleted, frustrating that an operation as simple as this produces an error, but at least there is a workaround.

Filed Under: Office 365

Office 365: How to add or remove an email alias using Powershell

December 19, 2018 by Paulie 4 Comments

Use the Powershell cmdlet Set-Mailbox to check email aliases assigned to Office 365 accounts, add aliases or remove aliases. Additionally the handy form underneath will generate the correct Powershell commands for you.

Check current email aliases assigned to an Office 365 account:

Get-Mailbox mailboxName | select -ExpandProperty emailaddresses | Select-String -Pattern "smtp"

Add an email alias to an Office 365 account:

Set-Mailbox mailboxName -EmailAddresses @{Add='[email protected]'}

Remove an email alias from an Office 365 account:

Set-Mailbox MailboxName -EmailAddresses @{Remove=’[email protected]’}

Or you can just use the form below and the required Powershell will be generated for you….


Now that you have got multiple email aliases, here is how to configure Outloook so that you can send from an alias.

Filed Under: How To, Office 365 Tagged With: Exchange, Office 365, Powershell

Use CDO to send email from VBScript or VBA through Office 365

December 16, 2018 by Paulie 35 Comments

Sending email via VBScript or VBA using CDO is easy to do, but the correct configuration to relay through Office 365 is confusing to say the least and it took me me a while to find the correct settings.

I knew from configuring other devices and software that the preferred way to setup SMTP to relay to Office 365 was to use TLS on port 587. The problem is that officially CDO does not support TLS, but unofficially it does. So I tried in vain to develop some code that would send email via smtp.office365.com using TLS and always came up with the following error:

The server rejected the sender address. The server response was: 530 5.7.57 SMTP; Client was not authenticated to send anonymous mail during MAIL FROM

So clearly the TLS support in CDO is not sufficient to be able to work with the Office 365 SMTP Server. The trick is not to use TLS at all, but to use SSL instead on port 25 instead, which seems to work fine:

VBScript to Send Email via Office 365 (smtp.office365.com)

This is just quick sample code to get you on the right path:

Dim objMessage, objConfig, Fields
Set objMessage = CreateObject("CDO.Message") 
Set objConfig = CreateObject("CDO.Configuration")
Set Fields = objConfig.Fields
With Fields
  .Item ("http://schemas.microsoft.com/cdo/configuration/sendusing") = 2 
  .Item ("http://schemas.microsoft.com/cdo/configuration/smtpserver") = "smtp.office365.com"
  .Item ("http://schemas.microsoft.com/cdo/configuration/smtpserverport") = 25
  .Item ("http://schemas.microsoft.com/cdo/configuration/smtpauthenticate") = 1
  .Item ("http://schemas.microsoft.com/cdo/configuration/sendusername") = "[email protected]"
  .Item ("http://schemas.microsoft.com/cdo/configuration/sendpassword") = "Office365Password"
  '.Item("http://schemas.microsoft.com/cdo/configuration/sendtls") = True
  .Item("http://schemas.microsoft.com/cdo/configuration/smtpusessl") = True
  .Update
End With
Set objMessage.Configuration = objConfig

With objMessage
  .Subject = "Test Message"
  .From = "[email protected]"
  .To = "[email protected]"
  .HTMLBody = "Test Mesage"
end With
objMessage.Send

VBA to send email via Office 365 (smtp.office365.com)

The code for VBA is almost the same as VBScript and I tested it using Excel 2016 without any problems at all. But first you need to add a reference to your project:

  1. In the Office VBA Code Editor go to Tools, and then References:
    Image showing how to add references to an Office VBA Project
  2. In the References dialog box add a reference to the “Microsoft CDO for Windows 2000 Library”:
    Image showing how to add the Microsoft CDO Library to the Office VBA Environment
  3. Use the following sample code….
Sub Office365_Email_Test()
    Dim objMessage, objConfig, fields
    Set objMessage = New CDO.Message
    Set objConfig = New CDO.Configuration
    Set fields = objConfig.fields
    With fields
        .Item("http://schemas.microsoft.com/cdo/configuration/sendusing") = 2
        .Item("http://schemas.microsoft.com/cdo/configuration/smtpserver") = "smtp.office365.com"
        .Item("http://schemas.microsoft.com/cdo/configuration/smtpserverport") = 25
        .Item("http://schemas.microsoft.com/cdo/configuration/smtpauthenticate") = 1
        .Item("http://schemas.microsoft.com/cdo/configuration/sendusername") = "[email protected]"
        .Item("http://schemas.microsoft.com/cdo/configuration/sendpassword") = "Office365Password"
        '.Item("http://schemas.microsoft.com/cdo/configuration/sendtls") = True
        .Item("http://schemas.microsoft.com/cdo/configuration/smtpusessl") = True
        .Update
    End With
    Set objMessage.Configuration = objConfig
    
    With objMessage
        .Subject = "Test Message"
        .From = "[email protected]"
        .To = "[email protected]"
        .HTMLBody = "Test Message"
    End With
    objMessage.Send
End Sub

A few things to note:

  • The account that you use must have at least an Exchange Online license.
  • You will only be able to send from addresses that account has send as permission for or an alias of that account.
  • It would probably be a good idea to use an account dedicated for sending SMTP because the password is being stored in clear text.
  • Your Firewall or your ISPs Firewall may block outbound port 25.
  • I’ve left the code for TLS in-place above but commented out, in case anyone else wants to have a play with it.

I hope this helps, I spent ages trying to relay through Office 365 over TLS with VBA, but SSL works just fine.


Filed Under: How To, Office 365, Scripts & Utilities Tagged With: Office 365, VBA, VBScript

Office 365: Change Primary email address of Active Directory user

August 20, 2018 by Paulie 11 Comments

It is simple to change the Primary Email Address of an Office 365 user when your tenant is not being synced to your on-premises active directory, but if you are syncing to Office 365 with any of the following tools:

  • Windows Azure Active Directory Sync (DirSync)
  • Azure AD Sync (AADSync)
  • Azure Active Directory Connect

Then you will be unable to change any of email addresses associated with that account, and you will get the following error:

The operation on mailbox “Mailbox” failed because it’s out of the current user’s write scope. The action ‘Set-Mailbox’, ‘EmailAddresses’, can’t be performed on the object ‘Mailbox’ because the object is being synchronized from your on-premises organization. This action should be performed on the object in your on-premises organization.

Image showing error from Office 365 when trying to change the primary SMTP address for an account that is synced to a local active directory.

How to change the Primary Email Address for an Office 365 account using Active Directory Users and Computers

  1. Open Active Directory Users and Computers
  2. Ensure you have “Advanced Features” enabled from the view menu:
    Image showing how to enable the "Advanced Features" in Active Directory Users and Computers
  3. Double click on the user that you want to edit the email addresses for.
  4. Go to the “Attribute Editor” tab.
  5. Go to the “proxyAddresses” attribute and click edit.
  6. Edit the email addresses as per your requirements. Note that the primary address (which is the address that the user will send emails from) is in uppercase “SMTP”.
    Image showing how to edit the proxyaddresses attribute for an Office 365 user synced to local active directory.

How to change the Primary Email Address for an Office 365 account using Powershell

You can perform the same operation using Windows Powershell, the basic syntax is like this:

Set-ADUser paulie -Add @{ProxyAddresses="SMTP:[email protected]"}

The problem with running this command is that you may already have a primary SMTP address set and this will not stop you from adding another one. So first of all run:

get-aduser paulie -properties proxyaddresses | Select-Object Name,ProxyAddresses |fl

This will show you all the current proxy addresses for this user. If you want to remove an existing proxy address you can use:

Set-ADUser paulie -Remove @{ProxyAddresses="smtp:[email protected]"}

It is possible neither of the above methods will work if you have never had Exchange installed locally, as the users will not have these attributes. You can follow the instructions on this page in order to get the attributes enabled for your users.

If you have any questions, feel free to ask in the comments.

Filed Under: How To, Office 365 Tagged With: Exchange, Office 365, Powershell

  • « Go to Previous Page
  • Go to page 1
  • Go to page 2
  • Go to page 3
  • Go to page 4
  • Interim pages omitted …
  • Go to page 7
  • Go to Next Page »

Primary Sidebar

Link to my LinkedIn Profile
Buy me a coffee

Subscribe to Blog via Email

Enter your email address to subscribe to this blog and receive notifications of new posts by email.

Join 245 other subscribers.

Go to mobile version