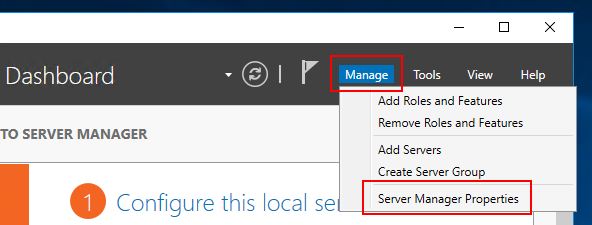
• Skip to primary navigation
  • Skip to main content
  • Skip to primary sidebar

Tachytelic.net

  • Sco Openserver
    • Sco Unix Support
    • SCO Openserver Installation ISOs
    • SCO Openserver Binaries
    • Add a Hard Drive to an Openserver 5 Virtual Machine
  • Scripting
    • PowerShell
      • Add leading zeros
      • Check if a File Exists
      • Grep with Powershell
      • Create Environment Variables
      • Test for open Ports
      • Append to a Text File
    • VBScript
      • Check if a File Exists
      • lpad and rpad functions
      • Windows Update E-Mail Notification
  • Office 365
    • Connect to Office 365 with PowerShell
    • Add or remove an email alias using Powershell
    • Change Primary email address of Active Directory user
    • How to hide an AD user from the Global Address List
    • How to hide mail contacts from the Global Address List
    • Change the primary email address for an account with PowerShell
    • Change Primary email address of an AD User
    • Grant a single user access to access to all calendars
    • Forward email to an external address using Powershell
    • Convert shared mailbox to user mailbox with Powershell
  • Get in touch
  • About Me
    • Privacy Policy

How To

Office 365: Change Primary email address of Active Directory user

August 20, 2018 by Paulie 8 Comments

It is simple to change the Primary Email Address of an Office 365 user when your tenant is not being synced to your on-premises active directory, but if you are syncing to Office 365 with any of the following tools:

  • Windows Azure Active Directory Sync (DirSync)
  • Azure AD Sync (AADSync)
  • Azure Active Directory Connect

Then you will be unable to change any of email addresses associated with that account, and you will get the following error:

The operation on mailbox “Mailbox” failed because it’s out of the current user’s write scope. The action ‘Set-Mailbox’, ‘EmailAddresses’, can’t be performed on the object ‘Mailbox’ because the object is being synchronized from your on-premises organization. This action should be performed on the object in your on-premises organization.

Image showing error from Office 365 when trying to change the primary SMTP address for an account that is synced to a local active directory.

How to change the Primary Email Address for an Office 365 account using Active Directory Users and Computers

  1. Open Active Directory Users and Computers
  2. Ensure you have “Advanced Features” enabled from the view menu:
    Image showing how to enable the "Advanced Features" in Active Directory Users and Computers
  3. Double click on the user that you want to edit the email addresses for.
  4. Go to the “Attribute Editor” tab.
  5. Go to the “proxyAddresses” attribute and click edit.
  6. Edit the email addresses as per your requirements. Note that the primary address (which is the address that the user will send emails from) is in uppercase “SMTP”.
    Image showing how to edit the proxyaddresses attribute for an Office 365 user synced to local active directory.

How to change the Primary Email Address for an Office 365 account using Powershell

You can perform the same operation using Windows Powershell, the basic syntax is like this:

Set-ADUser paulie -Add @{ProxyAddresses="SMTP:[email protected]"}

The problem with running this command is that you may already have a primary SMTP address set and this will not stop you from adding another one. So first of all run:

get-aduser paulie -properties proxyaddresses | Select-Object Name,ProxyAddresses |fl

This will show you all the current proxy addresses for this user. If you want to remove an existing proxy address you can use:

Set-ADUser paulie -Remove @{ProxyAddresses="smtp:[email protected]"}

It is possible neither of the above methods will work if you have never had Exchange installed locally, as the users will not have these attributes. You can follow the instructions on this page in order to get the attributes enabled for your users.

If you have any questions, feel free to ask in the comments.

Filed Under: How To, Office 365 Tagged With: E-Mail, Exchange, Office 365, Powershell

Office 365: How to hide a user from the Global Address List when using Dirsync,AADSync or Azure Active Directory Connect

November 15, 2017 by Paulie 11 Comments

To hide a user from the Global Address List(GAL) is easy when your Office 365 tenant is not being synced to your on-premise Active Directory, but if you are syncing to Office 365 with any of the following tools:

  • Windows Azure Active Directory Sync (DirSync)
  • Azure AD Sync (AADSync)
  • Azure Active Directory Connect

Then you will be unable to hide a user from using the Office 365 Web Interface or PowerShell. From both interfaces you will get the following error:

The operation on mailbox “Paulie” failed because it’s out of the current user’s write scope. The action
‘Set-Mailbox’, ‘HiddenFromAddressListsEnabled’, can’t be performed on the object ‘Paulie’ because the object
is being synchronized from your on-premises organization. This action should be performed on the object in your
on-premises organization.

From the web interface it will look like this:

Unable to hide mailbox from Office 365 when synced to on-premise active directory

How to hide a user from the Global Address List

The active directory property “msExchHideFromAddressLists” property must be set to “true”, here are two ways of changing it:

Using ADSI Edit to hide a user from the Global Address List

You can use ADSI Edit and navigate to your user and modify the property “msExchHideFromAddressLists” and simply change it to true. It is quite easy to do, but long winded and awkward.

Using adsiedit to set MsExchHideFromAddressLists to true to hide a user from the Office 365 GAL

Using PowerShell to hide a user from the Global Address List

You can achieve the same result in a single line of PowerShell using the Set-User cmdlet. This is a much faster and less error prone method of doing the same operation.

Here is an example:

Set-ADUser paulie -Replace @{msExchHideFromAddressLists=$true}

and to un-hide the user:

Set-ADUser paulie -Replace @{msExchHideFromAddressLists=$false}

It’s much easier to do in Powershell than ADSI Edit, but either way will work and the next time your AD synchronises with Office 365, the user should be hidden.

msExchHideFromAddressLists property missing from Active Directory?

If you discover that the msExchHideFromAddressLists property does not exist in your local active directory if you have never had a Microsoft Exchange Installed locally:

Image of ADSI Edit showing that the msExchHideFromAddressLists Active Directory property is missing
msExchHideFromAddressLists property missing from Active Directory

It is possible to extend the active directory schema to contain the required Exchange attributes without purchasing or installing Microsoft Exchange server. The easiest way to achieve this is to download the evaluation of Exchange Server 2013 and then:

  • Extract the contents of the download to a folder of your choice.
  • Run “setup.exe /prepareschema /iacceptexchangeserverlicenseterms” as per this screenshot:
    Screenshot of Extending the AD Schema to include Exchange Attributes
  • You should now have the msExchHideFromAddressLists active directory property available:
    msExchHideFromAddressLists property added to active directory by extending schema using Exchange 2013 evaluation


List all users hidden from the GAL

To list all users hidden from the GAL, use this:

Get-ADUser -Filter {msExchHideFromAddressLists -eq "TRUE"} |Select-Object UserPrincipalName

Questions? please ask in the comments section. If you found this post helpful, I’d really appreciate it if you would rate it for me 😀

Filed Under: How To, Office 365 Tagged With: E-Mail, Exchange, Office 365, Powershell

Exclude messages from Clutter in Office 365 using a transport rule

October 23, 2017 by Paulie Leave a Comment

This post shows you create a transport rule to exclude messages from clutter and provides the code for you to do it automatically. Clutter is a handy feature of Office 365, but sometimes you need to see emails even if they don’t really require any attention.

Example: Exclude message from clutter based on the email subject using a transport rule.

New-TransportRule -Name "Tachytelic Test Rule" -SubjectContainsWords "Sample Subject to bypass clutter" -SetHeaderName "X-MS-Exchange-Organization-BypassClutter" -SetHeaderValue "true"

The rule is created using the “New-TransportRule” cmdlet as per the above.

Fill the form below to have the PowerShell code to create a transport rule to exclude your important messages:

PowerShell code to exclude messages from Clutter


The above example should result in the following in the Office 365 Admin Centre:

Screenshot showing Office 365 Transport Rule to exclude messages from clutter

You can check if the rule worked by sending an email from an external account to your Office 365 tenant and checking the properties of the message when it has arrived:

Screenshot showing message properties from a message that has bypassed clutter
Look for X-MS-Exchange-Organization-BypassClutter: true in the message header to confirm your rule is working.

If you found this post helpful, please rate it 😀

Filed Under: How To, Office 365 Tagged With: E-Mail, Exchange, Office 365, Powershell

How to find the startup folder on Windows Server 2012 or 2016

October 18, 2017 by Paulie 6 Comments

It’s always been simple to find the startup folder in most versions of Windows to configure an application to start automatically when a user logs in.

Here is how to find the startup folder on Windows Server 2012 and Windows Server 2016

  • Right Click on the start menu and choose run
  • Type “shell:startup” and click ok.The run dialog box showing how to access the startup folder on Windows Server 2012 and Windows Server 2016
  • Then the startup folder will appear and you can drop shortcuts or applications into it.

To find the common startup folder for all users

  • Right click on the start menu and choose run
  • Type “shell:common startup” and click ok.
    Run window on Windows Server showing how to access the common startup folder for all users.

Easy but quite well hidden. If you found this post helpful, I’d really appreciate it if you would rate it for me.

Filed Under: How To Tagged With: Windows Server 2012 r2, Windows Server 2016

How to install Adobe Flash Player on Windows Server 2016

October 17, 2017 by Paulie 4 Comments

  1. Copy and paste the below command into a command prompt:
    dism /online /add-package /packagepath:"C:\Windows\servicing\Packages\Adobe-Flash-For-Windows-Package~31bf3856ad364e35~amd64~~10.0.14393.0.mum"
  2. You should get output like the following if you had a successful installation:Installing Flash Player on Windows Server 2016
  3. You can verify if the installation was successful by visiting:
    https://helpx.adobe.com/flash-player.html
    you should be able to see that Flash Player shows as installed and detected as per the following:
    Screenshot showing successful installation of Flash Player on Windows Server 2016

To install flash support on other version of Windows Server:

  • How to install Adobe Flash on Windows Server 2012
  • How to install Adobe Flash on Windows Server 2019

If you found this post helpful, I’d really appreciate it if you left a rating.

Filed Under: How To Tagged With: Windows Server 2016

  • « Go to Previous Page
  • Go to page 1
  • Interim pages omitted …
  • Go to page 6
  • Go to page 7
  • Go to page 8
  • Go to page 9
  • Go to page 10
  • Interim pages omitted …
  • Go to page 13
  • Go to Next Page »

Primary Sidebar