PCIe NVMe storage can provide an incredible speed boost to any server but booting from it is not natively supported on 11th generation Dell PowerEdge servers.
11th generation servers like the are very popular amongst the home lab community and could benefit from a fast boot device.
12th Generation servers such as the R720 support booting from NVMe devices if the latest firmware updates have been applied. So if you have a 12th generation server do not follow this guide. Simply update the firmware on your machine.
This procedure should work on any Dell PowerEdge Server that can boot from a USB device.
Booting from NVMe storage is simple to do. In this post I am going to explain how it’s done and show the benchmarks from a Dell PowerEdge R310.
Hardware you will need:
- Two USB Flash drives:
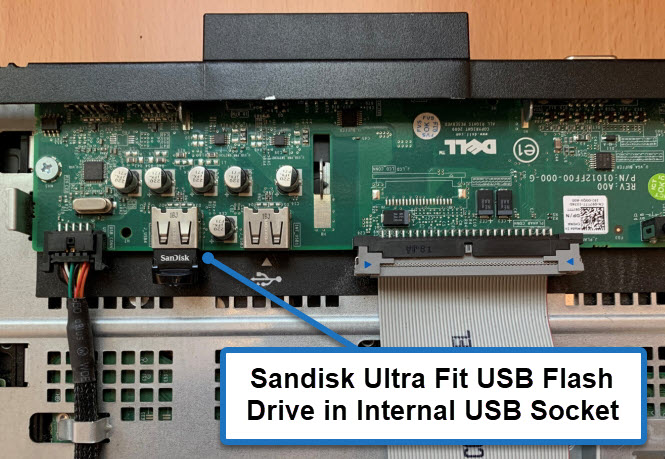
- One to run clover bootloader. I used this tiny Sandisk Ultra Fit Flash Drive.
- One for your bootable Windows ISO.
- A PCI NVMe Adapter and a NVMe Drive:
- I used this cheap NVMe to PCIe adapter from Amazon.
- With a Samsung 970 Evo Plus also from Amazon
I also tested the process on an 1.2Tb Intel DC P3520 PCIe card, which also worked fine.
Software you will need:
- A Windows Server Installation ISO
- Rufus to create the bootable Windows Installation.
- Boot Disk Utility
PCIe NVMe Boot Process
When this procedure is complete, the PowerEdge server will boot from the internal USB storage and run the Clover EFI Bootloader. Clover will contain the NVMe boot driver and boot the installed operating system from the NVMe storage.
If your server has internal SD card storage, you could boot from that instead.
Install the NVMe Adapter and Drive
First install the NVMe adapter and drive into your Dell PowerEdge server. I used this cheap adapter from Amazon and a 500Gb Samsung 970 Evo Plus.
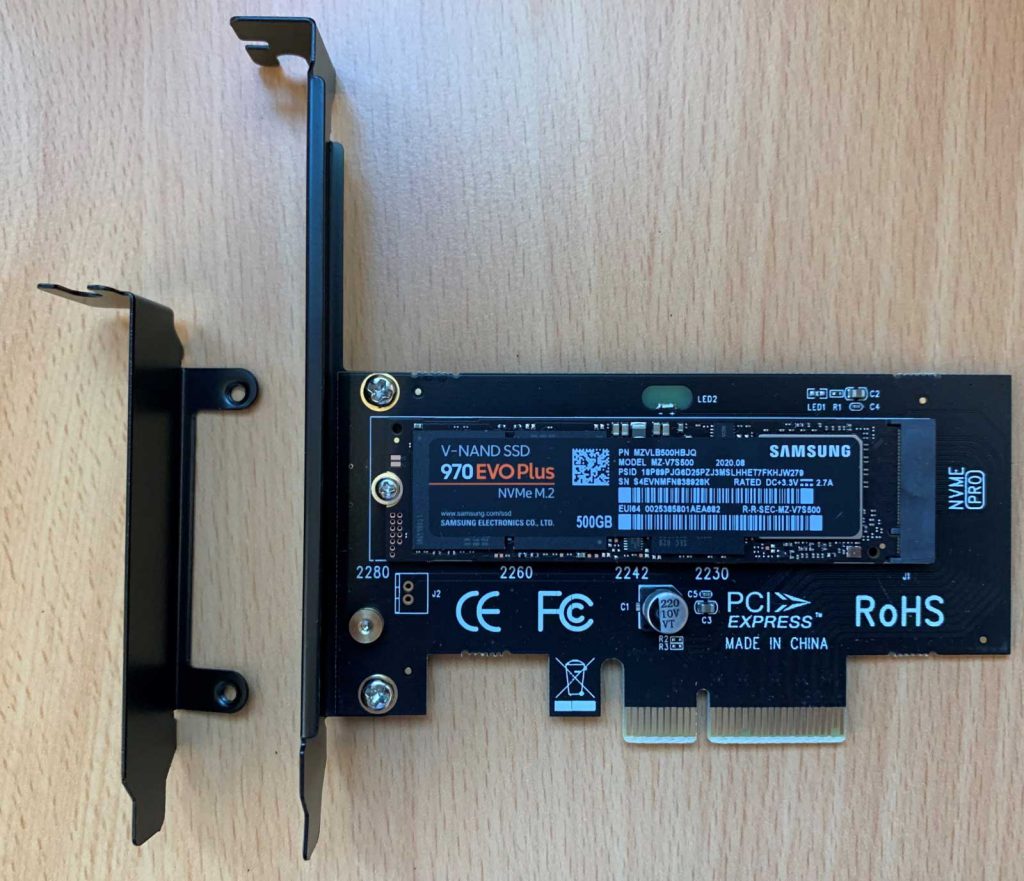
Here is the unit before I installed it into the server without the heatsink applied. It comes with regular and low profile PCIe bracket:
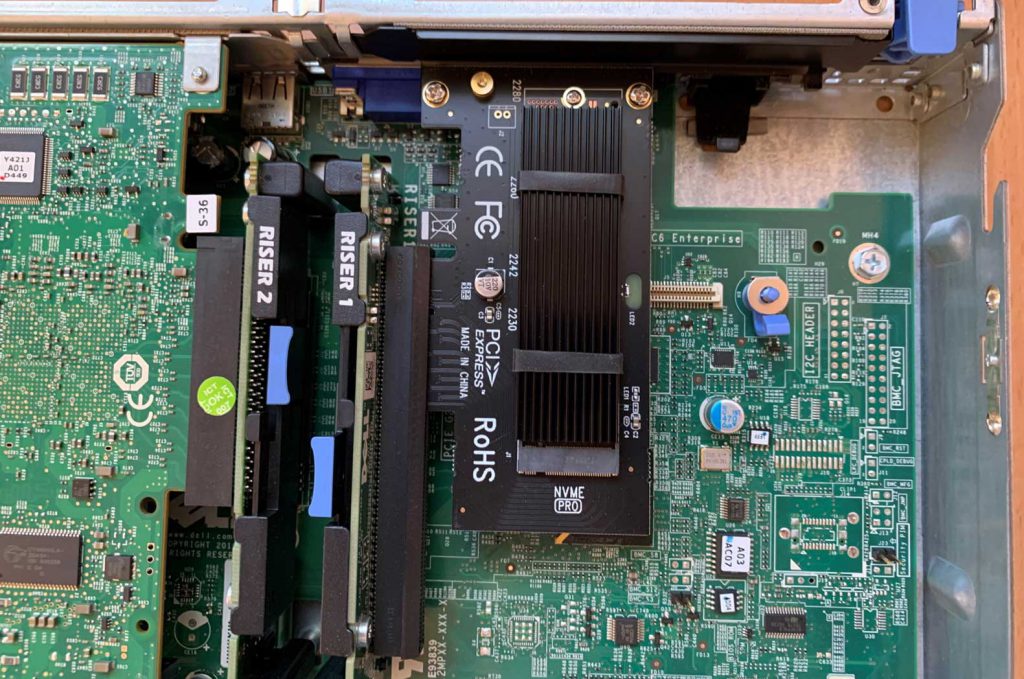
And here is the unit installed in the PowerEdge R310 with the heatsink and thermal pad applied:
Create your bootable Windows Server Installation
The first step is to create your Windows Server Installation USB Stick. There are lots of guides on how to do this but I will show how I did it.
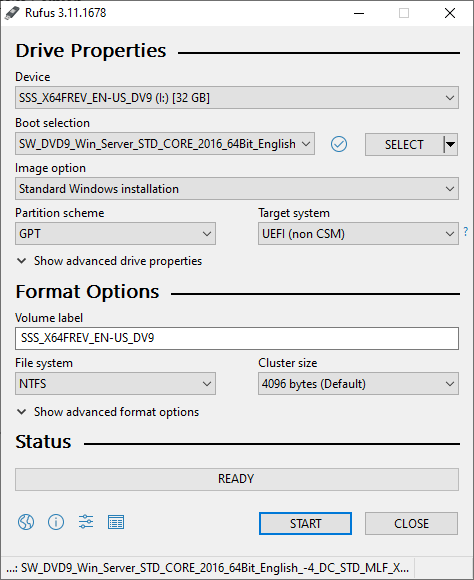
- Download and Install Rufus.
- Point Rufus to your Windows Server ISO.
- Configure Rufus with the following options:
- Partition Scheme: GPT
- Target System: UEFI (non CSM)
Install Windows in the normal way
Windows Server 2012 R2 and newer have Microsoft NVMe drivers built in, so it will see the NVMe storage and offer to install to that location.
When Windows setup is complete it will reboot. It will be unable to do because the Dell UEFI does not have any NVMe support. But don’t worry about that!
Setup the Clover EFI USB Boot Stick
Now setup the Clover USB Boot stick or SD Card.
- Download and run Boot Disk Utility.
- Insert the USB Stick that you are going to boot from into your PC.
- Select your USB Stick and click format:

- Open your newly formatted drive and copy \EFI\CLOVER\drivers\off\NvmExpressDxe.efi to:
- \EFI\CLOVER\drivers\BIOS
- \EFI\CLOVER\drivers\UEFI
Copying the NvmExpressDxe.efi to the drivers folder adds NVMe support to Clover which will enable booting from the Windows Installation that has just been completed.
My \EFI\CLOVER\drivers\UEFI looks like this:

Insert the Clover USB Flash Drive or SD Card into your server
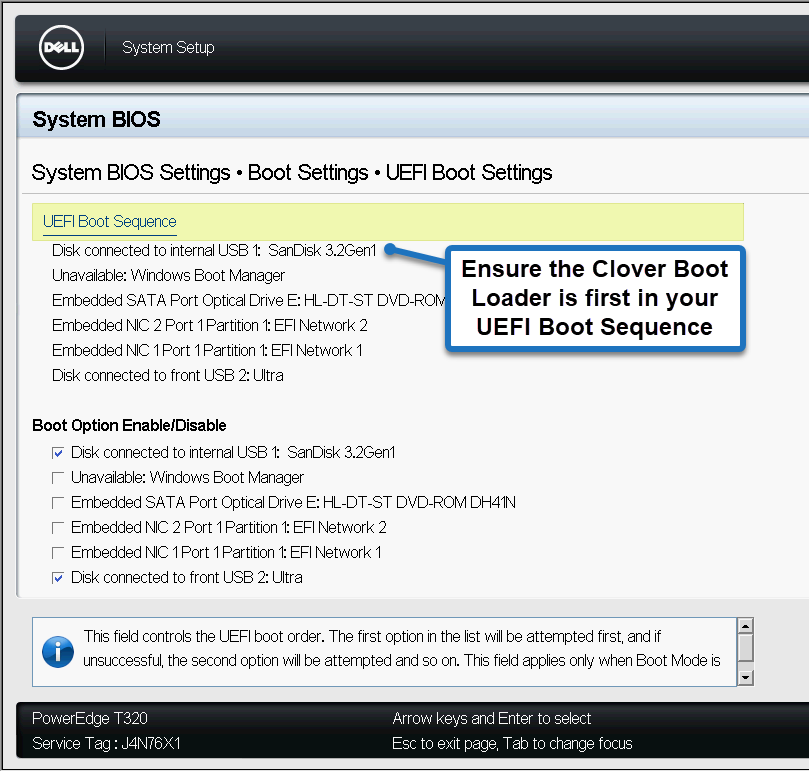
Next simply insert the USB flash drive or SD Card into your server and set the UEFI boot order on the server to boot from it:
Ensure your UEFI Boot order is set correctly and pointing to your Clover USB Stick or SD Card:
When booting from the internal Clover USB stick it will briefly display a boot screen:
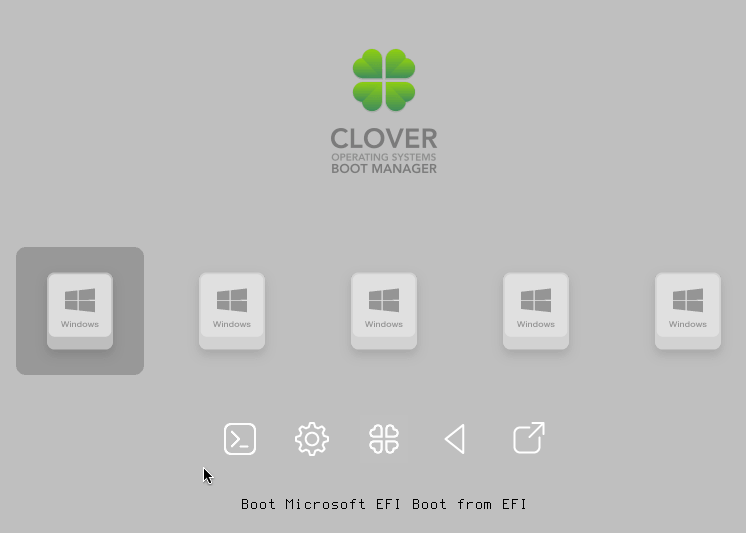
The clover defaults worked right away for me and I didn’t have to configure anything.
You can modify the config.plist file (which is in the root of the USB Stick) to reduce the timeout if you want to speed things up a little bit:
<key>Boot</key>
<dict>
	<key>#Arguments</key>
	<string>slide=0 darkwake=0</string>
	<key>#DefaultLoader</key>
	<string>boot.efi</string>
	<key>#LegacyBiosDefaultEntry</key>
	<integer>0</integer>
	<key>#XMPDetection</key>
	<string>-1</string>
	<key>CustomLogo</key>
	<false/>
	<key>Debug</key>
	<false/>
	<key>DefaultVolume</key>
	<string>LastBootedVolume</string>
	<key>DisableCloverHotkeys</key>
	<false/>
	<key>Fast</key>
	<false/>
	<key>Legacy</key>
	<string>PBR</string>
	<key>NeverDoRecovery</key>
	<true/>
	<key>NeverHibernate</key>
	<false/>
	<key>RtcHibernateAware</key>
	<false/>
	<key>SignatureFixup</key>
	<false/>
	<key>SkipHibernateTimeout</key>
	<false/>
	<key>StrictHibernate</key>
	<false/>
	<key>Timeout</key>
	<integer>5</integer>
</dict>
Modify the “integer” value on line 36 to reduce the boot delay.
Windows should now proceed to boot normally directly from the NVMe drive.
Performance Results
I was really impressed with the performance improvement when booting from the NVMe drive. For the purposes of clarity the config of this system is:
Dell PowerEdge R310
Intel XEON X3470 2.93GHz
16Gb Ram
Dell PERC H700 (512mb)
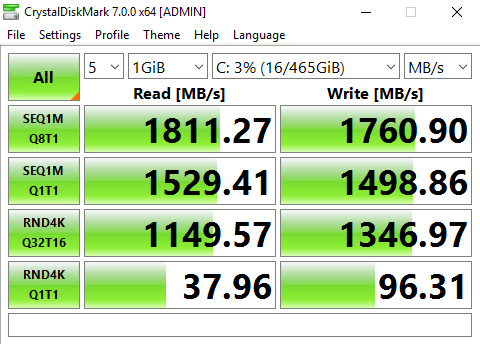
Performance of the Samsung 970 Evo Plus NVMe Drive is excellent. But the drive performance is constrained in the R310 because it has a PCI Gen 2 x 4.
Disabling C States in the BIOS increases performance a little bit.
Here are the results from a CrystalDiskMark from the R310 with C States Disabled:
Here are all the results from both machines with and without C States Enabled.
As a crude comparison here is the performance of a RAID 0 Array in the R310 comprising 4 x 7,200 RPM SATA Drives:
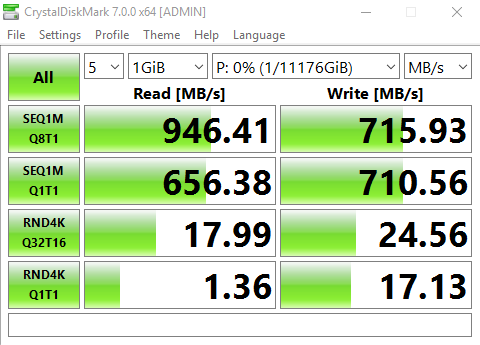
This R310 server also has a Samsung 860 EVO SSD in the DVD Drive bay, which is connected via a SATA 2 port on the motherboard:

You can see the performance of the drive being constrained by the SATA2 port, but it still gives good random performance.
If you are using VMWare then you can just access the NVMe drive in the normal way if you are booting from a different storage device such as SD Card or USB Stick.
Conclusion – is it worth adding NVMe storage to a old Dell PowerEdge?
Given the low cost of both the adapter and Samsung SSD and the huge resulting performance boost, it is certainly worth experimenting.
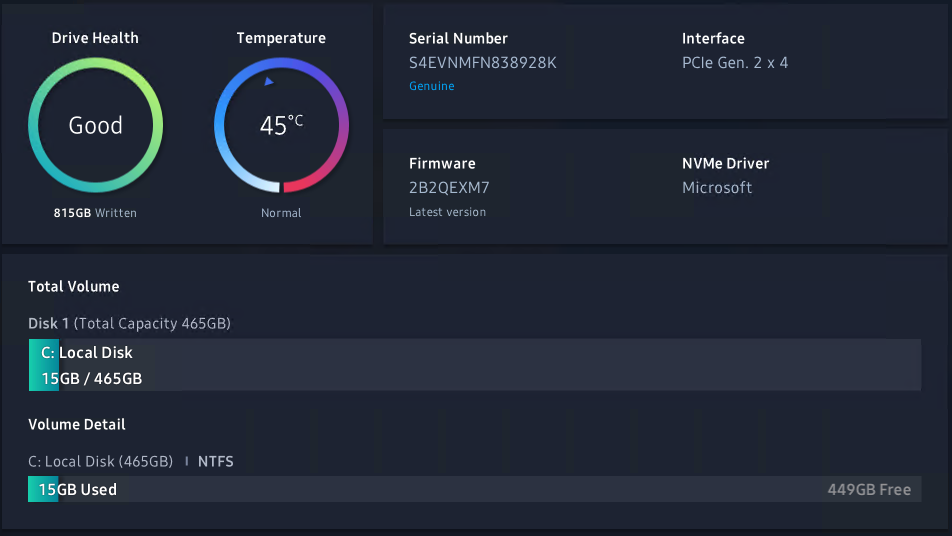
I can’t say if I would use this setup in production yet, but so far, it seems to work fine. Here is an image of Samsung Magician Drive information:
Jay says
Great article. Could I use this process to get proxmox booting from NVME on R710?
Paulie says
No idea because I have never used Proxmox, but I can try it out for you if you want. I don’t see why it wouldn’t work (with any operating system).
Jay says
I would love to see you try. I’m currently in the process of acquiring the hardware for a R710 freenas server based on proxmox.
Paulie says
Have you already tried?
Jay says
No, the R710 is still in the shipping box. I’ve used the Cloverfield method before on an older server motherboard with mixed results. I’d like to know for sure before I order a PCI-express card and SSD drive.
Paulie says
Tried it, worked fine:
https://ibb.co/kqS83r1
https://ibb.co/85rkHdR
Jay says
Wow, that was fast, thanks! Should any pci-e NVME adaptor work? I’m looking at cards with one NVME and one SATA m.2 connector on one card. Because the R710 pci-e slots do not support bifurcation, I can’t use Gigabyte’s quad NVME adaptor, for instance.
Paulie says
I think it would be ok. Once you have tried it please let me know how it went. You could put a SATA SSD in place of the Optical drive. But the SATA on the PCIe card would be faster.
Jay says
Proxmox isn’t as disk-intensive as its VM’s, so it could live on a SATA SSD in the optical drive bay. Then an NVME in the pci-e slot would be free for VM’s and their operations. In that case I wouldn’t need Clover. Will keep you up to date. This project is backlogged, so it will be a few weeks before I have an update for you. I appreciate your effort with this concept, and especially for sharing it on your blog.
Spencer L says
I followed this guide. Trying to get a R320 setup with Truenas. However using UEFI I’m getting garbled text when i select the PCIe device to boot from. I’ll have to try via BIOS later when I have time to test again.
The Truenas installer gives the option to install with BIOS or UEFI.
I opted to try the UEFI route.
I’ll report back if it’s successful with BIOS instead.
Bayrio says
many thanks for the article. with something difficult to start kiting I got it to work and it works great
Paulie says
@Bayrio – be interested to know what your configuration was. Just interested to hear what machines/configs people have set this up on.
Jay says
Hi Paulie, we chatted earlier about NVME and SATA m.2 drives. I got my R710 setup running with Proxmox 6.3. My storage is based off a dual-slot m.2 PCI-E adaptor card. One slot is m.2 NVME and the other is m.2 SATA which connects to the motherboard SATA from a standard SATA port on the adaptor card. This works GREAT. The R710 detects everything by default with no need for drivers or setup. The m.2 SATA SSD gets its power from the card’s PCI-E slot, which solves the problem of needing a custom SATA power cable for regular 2.5″ SATA SSD’s. Proxmox is booting off the m.2 SATA, so no need for Clover UEFI. The NVME SSD is for Proxmox VM storage and backup. Since the R710 is PCI-E 2.0 based, the NVME SSD is limited to 1000MB/s, but still far faster than any HDD and faster than most HDD RAID setups. The other nice thing about the adaptor card’s SATA slot is that the SATA m.2 uses the 300MB/s bandwidth of the SATA port rather than sharing the PCI-E bus with the NVME drive.
Paulie says
Hey Jay, sounds like a pretty neat setup! Glad you got it all working. The adapter card sounds pretty cool, could you share a link to it please?
Jay says
This is the one I used: https://www.amazon.ca/dp/B0773YNB5K. This card has one NVME and one SATA slot. Anyone looking to use other m.2 cards should be warned that cards with multiple NVME slots will only pass one SSD through the R710 8x risers because those configurations require PCI-E bifurcation technology. There is anecdotal evidence that the (super-rare) 16x riser card for the R710 may support bifurcation, and potentially could support a 4-way NVME SSD configuration. However, even in this case the setup wouldn’t make any sense because the PCI-express 2.0 bus bandwidth is severely limited.
Joa says
Very helpful article. Tried to boot VMware ESXi from NVME drive but clover cannot see it at the boot screen. Need any tweaking? TIA!
Jay says
Joa, try booting ESXI from an m.2 SATA SSD with a compatible PCI-E m.2 adaptor. That way Clover is unnecessary. The ESXI OS doesn’t really benefit from NVME speeds anyway. VM’s are a different matter, those should live on NVME drives.
Sean Graham says
This is fantastic, thank you! It will bring new life to our server. Worked perfectly.
Paulie says
It certainly does provide a really big boost in performance – well worth the low cost upgrade for massive performance increase. Quite a nice way of lowering power consumption too.
Mohammad Johan Rajabi says
I tried nvme on dell r620, pcie card use orico and ssd xpg sx8200 pro.
This nvme no detect on bios or my linux system, can you help me, what should I do?
Thanks
milosz berlik says
is there posibility to make raid with 3 disk
Ken Teaff says
Question about the Disk Utility. When I use your link, it takes me to what appears to be the same rev, 2.1.028, but the software appears to be a Mac boot utility. Is the one you use a different program? Or do I download the Mac boot manager from CVAD?
Ken Teaff says
Second question: How big does the boot flash drive need to be? I’m installing Server 2019.
Paulie says
Well, not very big but it depends on what else you are planning to put on there. I think you could install server 2019 on 128gb. But I would go 256gb minimum.
Paulie says
It is a mac boot utility / but it does not matter.
Ken Teaff says
Thank you for your instantaneous reply. You have a great weekend.
Ken Teaff says
Paulie, I hate to be a pain in the butt, but now I’m confused. I need one flash drive to install the OS on the add-in card, and another flash drive that I will leave in the machine to “point” the BIOS/Boot manager to the add-in card. Am I getting that wrong? If that’s the case, then how big is the leave-in flash drive? The Clover drive?
I ask because I have a bunch of 8GB and 16GB flash drives just lying around.
Paulie says
Anything will do for the boot drive. 8gb will be plenty. I like the ultra fit ones – but anything is fine.
JPP says
Sorry for the translation, but I use the translator.
I have noticed a problem, if I install proxmox on a single disk, the boot detects it correctly, if I install proxmox on 4 disks with the ZFS installation option (RAIDZ-1
A variation on RAID-5, single parity. Requires at least 3 disks.), It does not detect it.
Can you think of a solution?
Brandon says
Thank you for this guide! I was spinning my wheels setting up my T320 with NVMe M.2 + PCIe adapter and couldn’t figure out why Windows wouldn’t boot after install. I kept thinking it had to do with SATA AHCI vs Legacy options but it hadn’t crossed my mind that NVMe is it’s own protocol.
Jan-Christof says
Great article. Solved my problem i dealt with since 10 hours.
Thanks a lot!!!
Tada says
Has anyone tried on the R530? I’m looking to replace my RAID 1 SAS HDD (each with 1TB running @7.2K) with just a single NVMe m.2 PCIe. The NVMe I’m looking to purchase is the Samsung Evo 980 which can do 3500/3000 read/write. I’m curious if the NVMe will boot Windows Server 2019 straight from the PCIe or do I need to use the Clover USB method as well. Ideally less steps so less things can fail. One thought: I could boot the OS on one of those USB3.0 NVMe m.2 adapters from Amazon or eBay, but will be limited to the speed of the USB3.0 which is around 500MBps. Another thought: use the NVMe m.2 B+M key with SATA cable connected to the motherboard. I believe the R530 has such connectors on the motherboard, but then again this is also limited to using type of m.2 with SATA which isn’t as fast as the NVMe m.2 M key counterpart. Thanks
Ben says
Tested with Win Server 2019 on Dell R320 with WD Blue SN550 250GB NVMe SSD connected via Rivo dual M2 NVME to PCIe adapter.
Works great. Thanks for the article it was a big help!
Volker Matthes says
Hello,
I’m glad I found this guide. Unfortunately, this doesn’t work with my DELL R720.
I installed a Dell NVME card (4 Port) with one M.2 Samsung 980 512Gb.
(Storage Adapter Card JV6C8 PHR9G 6N9RH 80G5N)
when I boot with the clover-usb-stick the boot screen also appears, but no NVMe Card…
I installed Ubuntu 18.04 on the NVME beforehand, it worked great, but you can’t boot from it because there was no choice for NVMe card.
can I upload a pictures?
Paulie says
Did you make sure to include the nvme drivers on clover?
Volker Matthes says
yes,
I worked through the instructions very carefully…
\EFI\CLOVER\drivers\off\NvmExpressDxe.efi to:
\EFI\CLOVER\drivers\BIOS
\EFI\CLOVER\drivers\UEFI
I get the following error message: Error Not found while legacyboot
V.Matthes says
Hello,
I was just able to take a picture of an error message that was gone very quickly.
“There are problems in plist ‘\EFI\CLOVER\config.plist’
Warning: ProductName is not defined, the whole SMBIOS dict is ignored at line 1194
Warning: FixHeaders exists in ACPI and ACPI/DSDT/Fixes. Delete Fix Headers from ACPI/DSDT/Fixes.
Use CloverConfigPlistValidator or look in the log…
what’s that ?
Paulie says
Did you modify config.plist (or copy it from this site?) try creating a completely default clover and leave config.plist alone just to try it.
vma says
ok
i found a step by step installation docu…
https://community.spiceworks.com/topic/2313032-how-to-boot-a-dell-poweredge-gen-12-server-r320-r520-r720-etc-from-nvme
THX
Volker Matthes says
Hello, I’ve tried so many things but nothing works.
I could only find out how my NVMe card is defined:
– Disk /dev/nvme0n1: 465.8 GiB, 500107862016 bytes, 976773168 sectors
-/dev/nvme0n1: PTUUID=”5248dfee” PTTYPE=”dos”
/dev/nvme0n1p1: UUID=”4bac3b9b-c383-425a-904a-f485c02a06bb” TYPE=”ext4″ PARTUUID=”5248dfee-01″ bootPart
/dev/nvme0n1p5: UUID=”e60ea62b-6b06-47b9-80ca-a11fa96f6b1c” TYPE=”ext4″ PARTUUID=”5248dfee-05″
config.plist:____________
Boot
Timeout
5
DefaultVolume
“4bac3b9b-c383-425a-904a-f485c02a06bb”
GUI
TextOnly
Custom
Entries
Hidden
Volume
“4bac3b9b-c383-425a-904a-f485c02a06bb”
Disabled
Type
Linux
Title
Boot UBUNTU 18.04 on DELL PE R720 NVMe
——————————————————
but the nvme-PCIe-card is never found with the following error messages
preboot.log:____________
2:053 0:000 Default boot entry not found
2:053 0:000 BannerPlace at Clear Screen [896,224]
2:109 0:056 AnimeRun=0
2:136 0:026 GUI ready
11:334 9:197 BootVariable of the entry is empty
11:334 0:000 DeleteNvramVariable (efi-boot-device, guid = Not Found):
11:334 0:000 DeleteNvramVariable (efi-boot-device-data, guid = Not Found):
11:334 0:000 DeleteNvramVariable (BootCampHD, guid = Not Found):
11:350 0:016 EfiLegacyBiosProtocolGuid: Not Found
11:350 0:000 Fatal Error: Not Found while LegacyBoot
12:500 1:149 AnimeRun=0
Paulie says
Silly question – are you booting this machine in legacy or UEFI mode?
Volker Matthes says
oops, the configuration is not displayed correctly, that is probably being filtered.
Paulie says
Do you have an enterprise iDrac in this machine?
volker matthes says
yes, enterprise iDrac
volker matthes says
i boot in UEFI mode
volker matthes says
Paulie,
is the iDrac relevant for booting the UEFI ?
T O says
I am having an issue. I was able to boot into Ubuntu running on a PCIe adapter in my 720XD one time. After a reboot, the clover efi loads and then goes to gnu grub screen and will not load into Ubuntu anymore? Any ideas why this is happening?
Marlo P. Rodriguez says
When I run the Boot Disk Utility I got errors. Saying “Error During Extract Latest Clover Data Set”
Alireza Ahmadi says
Saved me
Thank you
John Smith says
I can’t even get the NVME to PCI express adapter listed on this article to allow a R720 to boot.
I get PCIe training error in whatever slot the adapter is put into with an m2 drive in place.
Considered trying to get a different NVME to PCIe adapter but it looks like there really is no components on this other than a capacitor.
Paulie says
I’ve never tried it on an R720. But I have done it on an R620 with no problems. Is your bios up to date (although I doubt that will make any difference).
Mark Symms says
Paulie,
I am so glad you are still active on this thread. I am attempting to do the same as others before me. Run Proxmox from an M2 sitting on a Startech (PEXM2SAT32N1) card with VMs in a RAID 10 array on a T420. I will try the above and let everyone know how this goes.
Paulie says
That card looks pretty interesting, having the SATA connections on there means that you can boot from a SATA M2 SSD without the need for a USB Stick. Probably slightly faster/neater as well. Let us know how you get on.
Warme Brezel says
Just found this article by accident, and I’d want to point out that Dell 12G PowerEdge servers *do* support native NVMe boot without the need to fiddle with Clover as described in this article.
I’m using standard U.2. M.2 and PCIe NVMe drives from intel, Kioxia, Micron and others, and the 12G boots just fine from them (for example, I have a Kioxia CM5-R 3.84TB in a PowerEdge T320 as boot drive). Another one (a T620) has an intel SSD DC P3600 which, again, works fine as boot drive out of the box. No Clover or other nonsense needed.
Keep in mind that most NVMe drives will *not* show up in the BIOS or UEFI boot manager, and only once an OS is installed then the boot sequence will show the boot loader (Windows Boot Manager, GRUB etc). Also, on 12G NVMe drives won’t show up in iDRAC either.
Lastly, keep in mind that I’m only using server grade SSDs, and that just because server grade SSDs work doesn’t mean cheap consumer grade/gamer grade SSDs will work, either. On top of that, not all server grade NVMe SSDs support booting (especially Samsung ones seem to cause a number of issues).
So if you got a 12G Poweredge then don’t waste your time with the procedure described above, just get a good server grade NVMe SSD, pop it in and Bob’s your uncle.
Jp says
Thanks for the write up. Works great on a T110 ii. I’m using Ubuntu 20.04 and a transcend 128gb nvme.
Artur Lorek says
@Warme Brezel – thank you very much for confirming this should work out of the box with Enterprise grade NVMe drives.
In all fairness – getting a consumer grade / gamers funky components to work with a typical server – most often ends up with issues, so I would myself be advocating use of the enterprise elements anyway.
The most recent BIOS for the PE T320 is 2.9.0, I think it is the same across the whole range of 12gen PowerEdges, would you please confirm for piece of mind – what bios are you on ??
I am planning on using Kingston DC1000B 240gb M.2 in a T320 myself (via a PCIe to M.2 add-on card), to get ESXi on it, instead of the SD Card, so your experience is utmost helpful and reassuring this all should work.
Addam B. says
Thanks so much for this post.
I was able to get my R720 to bootup VMWare vSphere ESXi 7 from my NVMe SSD.
Artur Lorek says
I feel I may report my attempts – tried Dell R320 with the latest bios v2.9.0 to boot from M.2 NVME.
Installed a dual M.2 card with its own chip to take care of bifurcation, as the server is not offering this funcationality.
Populated with Samsung PM961 (considered to be enterprise NVME, not AHCI) and Kingston Enterprise Data Center DC1000B which is specifficaly designed to be a server boot drive.
Run ESXi 7.0 installer as UEFI, making sure the installation is going to go ahead as UEFI and not in standard Legacy / Bios mode. The installer nicely detected both drives, no issue here. Installed nicely on both with no fuss.
Respective entries were added to the UEFI Boot Menu.Nice I thought….
Unfortunately it did not work, as the drives are not detected and thus the boot-up process cannot continue.
Returns – no boot drive present….
As Warme Brezel reported Intel DC P3600 to have worked for him – this is the 3600 / 750 group of products which seem to have the NVMe OpROM available, so they come with their own drivers.
Not quite sure how the U.2 factor Kioxa goes, but in general I feel that the U.2 segment is a different story to the M.2 although both are NVMe….
I am waiting for the Micron 7300 PRO in m.2, which according to the Micron support does have necessary NVMe drivers embedded on the drive itself. We’ll see how that goes…. I shall confirm when the drive arrives.
JoTag says
Thanks for this article & all the informative follow up!! While I appreciate the best practise of using enterprise class drives, the appeal for me is a low cost solution,.. so the PCIe card with sata boot & nvme support is interesting! If I could justify spending £200+ on a DC P3600 or better I would,.. but its many times the cost of the PCIe addon card.. and for a home lab type project,.. which I think was the OPs target audience (e.g. “I can’t say if I would use this setup in production yet”), this lower cost option is welcome.
thank you says
Great guide thank you. if you can’t see the NVME drive whilst in clover, press F3 to open a hidden menu, that yielded results for me
Phuc Pham says
Tested on R530, kind of Dell 13G poweredge. It’s already got BIOS, iDRAC, chipset upgraded to version 2022.
There’s no showup of NVMe PCIe in BIOS and iDRAC (as Warme Brezel mentioned), which is WD Black SN750 1TB installed on ORICO PCIe 3.0 X16 adapter . I don’t try a fresh installation of OS on NVMe but using a clone disk to have old OS available on NVMe disk instead. And the last step like everyone, an USB with Clover bootloader installed, to pass the boot sequence to OS on NVMe disk.
Kevin says
Worked! I’m so glad you made this! I was stuck for hours trying to figure out why I couldn’t boot to the OS after installing it. THANK YOU!!!
David Alonso says
Hello my friend, thank you very much for this post, you have found a very useful and important compatibility solution, I was looking for it for a long time and I already found it thanks to you, I inform you that I used this solution of yours with a Dell Poweredge T150 and it It worked perfectly, using the internal usb stick, a generic m.2 to pcie adapter, and a m.2 nvme PCIe Gen3x4 ssd.
Thank you very very much!!!
Ahmed says
Hello Paulie,
As usual, a great and well written article!
I have tried the same on the OptiPlex 9010 via your article (http://tachytelic.net/2021/12/dell-optiplex-7010-pcie-nvme), and it worked from the first attempt!
I wonder, would it work on R420?
I am looking for compatible NVMe Adapter and Drive to buy, but I am concerned it wouldn’t work.
Also, is there a way to boot the server normally from the PCIe without Clover EFI Bootloader? by modifying the BIOS and Injecting the NVMe Driver?
Thank you so much.
Kaman says
Anyone know if “PowerEdge T40” can boot from an NVMe SSD in a PCIe adapter directly? or still need boot from USB first, then use CLOVER to load OS?
Jason says
Hello,
I have a Dell Inspiron 3847 and I’m wondering if I can do the same with this machine? I’m game to try but don’t want to buy the card and drive until I know if the BIOS will accept the upgrade files?
Very well written article. Thank you for any help here.
Jason
Joseph says
I use an old t310 as nas with proxmox and some VPS… With h200 sas controller with 4sas zfs ,2sata zfs and 2ssd.
It can works to run Windows 10? I need to use CPU power to transcode some video files, switching the boot device from nvme to SSD proxmox raid.
Paulie says
I’ve never tried to run Windows 10 on a PowerEdge, but I expect it would work.
Gavin Conaghty says
Thankyou!
I purchased an adapter card for my t330 assuming it would work but it didn’t. I updated the bios but it didn’t help. even though its a gen13.
I had windows 11 installed in the NVME on another motherboard and it worked fine.
I had to turn off secure boot to boot from the internal USB. I thought it would stop windows11 but it booted fine.
Awesome article!
Jordan says
I have a Dell PE R720 and have purchased the same PCIe NVMe card and SSD, however, I am not able to boot from the SSD as the system is not recognizing it.
I was able to install VMWare ESXi 6.5 on the internal thumb drive then see the NVMe to use as storage. This is not what I want. At the beginning it was stated to not follow the instructions if one has a 12 gen server. What do I do to get this machine to boot from the NVMe?
Artur says
@ Jordan – get yourself an enterprise Micron 7300 PRO – which I can confirm boots just fine on my T320, R320 and T330. Tried on 3 different adapters and no problem at all. Or Intel DC P3600 / 750 (those probably would be 2nd hand, as to get them new – if at all possible, would come at a cost of your whole server or more).
Or you may source some Samsung SM951, which is half blood NVMe M.2 but works as well.
Cristian says
I have an r720xd server that works with an nvme g2 . When I use an nvme g4 the server doesn’t recognize it. If I use the vmware iso, it appears to format, after formatting, it does not start and does not appear at boot. what can I do?
Gavin Conaghty says
Hi Paul,
I have a USB stick in the USB slot on the motherboard with clover boot installed.
I have the BIOS set to boot off of that that USB then Clover finds my NVMe drive.
Miro says
Thanks very much.
Works perfectly for PowerEdge T20.
Chase says
Just to reiterate what Artur said. The Micron 7300 Pro works on a R720xd with the 2.9.0 BIOS. I originally had a different Micron Nvme drive that did not have the proper driver built in. The Micron 7300 Pro worked without issue.
I used a Startech Nvme to pcie adapter. I did have a dell Boss nvme card but that was a no go.
https://www.startech.com/en-us/hdd/pex4m2e1
Ryan L says
I can confirm that this works for the R630:
– Crucial P5 M.2 NVMe SSD w/ U.2 converter bay
– Dell NVMe expansion kit (10-bay R630s have 4 PCIe bays on the right-hand side, but don’t necessarily have the cables + PCIe expansion card you need to use them).
I spent the better of 24 hours trying to get the server to boot from NVMe, and it’s just not possible with the Crucial P5. I have a Samsung EVO that will be here tomorrow. I’ll report back if the results are different, but for now it looks like it’s The Clover Way for me.
Yeah, the R630 is a Gen 13, and I have all the latest firmware updates. I’m hoping it’s just the brand I happened to pick. I will probably keep trying and returning them until I find one that works, then buy 4 of them.
Thanks for the write-up. I’m using RHEL9, but it’s easy enough to translate from Windowsese 🙂
Chase says
Ryan,
I’d recommend looking at the Micron 7300 U.2 NVMe. These have the proper firmware built into them.
If you have the extra slot in the R630 maybe you can get an NVMe Pcie card instead of using the NVMe expansion. That eats up a slot anyways. I can verify that the Micron 7300 Pro works flawlessly. Everything else I tried didn’t get passed through to the boot menu.
It’s also possible that you could use a SataDom for the boot drive. I have a R630 that I am using with a Satadom that boots ESXi. No issues there.
https://www.ebay.com/itm/295465998040
Paulie says
That SATA Dom looks really interesting – thank you for sharing
Chase says
The boot speed isn’t as fast as a NVMe, but it works for an inexpensive media. I have these in two of the Rx30 series systems and haven’t had any issues.
Although I did find out these don’t work in the Rx20 series.
As these systems get older it’s always hard to find the right boot media to get everything working.
Thank you for all the work you put into this blog post Paulie. Without it I would have never got my R720 booted.
AMJ says
I am on verge of giving up on booting with nvme after i successfully installed proxmox ve8.
Tried ?Kioxia 256GB NVMe PCIe M.2 2280 Solid State Drive SSD, OEM Packaging – KBG50ZNV256G with (M.2 NVME SSD To PCIe 4.0 X4 Gen 4 Adapter Card 64Gbps Full Speed) from ebay see link
https://www.ebay.co.uk/itm/175902112670
Also (Kioxia 256GB) with (M.2 NVMe SSD NGFF TO PCIE 3.0 )
from ebay see link
https://www.ebay.co.uk/itm/155714262156 I am still unable to boot with R720 and T320
BIOS. updated to 2.9.0 on both PE Servers, please advice. Thanks.
Abdul Malik JALLOH says
Thanks to everyone for your contributory posts on this topic. I have a small issue of NVME not booting from either PE T320 and PE R720 servers, even though their bios version has been updated to 2.9.0. I am not looking to use clover solution.
I have used these models of Sabrent Rocket NVME
SABRENT M.2 NVMe SSD 500gb 4×4, Solid State 5000 MB/s Read, PCIe 4.0 2280, M2
SABRENT M.2 NVMe SSD 500GB Gen 4, Internal Solid State 7000MB/s Read, PCIe 4.0 M2
Also these other two models of NVME
WD Blue SN570 2TB High-Performance M.2 PCIe NVMe SSD, with up to 3500MB/s read speed
KIOXIA EXCERIA 250 GB NVMe M.2 SSD
OS ProxMox Ve8 installed
UEFI boot
With the following PCIE NVME Adapter Cards
https://www.ebay.co.uk/itm/155714262156
https://www.ebay.co.uk/itm/175902112670
Please, your help would be really appreciated in pointing me which compatible PCIE NVME Adapter cards and, brand and model NVME disk drive worked for you.
As well as any BIOS configuration.
Thank you all.
Sandor says
I’ve been trying for weeks to get my Dell PE R720 to boot off any PCIe slot with three different cards and Samsung 980 Pro 500GB drives. Nope.
Successfully been able to install any OS onto the NVMe drive.
Does not show up as a suitable source to boot from.
Running latest and last 2.9.0 bios in UEFI mode, although in legacy BIOS mode, also doesn’t see the NVMe.
I do see the Windows Boot Manager listed in some views, but it’s always grayed out.
In the first section of this article Paulie you claim G12 doesn’t need the extra work… I think this model is an exception or I haven’t found the magic sauce yet to boot natively with a limited selection of brands and types in some combination I can’t afford to explore.
Really good work though here on your site, several other writeups have been helpful. Thank you.
Dave Burton says
Thank you, Paulie, for explaining how to use the Clover EFI USB Boot Stick trick to boot from an M.2 NVMe SSD on a PCIe adapter!
However, I think it is even more useful than you think it is, because I think it is necessary for Dell 12th-14th gen servers, too. I don’t think it’s correct that the “12th [and later] Generation servers such as the R720 support booting from NVMe devices if the latest firmware updates have been applied.”
(When you say “latest firmware updates,” you mean BIOS, right? Not iDRAC / Lifecycle Controller Firmware?)
I have a PCIe NVMe M.2 adapter somewhat similar to yours (but which uses bifurcation to support more than one). I’m trying to use it in an R640 (14th gen).
Thankfully, the R640 does support bifurcation. (PCIe slots are a very precious resource for me, because I have only two, because I’m running only one CPU, and the 3rd PCIe slot is connected to the 2nd CPU, so it is unavailable to me.)
The Windows installer sees the M.2 drive, and copies the files to it. A live Linux distro that I tried also saw the M.2 drive, and I could view the files. But the R640 BIOS can’t see it, so it can’t boot from it. I’ve tried both MBR and GPT partitioning.
I am running a back-level BIOS (because I want fan speed control, which they deleted from recent BIOSs). It’s BIOS version 2.11.2 (07 Jun 2021) = newer than your article.
I looked through the BIOS version history and found only one fix/enhancement listed which sounds like there’s an outside chance that it could be pertinent:
2.14.2 “Enhanced the capability for supporting complex PCIe device”
Anyhow, I’m going to go ahead and use the Clover EFI USB Boot Stick trick.
Paulie says
Useful info Dave. Thanks! Glad you found it helpful.
Dave Burton says
Your Clover EFI USB Boot Stick trick enabled me to install and run Windows 10 on this R640. Thank you!! (Note: I used Ventoy instead of Rufus to make my “big” thumbdrive, with Windows installers for two Windows versions, plus a few Linux live distros. It worked fine.)
But then I ran into another issue. I installed a TPM 2.0 module (bought on eBay), in hopes of enabling Windows 11 to install. But with the TPM module installed my R640 freezes during boot, at “Loading BIOS Drivers”. iDRAC access still works fine, but there are no interesting entries in the System Event Log. If I remove the TPM module, it boots normally.
Have you seen that before?
Maybe I just got a bad TPM module. They aren’t expensive. I can get another, from a different seller, for only about $14. I should probably just buy another and try it, before spending a lot of time trying to fix the problem.
David Oxenreiter says
Has anyone been successful with rhel9?
I was able to image the m.2 in the server to rhel9 using a flash drive. But booting obviously isn’t working (why I’m here)
What changes need to be made to make this work? I followed the instructions but I know it was aimed more towards Windows. Not sure what rhel9 or Linux changes need to be made to make this work.
When booting the clover flash drive I get a “general protection fault (13) source: software” with a bunch of numbers everywhere and a line that says “crash occurred here”
List of what I have:
Dell PowerEdge r910
Vantec M.2 NVMe ssd PCIe x4 adapter
Samsung 980 pro 2tb
Sandisk cruder glide flash drive
Any help would be greatly appreciated.
Ryan L says
Yes, I got RHEL9 to boot, piggy-backed off of a USB stick with the Clover bootloader.
I would recommend trying a newer version of Clover; after I had messed with it a bit, I realized it was about 2 years behind the latest version (I can’t remember where I got it, but I think I got the newest version from sourceforge).
What software tool are you using to create the bootable USB image?
David Oxenreiter says
I’m using Rufus. I think I grabbed it from sourceforge actually. Upon a little more research, I’m wondering if my PCIe adapter is compatible. In the morning I’ll try my now multiple flash drives with different clover configs in a computer and see if I can get it to pull up. Some Dell forums seem to think that error message I get, is a card plugged into the server that isn’t compatible (aka maybe my nvme card) so I’ll try removing the card and simply try to boot the flash drive successfully as well. Hopefully that will narrow down the issue with some kind of success. If it’s a bad nvme card for r910, I’ll need to figure out what cards work with it and order another one. I was hoping the cheap Vantec card would work. Thanks. I’ll post the results tomorrow
Jay says
On Dell servers, there is a setting in BIOS to set the PCIe slots from default bifurcation to 4x4x4x4.
BIOS > Integrated Devices > Slot Bifurcation >
Make sure that this is set correctly, otherwise your system may not see the NVMe card and throw a “training link” error.
Sandor says
I have similar problem with other hardware. The boot disk utility link is pointing to source code. I am not a professional, so I cannot run the clover formatting utility.
I tried to get it as exe but got different size from different sources.
2149KB and 2018KB
When I run one of those I got empty formatted drive.
John says
Thanks for the writeup, just used it on my R510. Everything worked.
Rather than installing an OS I used a ToDo Backup ISO on a Ventoy USB to clone my current boot drive to the new drive. Then I pulled the original disk substituted the Clover USB for the Ventoy, and rebooted.
Randall says
I am close but am getting a blank screen after selecting my OS in Clover.
Dell Poweredge T110
Sabrent NVMe card
Samsung 980
I plugged the card and drive in and booted from the SSD and confirmed it works. Install of Server 2022 went fine, rebooted into Clover and selected the OS and it just goes to a black screen everytime.
Any ideas?
Randall says
Disregard my comment!
I did round 2 of the OS install but this time using boot media made through rufus and it all worked out.
Thanks for the article!
Cheers
Emmanuel Efuwape says
Thanks for this. I just needed to use the latest version of the Clover EFI bootloader but it worked.
sunny says
Hi, Great article,
have anyone tried Dell R230 or R330?
AF says
Got this working on a R510 and TrueNAS
5 years on and still helping people!
This is the only blog that discusses this issue and solution.
Thank you for posting this!
Flash says
To reiterate what @Aurther stated:
Micron 7300 Pro works on a Dell T630 with both adapters I have running BIOS 2.19.0
I can see it from the Lifecycle Controller under BIOS-Devices as a PCIE device.
In order to boot from it (and see it as a boot device):
1. Need to install an OS onto the NVME drive to make it bootable.
2. You need to get familiar with adding and deleting boot devices from the list. I had several in the list (from years ago that don’t even exist anymore for me) that I needed to remove. I was able to add a boot device and select the NVME device. I was not able to add the NVME drive to the boot devices until it had something bootable installed to it.