• Skip to primary navigation
  • Skip to main content
  • Skip to primary sidebar

Tachytelic.net

  • Sco Openserver
    • Sco Unix Support
    • SCO Openserver Installation ISOs
    • SCO Openserver Binaries
    • Add a Hard Drive to an Openserver 5 Virtual Machine
    • Install SCO Vision SQL-Retriever ODBC Driver on Windows 10
    • License Expired on Virtual SCO Openserver Installation
    • How to reset the root password on SCO Openserver 5
  • Scripting
    • PowerShell
      • Add leading zeros
      • Check if a File Exists
      • Grep with Powershell
      • Create Environment Variables
      • Test for open Ports
      • Append to a Text File
    • VBScript
      • Check if a File Exists
      • lpad and rpad functions
      • Windows Update E-Mail Notification
  • Office 365
    • Connect to Office 365 with PowerShell
    • Add or remove an email alias using Powershell
    • Change Primary email address of Active Directory user
    • How to hide an AD user from the Global Address List
    • How to hide mail contacts from the Global Address List
    • Change the primary email address for an account with PowerShell
    • Change Primary email address of an AD User
    • Grant a single user access to access to all calendars
    • Forward email to an external address using Powershell
    • Convert shared mailbox to user mailbox with Powershell
  • Get in Touch
  • About Me
    • Privacy Policy

Change column headings for an Entity List in Power Apps Portal

January 31, 2020 by Paulie 1 Comment

When you build an entity list for display in a Power Portal the column headings may not suit your requirements. For example:

The column headings are too long for the data and will waste valuable screen estate on a mobile device. I renamed the columns to look like this:

This is an improvement, but the column widths still aren’t right. The Invoice Number column is too wide and the customer name and reference could do with being wider to prevent wrapping. Fortunately you can make both changes in the same place.

Change column display names and widths for an Entity List on a Power Apps Portal

  1. Go into Portals Management App.
  2. Navigate Entity Lists.
  3. Choose the Entity List that you want to modify.
  4. Click on the Options tab.
  5. Enable “Advanced Settings” by clicking the tick box at the top grid configuration:
    Image showing how to enabled advanced options for a PowerApps Portal Entity List
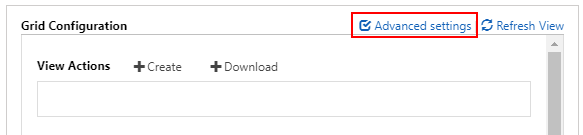
  6. Scroll Down to the Section labelled “Override Column Attributes”
  7. Add an entry for each column that you want to rename:
    Image showing how to change the display names of Entity Lists in a PowerApps Portal
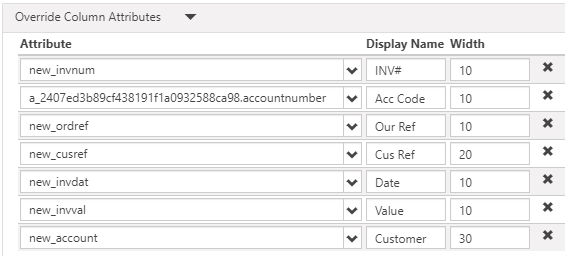
  8. Put in a value for the width. You can choose between percentage or pixels widths.
  9. Scroll to the bottom of the grid configuration and choose between Percent or Pixels in the Grid Column Width Style drop-down.

I was quite pleased with how much better the Entity list looked after these small modifications:

Related

Filed Under: Power Platform

Reader Interactions

Comments

  1. John says

    February 5, 2020 at 3:21 pm

    Nice Post Paul. Would’ve taken me ages to figure that one out. I’m just starting to understand the potential of PowerApps – perfect for a citizen developler like me!

Leave a Reply Cancel reply

Primary Sidebar

Link to my LinkedIn Profile
Go to mobile version