• Skip to primary navigation
  • Skip to main content
  • Skip to primary sidebar

Tachytelic.net

  • Sco Openserver
    • Sco Unix Support
    • SCO Openserver Installation ISOs
    • SCO Openserver Binaries
    • Add a Hard Drive to an Openserver 5 Virtual Machine
    • Install SCO Vision SQL-Retriever ODBC Driver on Windows 10
    • License Expired on Virtual SCO Openserver Installation
    • How to reset the root password on SCO Openserver 5
  • Scripting
    • PowerShell
      • Add leading zeros
      • Check if a File Exists
      • Grep with Powershell
      • Create Environment Variables
      • Test for open Ports
      • Append to a Text File
    • VBScript
      • Check if a File Exists
      • lpad and rpad functions
      • Windows Update E-Mail Notification
  • Office 365
    • Connect to Office 365 with PowerShell
    • Add or remove an email alias using Powershell
    • Change Primary email address of Active Directory user
    • How to hide an AD user from the Global Address List
    • How to hide mail contacts from the Global Address List
    • Change the primary email address for an account with PowerShell
    • Change Primary email address of an AD User
    • Grant a single user access to access to all calendars
    • Forward email to an external address using Powershell
    • Convert shared mailbox to user mailbox with Powershell
  • Get in Touch
  • About Me
    • Privacy Policy

How to give send as permission in Office 365 Using Powershell

March 18, 2014 by Paulie 2 Comments

Granting “Send As” permissions on Office 365 permits a user to send mail from using an email address assigned to another user or other mail enabled object, such as a distribution group.

Use the Add-MailboxPermission cmdlet to give “Send As” permissions to a user. For example:

Add-RecipientPermission "Sales Group" -AccessRights SendAs -Trustee "Paulie"

Powershell to grant send-as permissions

Fill the form below and the required Powershell will be generated for you.

  • Fill the “Identity” field to with the target object that you want to to send as.
    Can be any value that uniquely identifies the object such as Alias, email address etc.
  • The “Trustee” is the user or group to whom you want to grant access
  • Copy the automatically generated code into a Powershell window and the change will be made.

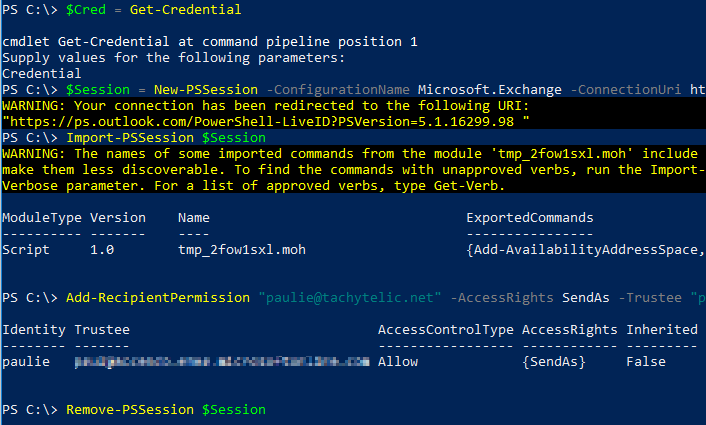
If successful, your PowerShell should look something like this:

Image showing Powershell Window adding send as permissions on an Office 365 account
Successfully added send-as permission.

Hope this helps 🙂

Filed Under: How To, Office 365 Tagged With: Office 365, Powershell

Reader Interactions

Trackbacks

  1. Error 80070005 using Office 365 to send-as from a Shared Mailbox or Distribution Group | Tachytelic.net says:
    March 18, 2014 at 11:35 pm

    […] Adding send-as permissions with Powershell is easy and I have written a separate post on how to do it here […]

  2. Use CDO to send email from VBScript or VBA through Office 365 says:
    December 16, 2018 at 11:12 pm

    […] will only be able to send from addresses that account has send as permission for or an alias of that […]

Leave a Reply Cancel reply

Primary Sidebar

Link to my LinkedIn Profile

Subscribe to Blog via Email

Enter your email address to subscribe to this blog and receive notifications of new posts by email.

Join 107 other subscribers.

Go to mobile version